

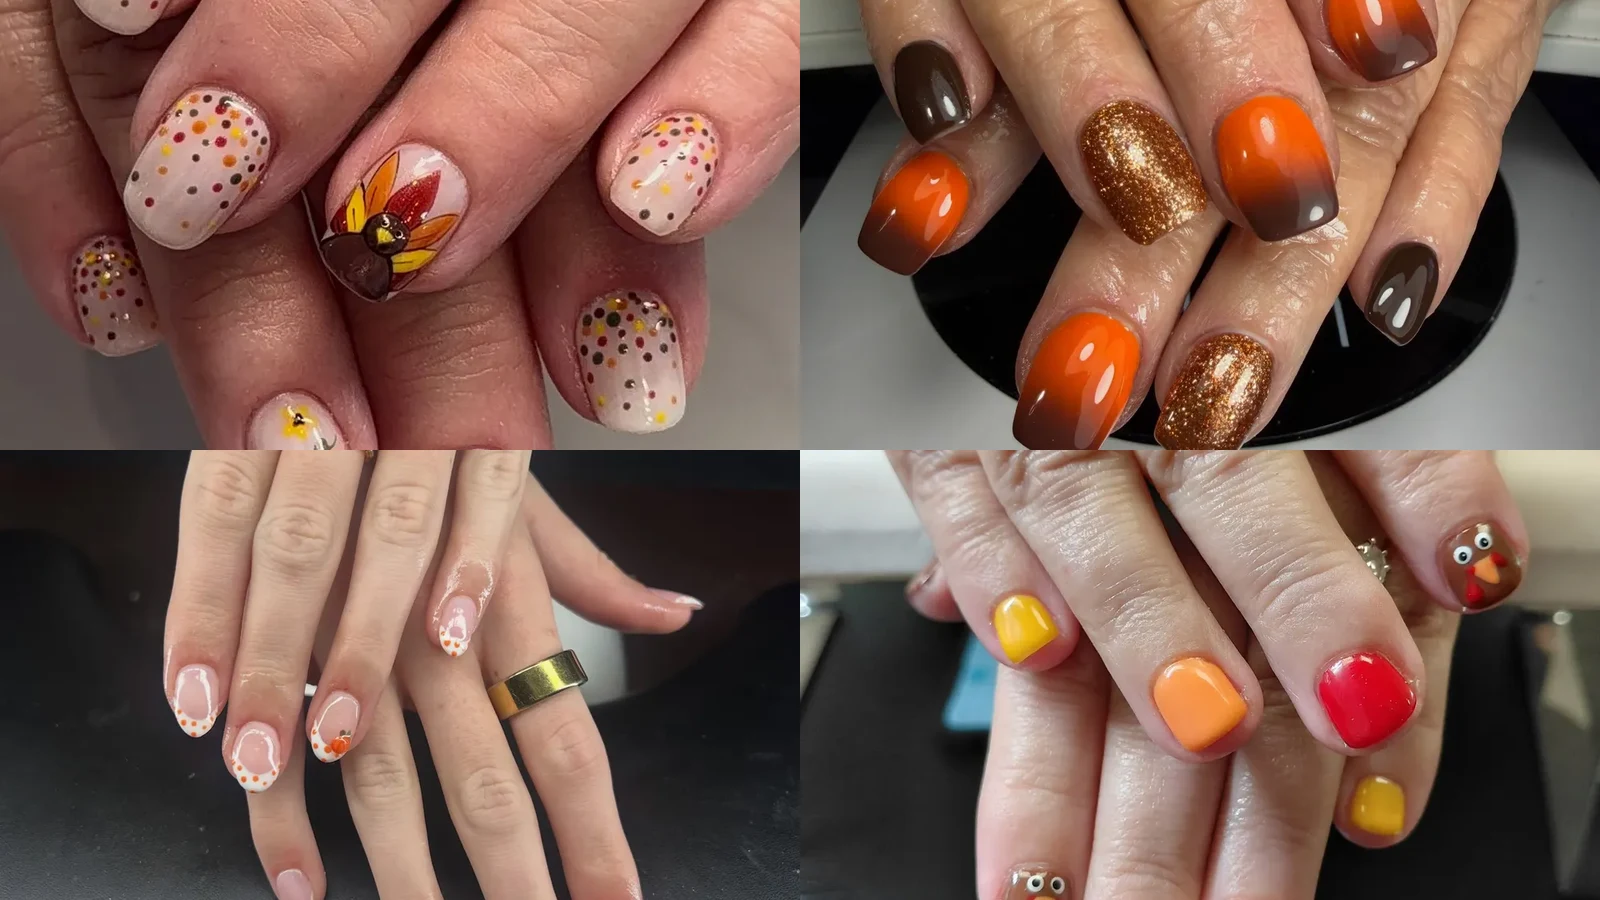
Easy Thanksgiving nails start with simple tools and a clear plan. Thanksgiving nail art easy enough for beginners relies on dots, sponges, stickers, and tape. Dots become pumpkins and turkey feathers. Sponges blend orange into brown. Stickers place acorns, squirrels, and leaves quickly, while tape keeps plaid and French tips straight. Cranberry, olive, mustard, peach, and copper glitter set the palette. Most designs need only a few polishes and one tool.
1. Confetti Dot Turkey Pumpkin
Glossy shine sits over a pale pink base and keeps each confetti dot bright. Red, orange, yellow, and green dots scatter in mixed sizes. Pale base shows through between them. Next to them sits a brown turkey body. Red, orange, and yellow feathers fan around it, with a small yellow beak. An orange pumpkin shows dark ribs and a green vine curl, with tiny yellow flowers close by.
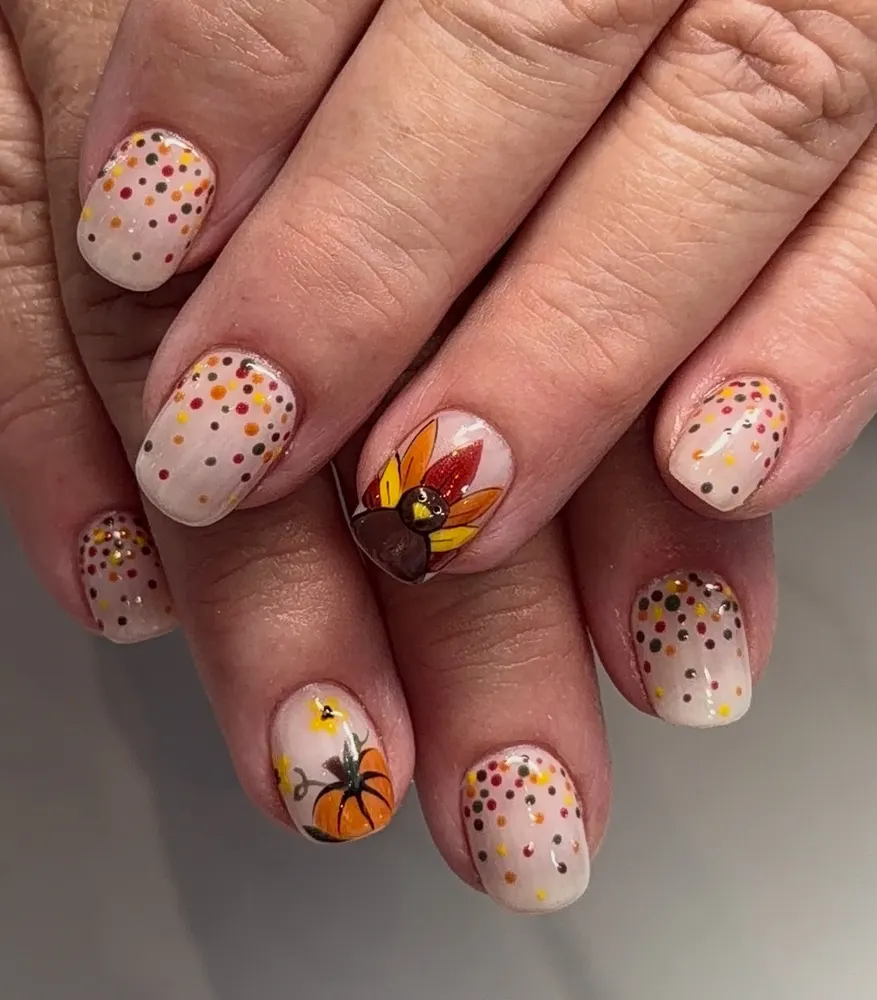
Crowding dots against the cuticle is the usual slip, so leave a small gap there. Load the large tool with red first. Then switch to smaller tools for orange, yellow, and green. Let the dots set before pressing turkey and pumpkin stickers flat. Seal with a thin top coat. Finish one hand completely before starting the other, so dot sizes match.
2. Ember Fade Copper Glitter
Dense copper glitter throws gold and bronze sparkle in tiny points under bright light. Orange polish melts into deep brown toward the tips. Where the colors meet, the blend stays soft with no hard line. Dark brown solid nails sit beside the fade. Their glossy coat stays even across each nail. Fade nails read as smooth gradients, while glitter nails read as pure sparkle.

Skipping thin layers is the quickest way to a patchy fade. Dab orange onto a damp sponge, then tap it across the top half. Next, press brown near the tips and blend where they meet. Build color in sheer coats, letting each one set. Sponge glitter over every other nail, then seal all nails with top coat. Before that last seal, wipe skin edges with a flat brush dipped in remover.
3. Olive Acorn Dot Cream
Deep gloss gives olive green nails an even, rich color that reflects light softly. Cream nails hold a tan acorn with a brown dotted cap. Beside it sits a small green oak leaf. Tiny brown dots scatter over the cream in neat, even spacing. Cream backdrop keeps the acorn easy to read. Brown appears twice, in the cap and in the dots.

Thick olive coats are the mistake to dodge. Paint two thin layers instead, letting the first one set. Next, brush on the cream nails. Draw the acorn with a dotting tool, then use a liner brush for the cap. Space brown dots wider near the cuticle with the smallest tool. Press the leaf sticker flat and cap the free edge with top coat. Keep a spare sticker nearby, since one may fold.
4. Peach Dot Pumpkin Tips
Smooth peach polish glows softly under a glossy coat. Orange dots of varied sizes scatter across the peach, bright against the pale color. White French tips hold a small orange pumpkin topped by a black stem line. Shine flashes across the peach. Orange appears twice, in the dots and in the pumpkin. Pumpkin outline stays simple and easy to spot. Peach tone stays even all over.

Drawing the black stem too early is the usual smudge. Wait until the orange has set. Use three tool sizes for the orange dots, largest first. Paint white French tips with a liner brush. Then shape the pumpkin with orange polish and a dotting tool. Seal the tips first. After that, lay a full second top coat over every nail. Keep hands resting flat until the dots harden.
5. Matte Leaf Sprig Gold
Matte finish covers a pale nude base with a soft, flat surface. Burgundy and burnt orange leaf sprigs fan out from thin stems. Each leaf ends in a point. Tiny gold dots scatter between the sprigs and catch the light. Real autumn leaves in gold, orange, and green fill the background. Gold dots stay the only bright points on the calm surface.
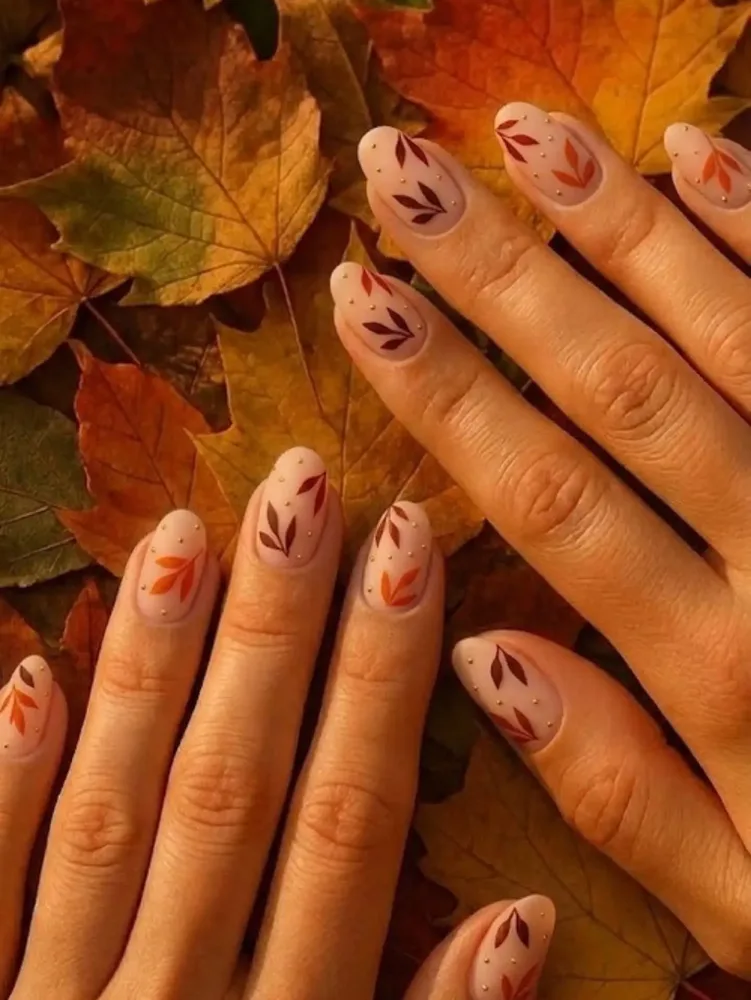
Gloss top coat is what to skip here, since it breaks the matte look. Set the decals on a nude base that is completely dry, pressing from the middle out. Dot gold with the smallest tool and stay off the sprig edges. Seal with matte top coat. Give it time to harden before it meets sleeves or hair. Return spare decals to the sheet, flat, to protect their edges.
6. Polka Turkey Face Dots
Crisp gloss covers white polish dotted in red, yellow, and brown. Dot sizes mix freely. Cartoon turkey faces sit on the white nails, each with a brown body and wide googly eyes. Red and yellow feathers fan in pointed shapes. Small beaks add bright yellow points. White base makes every color pop clearly. Brown, red, and yellow repeat across both dots and faces.
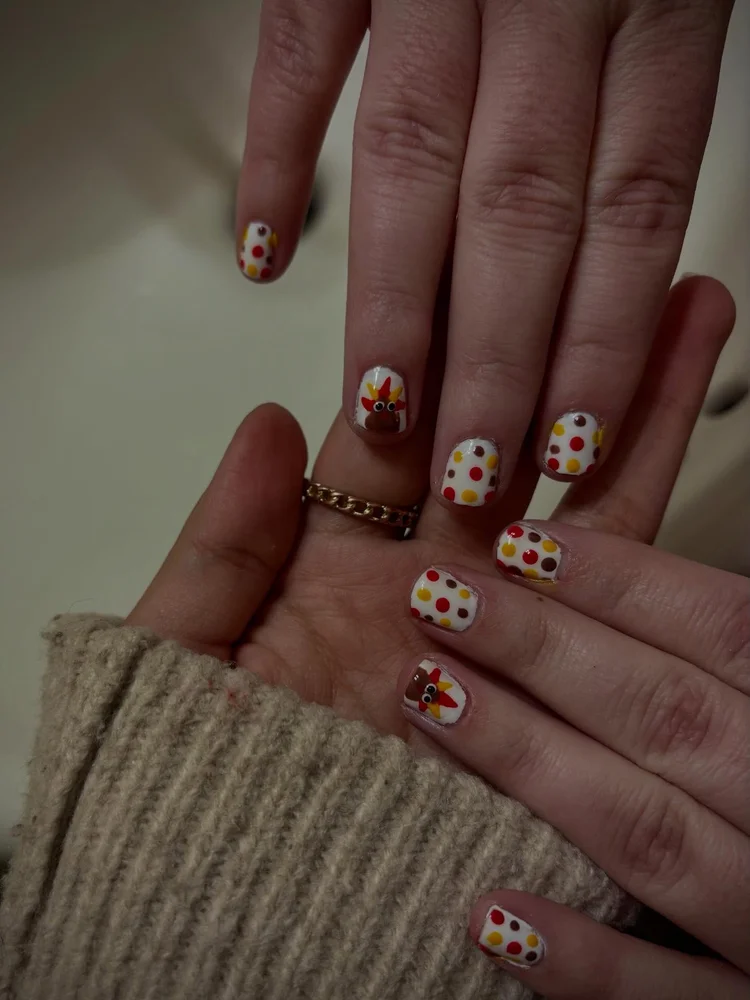
Gummy polish ruins dots, so cap bottles between colors. Clean nails with alcohol first, then paint white in two thin coats. Reload the dotting tool after every third dot for even size. Start each face with a brown dot. Next dab feather dots, then white and black eyes. Let faces set before top coat so black pupils stay sharp.
7. Squirrel Sticker Harvest Solids
High-gloss solids alternate in mustard, olive, deep teal, and burnt orange. One nail carries a tiny orange squirrel sticker clutching an acorn. Red berry dots sit on a thin branch overhead. Red, yellow, and green maple leaves rest on the mustard nails, traced with fine vein lines. Sticker edges lie flat and clean, and light bounces off every solid.
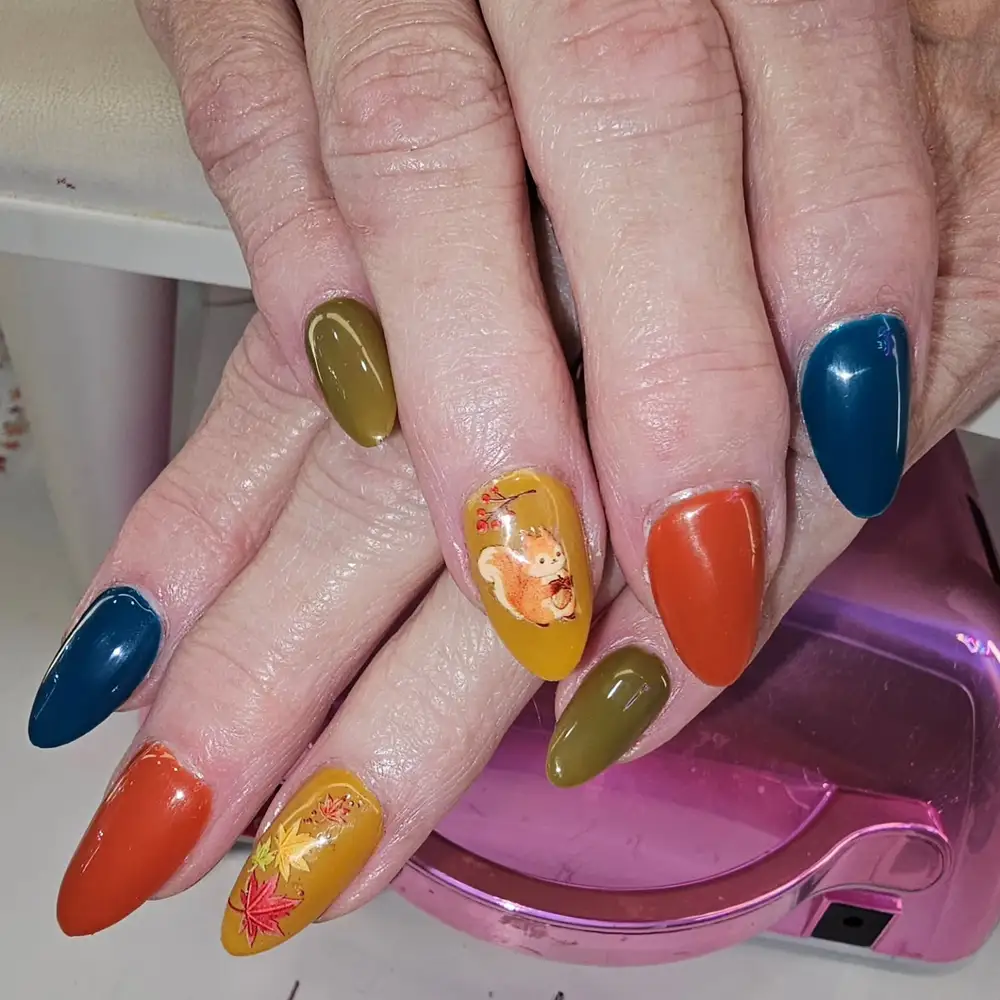
Back-and-forth strokes over stickers are the trap, since they drag edges up. Paint the solids first, using two thin coats. Give sticker nails only one coat, so decals rest lower. Lift each sticker with tweezers, gripping the clear border. Set it on dry polish, then press from the center out with a silicone tool. Trim any lifted edge with small scissors. Seal with one slow stroke.
8. Glitter Plaid Wrap Checks
Gold glitter lines cross a glossy plaid in teal, navy, orange, rust, and cream. Squares vary in size, and the crossings stay crisp. Copper glitter nails sit next to the plaid, packed with gold, orange, and bronze sparkle. Glitter nails sparkle in tiny points, while plaid nails stay glossy. Plaid colors echo the orange and yellow of blurred autumn leaves in the background.
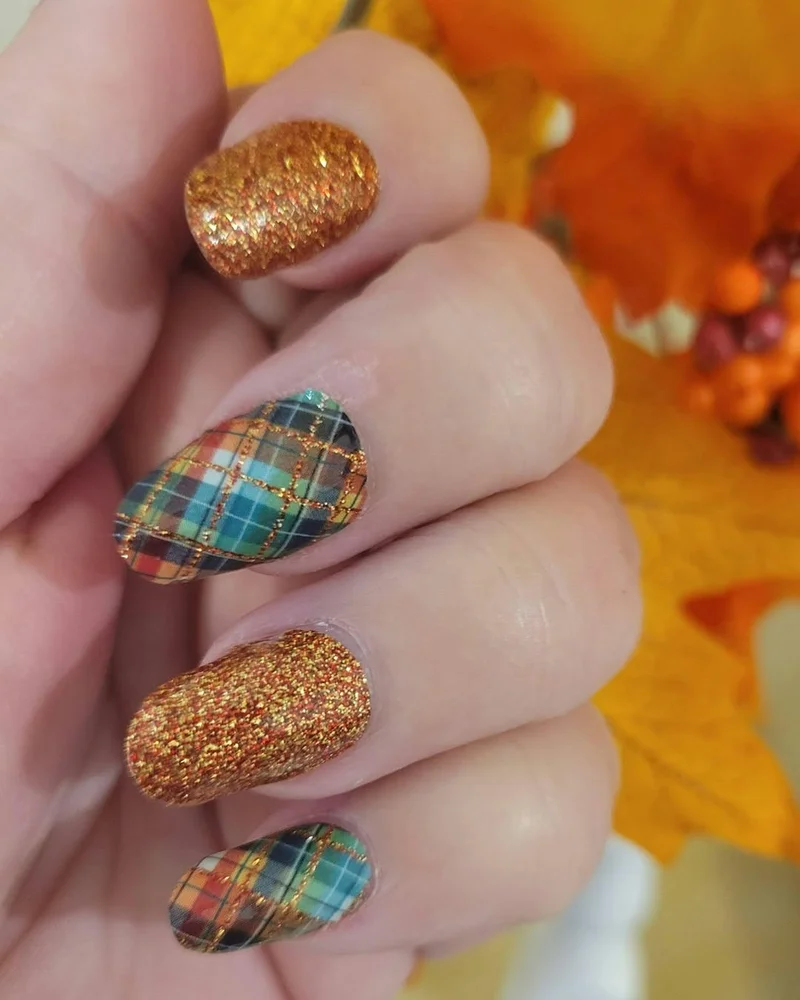
Tugging wrap sideways is the common error. Work from the middle out with a cuticle stick instead. Set the wraps on fully dry polish. Trim overhang by filing down, never sawing back and forth. Dab glitter polish over every other nail in thin layers. Press gold striping tape over plaid crossings, tucking ends under top coat. Seal twice, letting the first coat dry before the second.
9. Half Pumpkin Dot Orange
Bright gloss covers orange nails dotted in white, set in neat rows. Dot sizes shift slightly from one to the next, so the rows look hand-done. Clear nude nails carry half pumpkins. Brown rib lines curve down from a small stem curl. Ribs meet at a central point. Pumpkin halves glow against the pale base. Pumpkins and dots share a playful, bright mood.

Guessing rib spacing is a common misstep. Sketch a half pumpkin on paper first to judge it. Then outline it on nude nails with brown polish and a liner brush, in a single steady sweep. Fill the shape with orange. Draw ribs after the fill sets. Dot white over the orange nails with a mid-size tool, spacing rows evenly. Curl the stem last, then seal.
10. Terracotta Acorn Leaf Sprigs
Even gloss runs over solids in terracotta, deep green, and dusty rose. Solids alternate around the art. Cream nails hold tan acorns capped in brown dots. Green leaf sprigs on fine stems sit beside them. Small rust dots sit evenly over the cream. Acorn and leaf details stay tiny and tidy. Light reflects off the gloss without blurring any detail.

Painting solids with a loaded brush is what to avoid, since thick edges gather near the cuticle. Wipe excess polish from the brush and keep coats thin. Place acorn and leaf stickers on cream once the base is completely dry. Look at each corner for lift, then smooth edges down using an orange stick. Dot rust with a small tool. Seal in slow strokes. Hold hands still afterward so stickers stay flat.
11. Champagne Feather Turkey Glitter
Fine gold sparkle covers the nails in soft champagne glitter that glows under light. Pointed feathers in red, yellow, and brown layer up in rows across the glitter. Turkey faces on the glitter nails have wide eyes and tiny beaks. Their bodies are dark brown. Sparkle shows through the feather colors. Bright and festive, the colors keep the set lively.
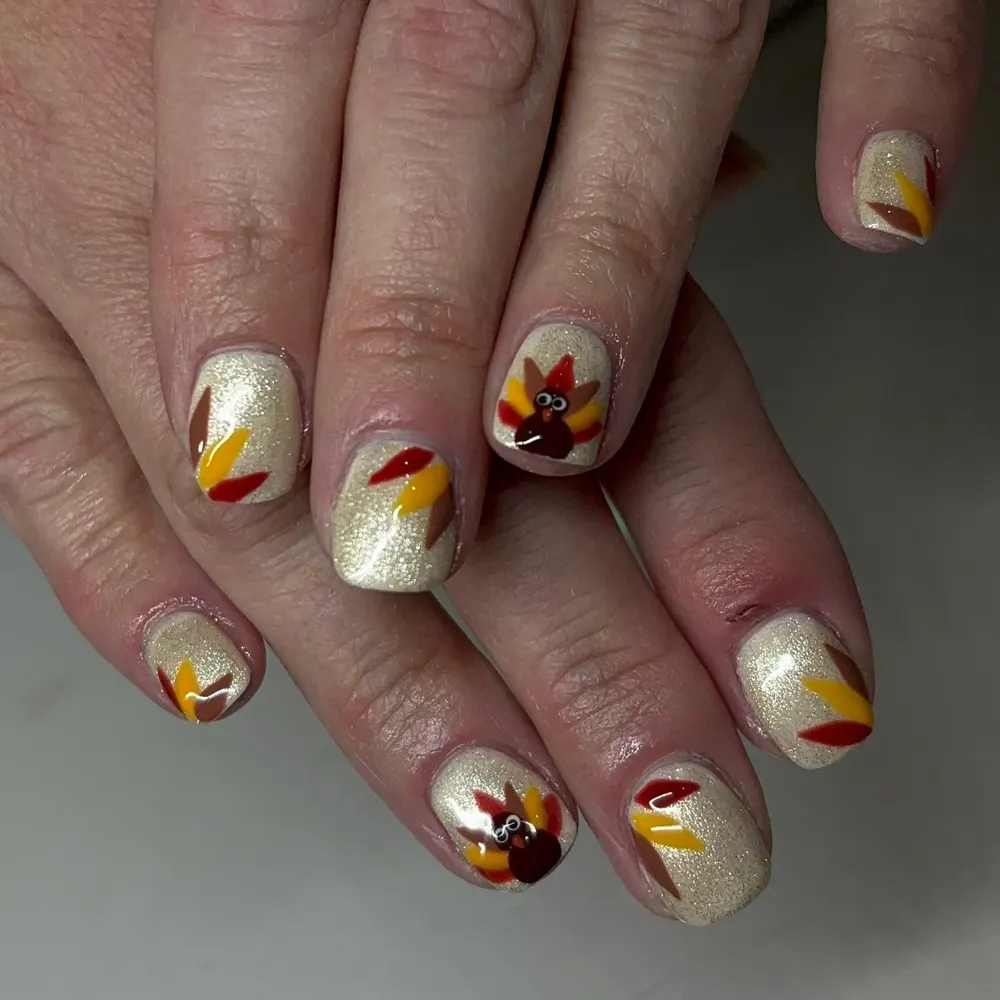
Round blobs instead of points are the usual feather mistake. Drag the dot back toward the cuticle to stretch it into a point. Dab a sheer layer of glitter on the base before the feathers so the sparkle peeks through. Lay red feathers, then yellow and brown once red sets. Press turkey face stickers down, starting at the eyes and beak. Seal with top coat. Feather nails take a second coat for extra hold.
12. White Dot French Pumpkins
Polished, even pink covers every nail with a glassy shine. Tiny orange dots line up in tidy rows across white French tips. One tip holds a small orange pumpkin with a green stem and fine ribs, bright against the white. Orange links the dots to the pumpkin. Gloss glints along the tip edge, which keeps the dotted French crisp and clean.
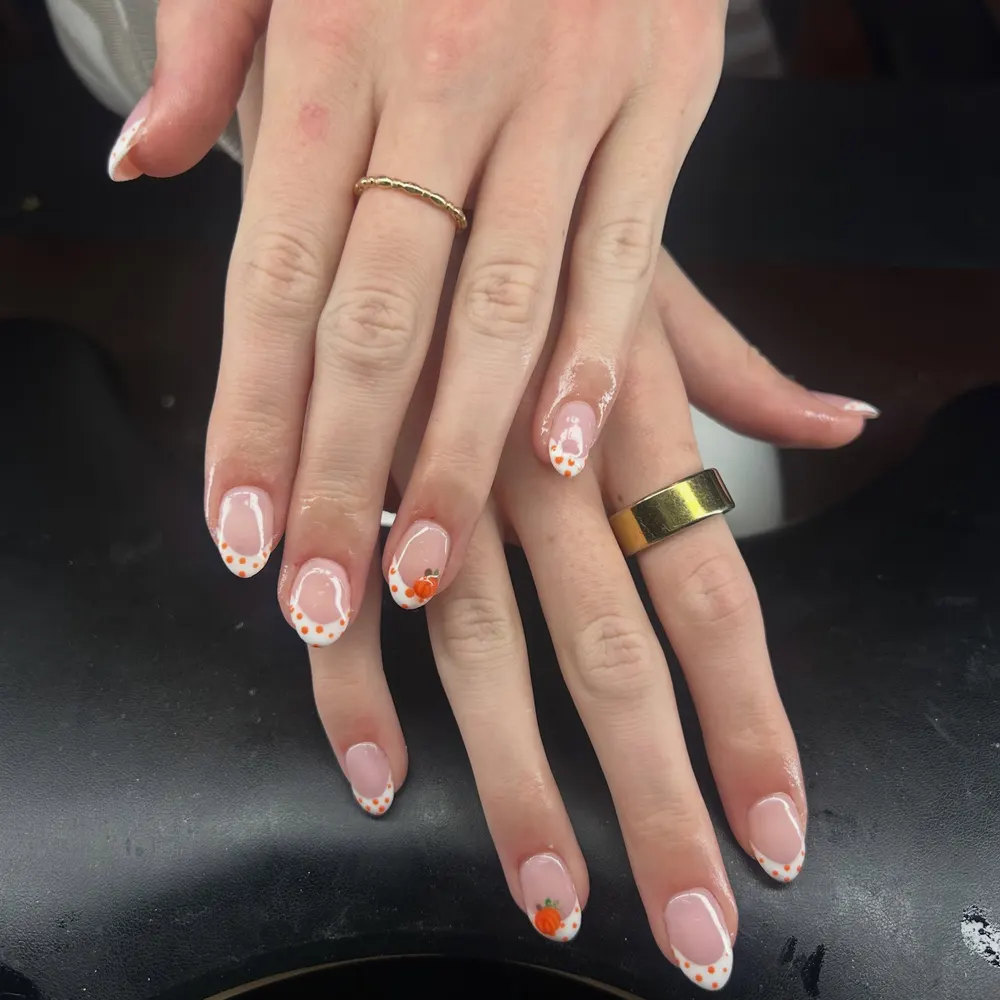
Peeling tape from fully hardened polish tends to chip the line. Mark off the tips with striping tape and paint one thin coat of white. Pull the tape slowly toward the tip while the polish is still tacky. Dot orange onto the white with the smallest tool, spaced evenly. Form the pumpkin with a single big dot, then draw the ribs and stem once it sets. Cap the tip edge with top coat to guard the white line.
13. Sunny Turkey Face Blocks
Flat, even color fills every nail, with nothing shaded or blended. Yellow, orange, and bright red solids alternate under a bold gloss. Brown nails carry turkey faces with white eyes, orange beaks, and red wattles. Wide eyes and a pointed beak make each face easy to read at a glance. Brown anchors the faces while the bright solids sit around them.

Over-mixing custom shades is the trap, since the bottle colors work as they are. Paint solids in two thin coats, with drying time between them. Start each face with a brown dot. Next, dab white eyes, black pupils, a beak, and the wattle. Let the faces set before glossy top coat. Wipe skin edges with a lightly damp cotton bud before sealing.
14. Caramel Acorn Outline Solids
Shiny tan polish carries a small brown acorn outline, thin and neat. White dots sit inside the cap, and a curved stem tops it. Near the tip, a simple curved line forms the body. Bright orange and caramel brown solids alternate beside it, evenly covered and glossy. Light shines off every coat, while the outline never fills in. Dots stay inside the cap only.
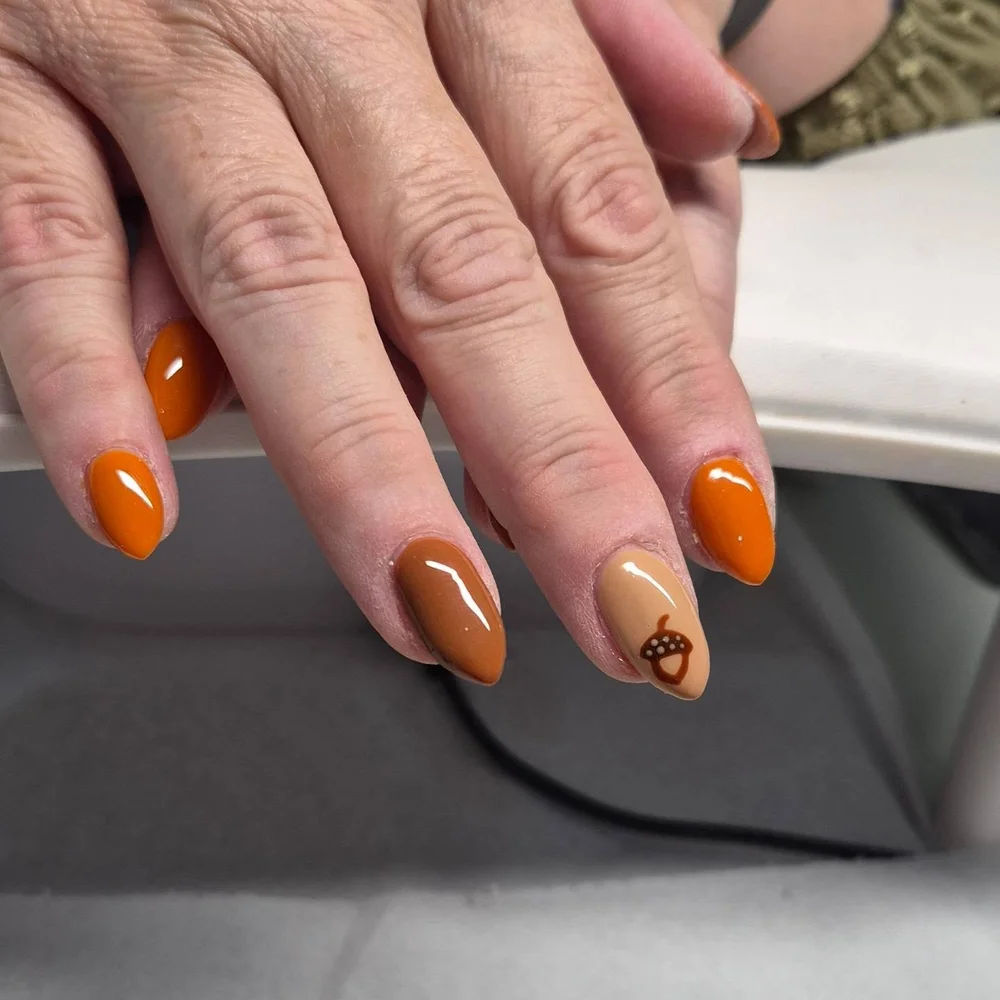
Rushing top coat over wet lines blurs them. Sketch the cap curve first, using brown polish. Dot inside the cap with the smallest tool, and leave the body open. Paint orange and caramel in two thin coats, brushing in one direction. Hold the top coat until the art is dry. Quick-dry formulas work only after that point. Thin lines stay sharp that way.
15. Nude Plaid Dot French
Sheer, glossy nude lets a pink glow come through. Tips alternate between brown with white dots and white with a tiny orange pumpkin. Fine plaid lines sit on the white tips. Brown and white lines cross near the tip edge, thin and precise. Soft reflections bounce off the sheer base. Small details stay visible. Dots, pumpkin, and plaid share the tip space neatly.

Yanking tape off fast ruins a tip line. Mask the tips with tape, then paint brown on some and white on others. Ease the tape away slowly before the polish hardens fully. Dot white along the brown tips in a single row near the edge. Draw plaid with a liner brush once tips set, brown over white. Shape the orange pumpkin last, then seal with top coat.
16. Smiling Acorn Leaf Stickers
Brown shimmer solids glow with a copper tone under light. White nails carry orange and brown leaf shapes in varied sizes. White nails also show a smiling acorn face and a smiling pumpkin face. Orange dotted nails sit alongside, with white dots over bright orange gloss. Brown adds warmth to the set. Smiling faces keep it cheerful and friendly.
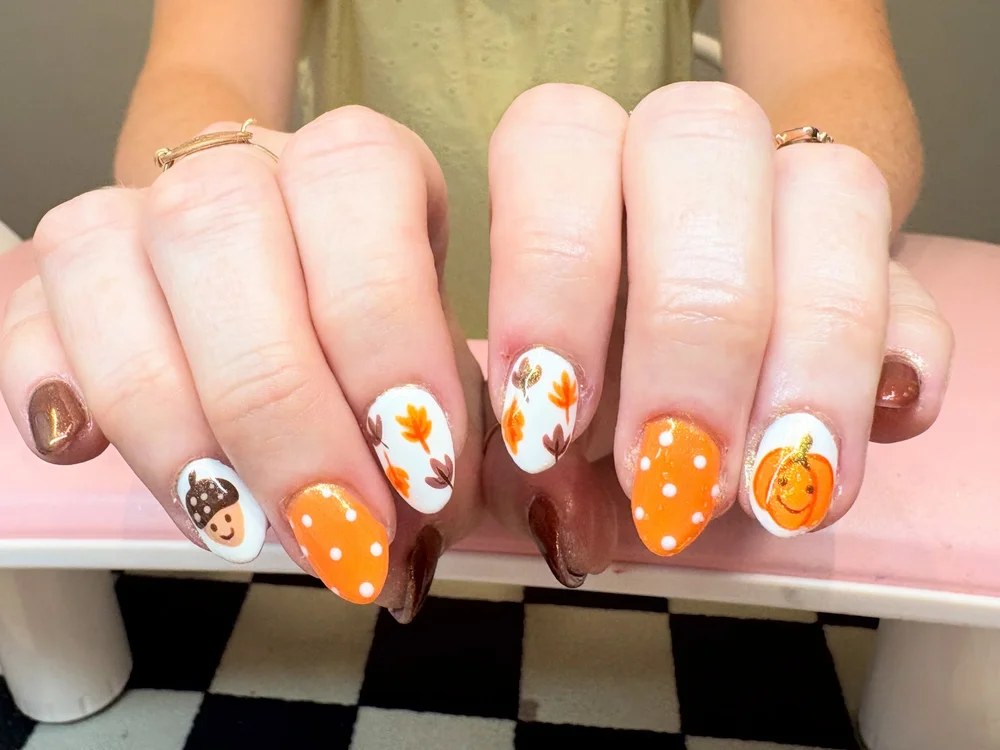
Top coat over wet shimmer is the thing to hold off on. Paint brown shimmer in two thin coats and let it dry fully first. Use a silicone tool to press each sticker down, center first. Dot orange afterward, keeping clear of the face details. Cover stickers with one thin top coat. Repeat once that layer sets. Store sticker sheets somewhere cool to protect the adhesive.
17. Raised Pumpkin Dotted French
Raised orange pumpkin sits on a white tip, its dark green stem throwing a small shadow. Brown French tips with white dots cover a glossy, smooth nude pink base. Thin brown plaid line crosses one tip beside the pumpkin. Highlights flash on the raised shape. Dotted French edges stay crisp. Pumpkin height sets it apart from the flat dots.

Skimping on dots flattens the pumpkin. Join three orange dots into a single raised pumpkin and let it set. Draw the stem with a thin line of dark green on a liner brush. Paint the brown tips first, then dot white once they feel dry. Lay striping tape for the plaid line, tucking the end beneath the pumpkin. Seal with extra top coat around the pumpkin to lock its edges.
18. Cranberry Bow Turkey Dots
Rich, glossy cranberry red covers some nails in deep, even color. Thin gold bow loops cross those nails, delicate against the dark red. White nails carry multicolor dots and a cartoon turkey face with red, yellow, and orange feathers. Turkey eyes look wide and bright. Dots scatter across the white in a confetti style. Gold and cranberry make a delicate contrast.
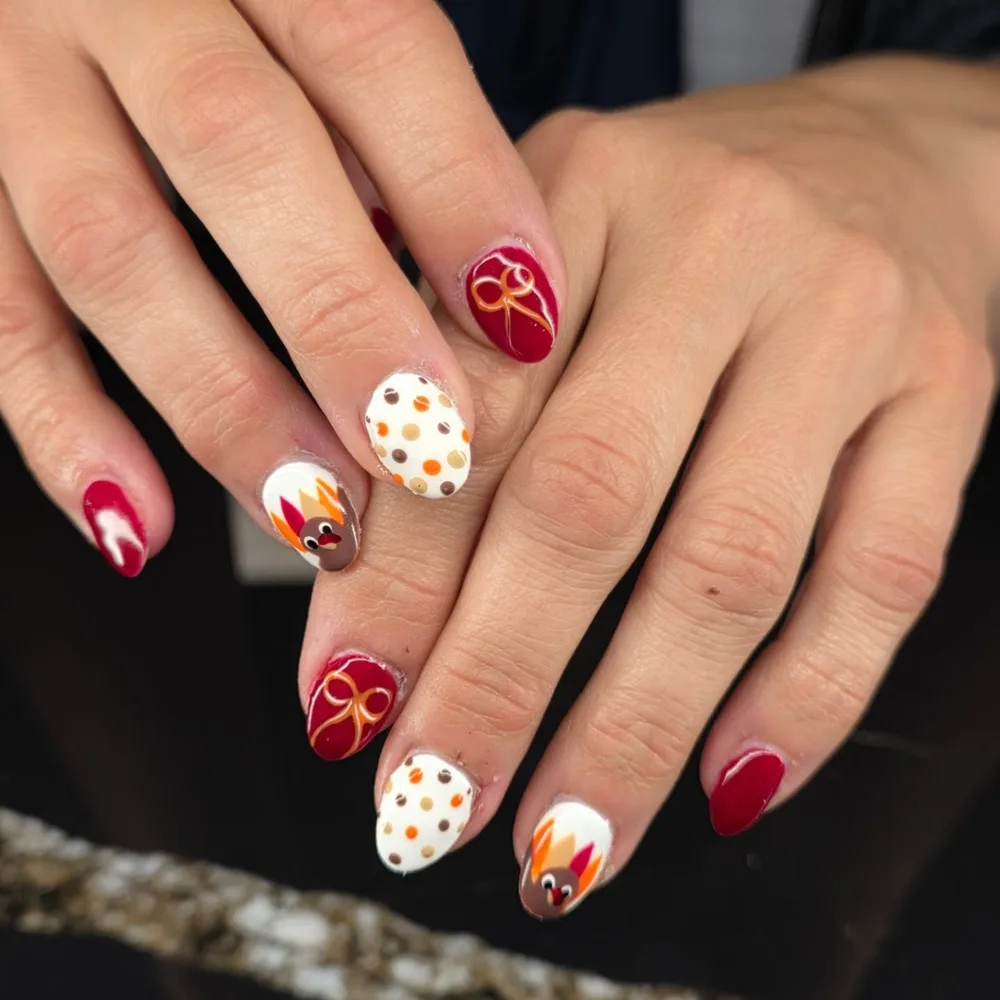
Gold lines smear when painted over fresh color, so seal the cranberry with top coat first. Draw small, even bow loops in gold with a liner brush. On white nails, dot the feathers first. Then paint the body and eyes once feathers set. Vary dot sizes for a confetti effect. Keep the set away from fabric for a while after finishing.
19. Red Dot Pumpkin French
Silky gloss gives pale pink nails an even, smooth coat. Small red dots sit in tidy rows on the white French tips, bright against the edge. At the tip edge, an orange pumpkin shows dark ribs and a tiny green stem. Soft highlights play over the pink, and red keeps the tips lively. Pumpkin shape stays small next to the dots.

Muddy red dots happen when the brush still carries white. Clean it between colors. Paint white tips with one smooth stroke each, using a liner brush. Dot red with the smallest tool once the white tips have dried. Paint the pumpkin at the tip edge in orange. Draw ribs after it sets. Seal over the free edge to protect the dots and pumpkin.
20. Coral Dotted Pumpkin Tips
Warm gloss covers coral peach nails in an even sheen. Tiny brown dots sit along peach French tips. One nail holds a small orange pumpkin. Thin green vine curl loops beside it. Caramel brown solids sit next to the tips, deep and even. Pumpkin stays small and tidy. Peach shades keep the set soft and warm. Brown shows up twice, in the dots and the solids.

Repeating the same design on neighboring nails is the thing to avoid. Rotate peach tips, caramel solids, and pumpkin nails instead. Dot brown near the tip edge with a small tool. Paint the pumpkin orange. Draw the green vine curl once it sets. Seal in slow strokes so the brush never drags across the vine. Let nails rest before hands go into pockets.
21. Plaid Tip Red Pumpkins
Thin brown and orange lines cross the nude nails in plaid tips, forming small squares. One nude nail holds a glossy red pumpkin, small, with a green stem and a soft highlight. Dotted French tips in brown and white sit beside the plaid for contrast. Gloss reflects light, so plaid lines stay sharp. Pumpkin stands out easily. Brown appears in both the plaid and the dotted tips.
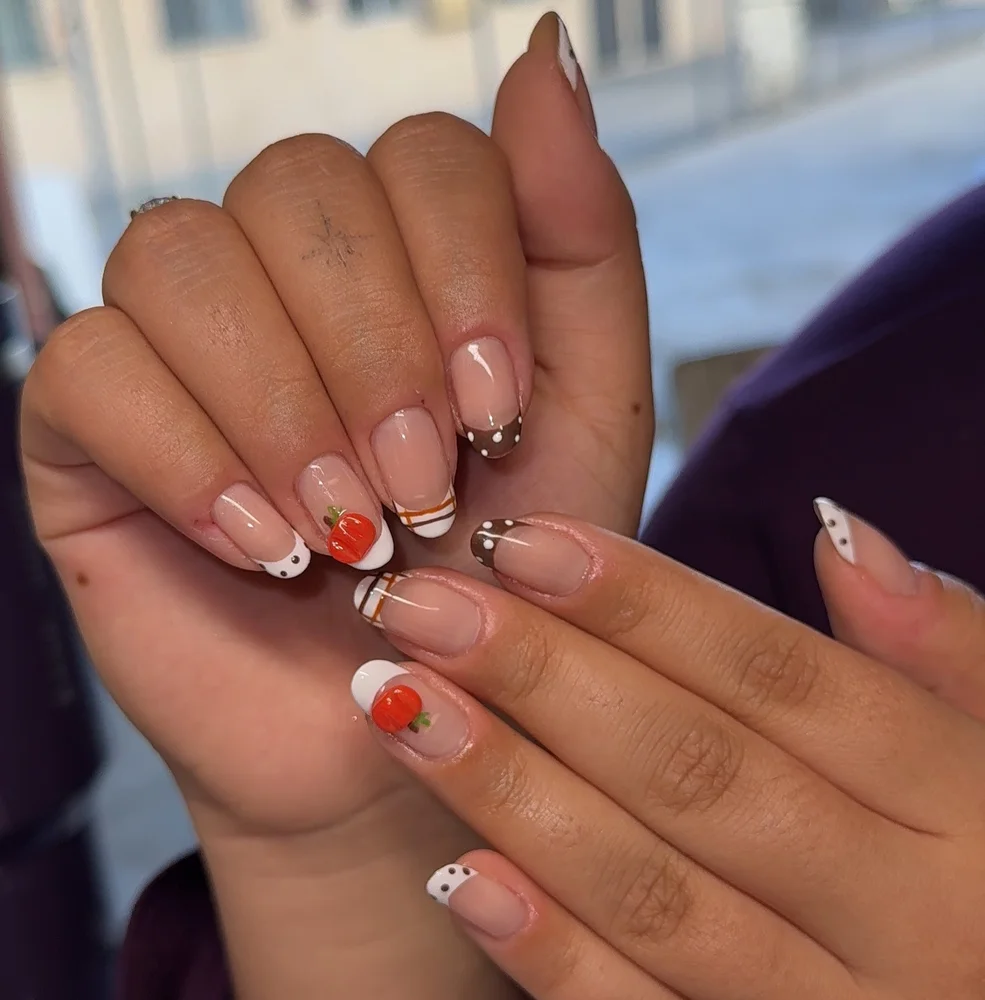
Lifted tape ends spoil the grid. Smooth them down with an orange stick and cut away overhang. Lay brown and orange striping tape across nude tips to form the grid. Shape the pumpkin with two merged dots from a dotting tool. Seal over the tape, then apply a second top coat after the first sets. Keep the tape roll somewhere dry so adhesive holds.
22. Tape Stripe Plaid Dots
Pearly glow spreads over soft peach and nude polish with a smooth finish. White dots scatter over the peach nails, small and evenly spaced. One nail carries straight brown and orange stripes. Stripes stay straight and even across the nail. Another wears a plaid grid in rust, white, and brown. Edges look crisp where colors cross. Soft shades sit behind every line and dot.
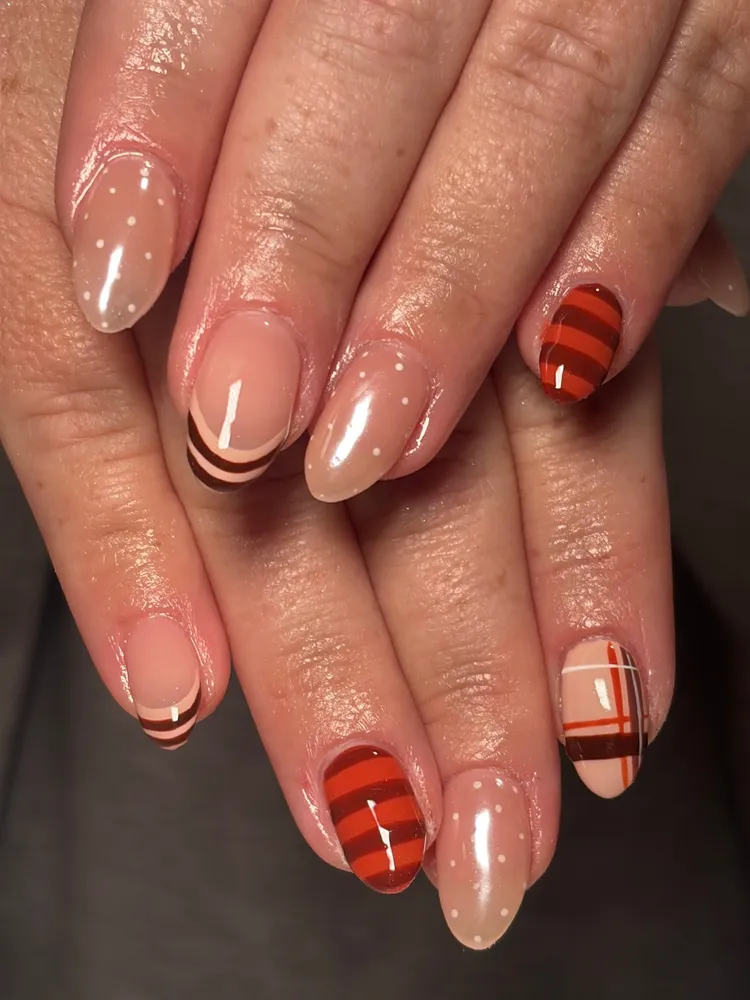
Bleeding under tape is the usual failure here. Press each piece firmly along its full length to stop it. Cut strips a bit longer than the nail’s width. Lay them over dry polish. Brush stripes and plaid lines with a liner brush, then peel tape before the polish fully hardens. Dot white afterward. Finish with top coat over the whole set. Leftover strips keep well on wax paper.
23. Midnight Leaf Sticker Gold
Inky black polish coats the nails in deep gloss and rich color. Small leaf stickers in yellow, orange, and red sit on it. Each one carries fine vein details. Light catches the gloss, so leaf colors glow against the dark base. Stickers lie flat with clean edges. Red, orange, and yellow leaves look warm next to black. Black keeps the whole set bold and seasonal.
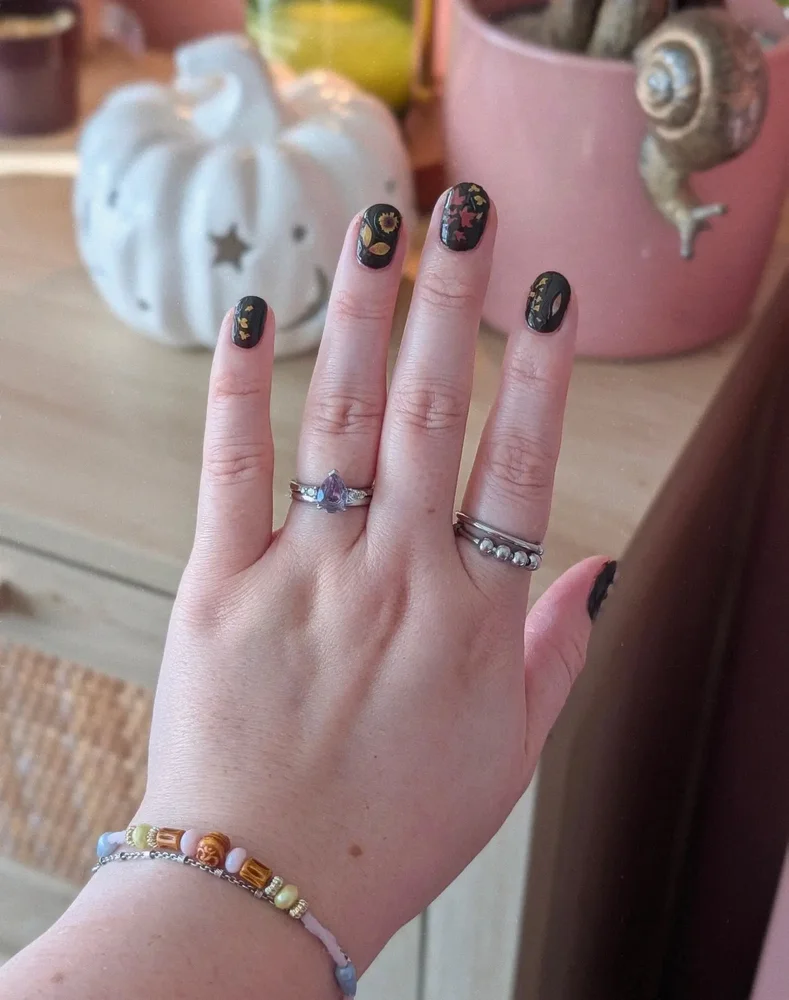
Smudges happen when stickers go on early, so let the black polish dry fully first. Trim each leaf sticker close to its design edge. Use tweezers to set it down, and a silicone tool to push out air bubbles. Seal each nail in a single slow pass so corners stay put. Keep a spare leaf handy, since tears happen.
24. Shimmer Gold Leaf Decals
Metallic gold leaf decals rest over peach shimmer polish, small and delicate. Fine sparkle glows softly across the peach base, even under bright light. Leaves vary in size, with pointed tips and thin vein lines. Their metallic foil catches the light in small, bright points. Peach keeps the set soft, while the gold stays bright. Decals stay delicate even at the larger sizes.

Thick peach coats bury the sparkle, so keep layers thin. Paint the peach shimmer in two coats first. Set decals on polish that is still tacky, then tap lightly with a silicone tool. Brush a thin top coat over the decals only. Seal the whole set once they feel secure. Store spare decals somewhere cool and dry so the foil stays bright.
25. Berry Dot French Nudes
Wine red polish shines with a deep, even gloss. Nude nails hold cranberry dots in varied sizes. Dots scatter over the pale base. Cranberry French tips sit beside them, each with a clean curved edge. Light bounces off the gloss. Rich cranberry stands out against the nude. Dots and tips share one berry color, so the set feels cohesive.
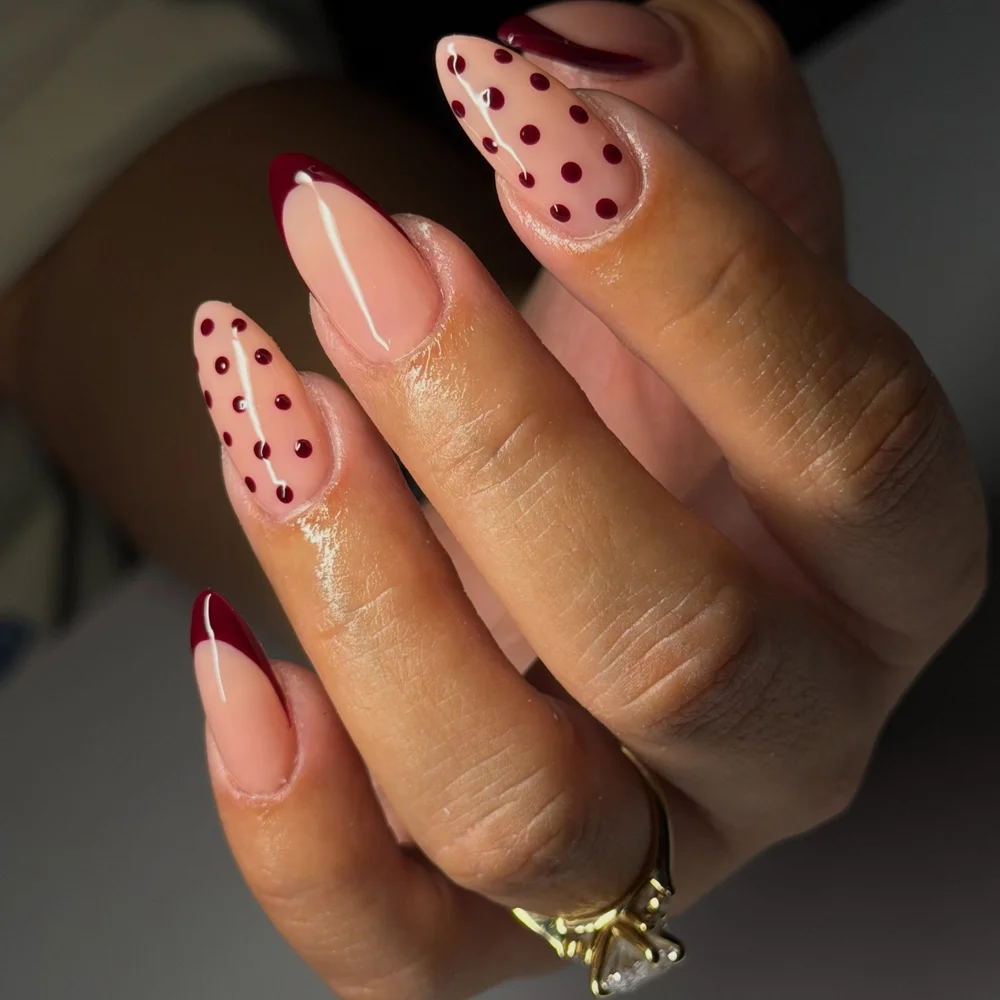
Dots smudge when top coat goes on too soon, so let them set first. Finish the cranberry solids, then use three tool sizes for the dots on the nude nails. Draw the French tips with a liner brush, holding each curve steady. Seal with glossy top coat. Cap the free edge on the tips. Brush on one more top coat after a few days to keep the dots bright.
Conclusion
Dinner prep leaves little time for fussy manicures. Choosing one design and repeating it across every nail still looks intentional. Such a plan keeps Thanksgiving nail art easy even on a busy day, since nothing demands perfect lines. Cotton buds, remover, and a spare sticker fix most mishaps fast. Paint the night before so polish has time to harden. Finish by checking each free edge for a smooth top coat seal.
