

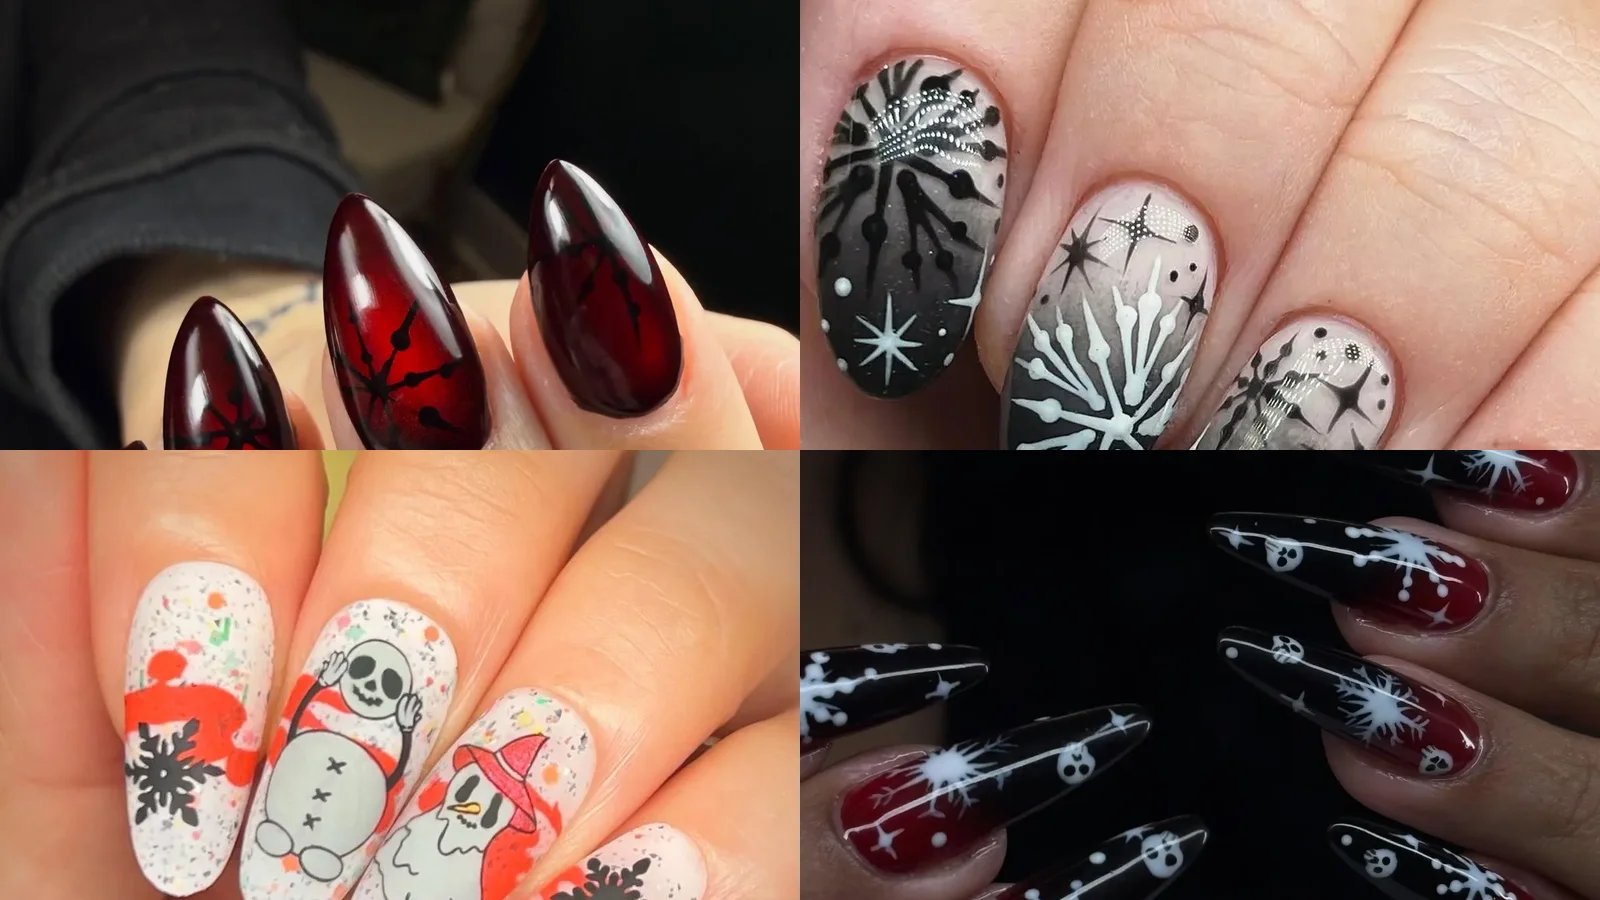
Some December evenings feel softer when the manicure matches the mood, calm and a little mysterious. Pearl white, flat black, emerald shimmer, and silver chains create that atmosphere, while ghosts and baubles add a gentle holiday wink. This collection of gothic Christmas nails leans on one clear idea per set, so nothing competes for attention. You will find matte and glossy pairings, magnetic cat-eye stripes, glitter accents, and sheer bases that keep darker art light. Simple tips on thin coats and sealed edges keep every look neat through cold, busy weeks. Pick the calmest design first, then add a bolder motif when the mood changes.
1. Burgundy Aura with Black Starburst Flakes
Wine-red glow gathers near each tip middle, then darkens toward the rim in a soft fade. Black burst shapes scatter over three tips, with thin arms reaching outward and tiny dots capping each arm. Gloss catches light along each surface, so a bright band runs down its center on every tip. Plain wine-red and black surfaces sit beside patterned ones, while dark rims mute the red tone.
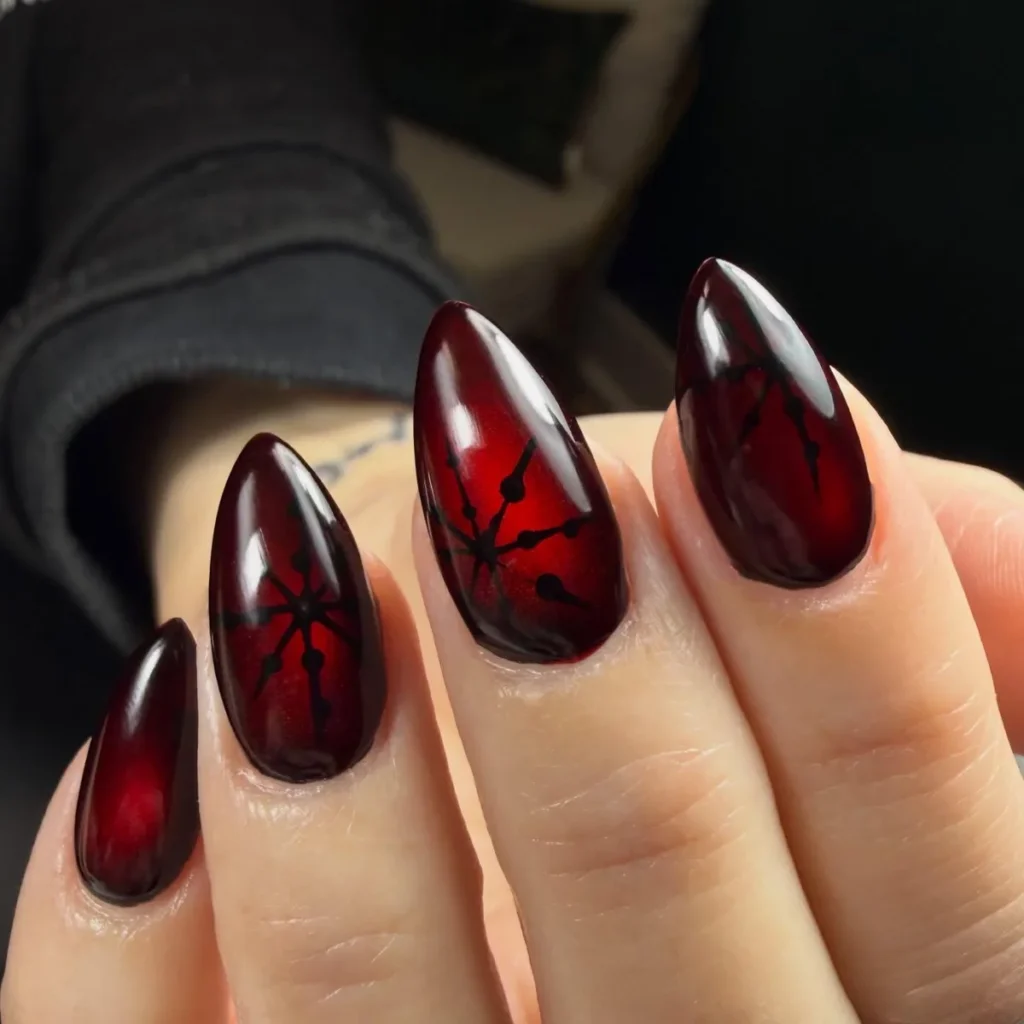
Start with a wine-red coat on every tip, then wait until the surface feels dry. Blend sheer black near the outer edge, because a soft edge keeps the center glowing. Draw burst motifs using a slim brush, moving from center to edge on each motif. Dot tiny specks onto arm ends using a dot tool, then add a clear gloss seal over all. Cap the edge with the same seal, so chips start later at the rim.
2. Smoky Ombre Snowflakes and Silver Stars
Pale gray lightens the base, while black deepens across the ends in a smoky wash. White flakes vary in size, and each shows slender arms with dotted centers. Dark flakes sit near pale ones, and their tones answer each other across the set. Little stars and dots drift in the gaps, giving a night-sky feel. Shine softens the gray, and the light ground lets every flake show plainly.
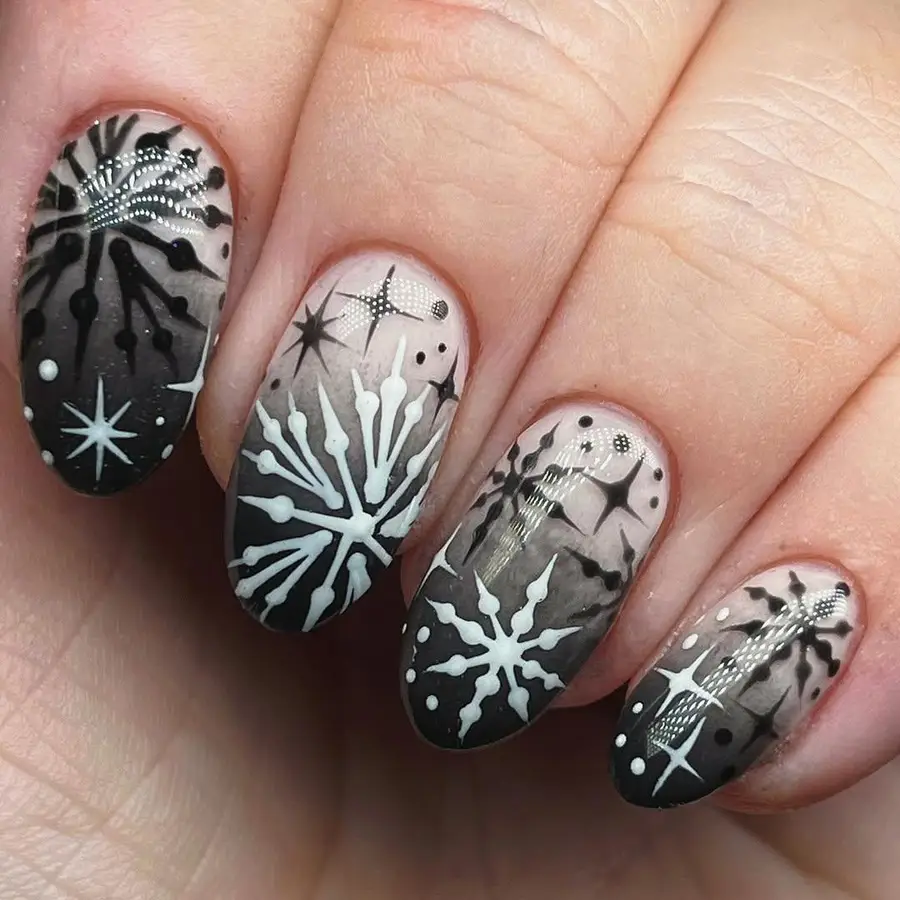
Sponge a light gray wash over each surface, then darken the ends in black. Smooth the meeting point while the coat stays damp, because a hard edge would spoil the fade. Use a slim brush for pale flakes, opening each from its center outward. Make dark flakes after the pale ones, and keep them tinier than the pale set. Cover all with a clear gloss coat, then run it over the rim, so chips start later.
3. Black Stiletto Snowflakes with a Skull Face
Mirror-like black covers most pointed tips, with a deep shine that reflects light sharply. Bare tips hold white flakes, crisp with sharp edges against pale skin tone. Grinning skull face fills a single tip, its eyes hollow and dark. Pale flakes dust the bare tips, so the dark group holds a festive link. Dark surfaces beside bare ones make the skull face feel eerie and strange.
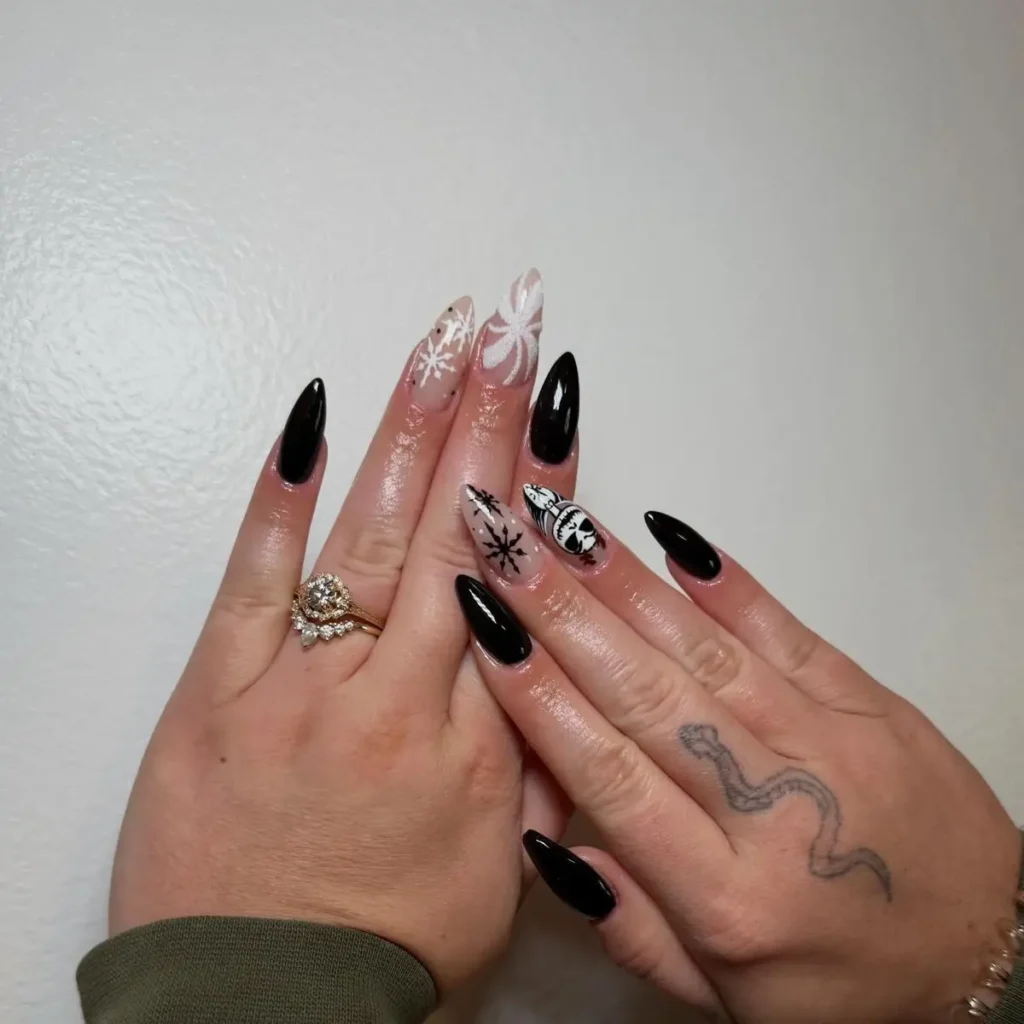
Coat dark surfaces in two thin layers, then wait until each coat feels dry. Leave two tips bare, and draw flakes on them using a slim brush. Draw the skull after the flakes dry, because wet paint would blur its edges. Widen the grin, and deepen the eye hollows for a hollow look. Seal everything under a clear gloss coat, and seal the rim so chip damage starts later.
4. Crimson Ombre Skulls and White Snowflakes
Crimson near the base glows bright, then darkens toward black at each tip. Dark surfaces carry white skulls, small with even spacing across the group. Flakes open across the red, spiky and strong in shape for every tip. Small stars drift among the skulls and make the group feel lively and full. Shine travels along each surface, and the fade shifts while hands turn in light.
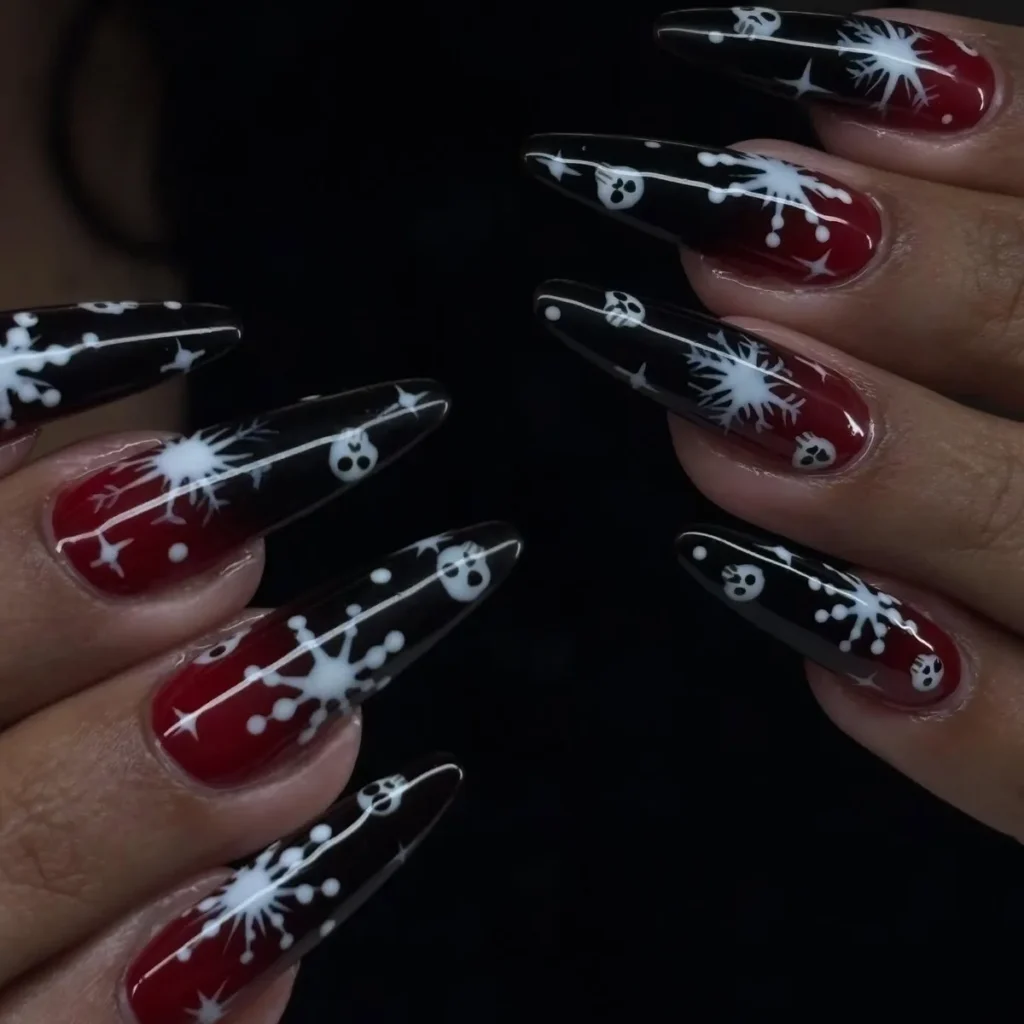
Spread wine-red color toward black using a sponge, moving inward from the end. Wait until the fade feels dry, because wet layers blur the join. Stamp or draw pale skulls using a slim brush, leaving even gaps between them across tips. Add flakes last, keeping every flake centered on its tip. Seal under a clear gloss coat, then seal the rim so chip damage starts later.
5. Skull Snowmen on Striped Red and White
Speckled white covers tips with small flecks, red and green plus black. Wavy bands of red with white sweep across two tips in strong, curving lines. Black flakes rest on the bands, crisp with sharp edges. Skull-faced snowman stands on a single tip, red scarf on and an arm waving. Next snowman sports a witch hat in red, a carrot nose, plus a stitched mouth.
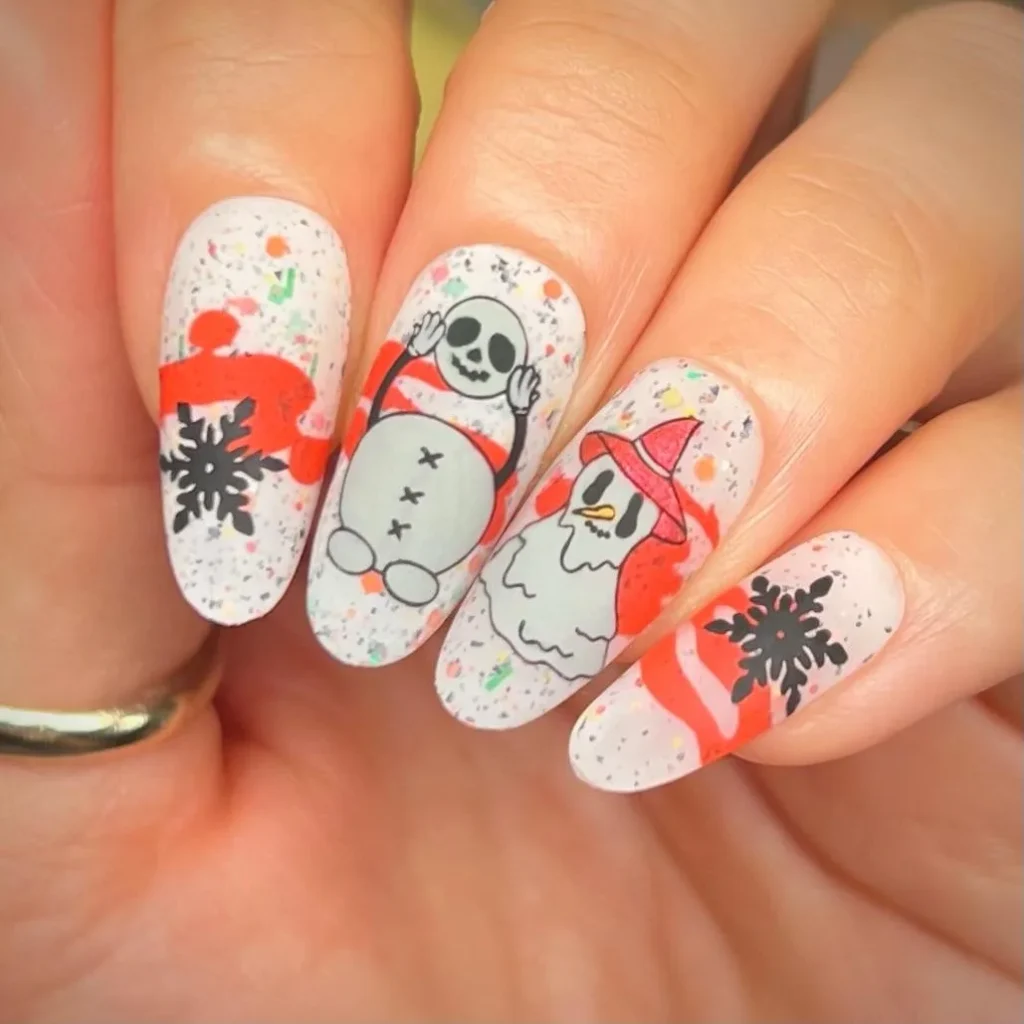
Lay striped bands down to start, then add black flakes using a slim brush. Paint snowmen over a light ground, with shapes simple and tidy. Give scarves and hats wine-red color, because those marks hold the red tone. Set the carrot nose in place using a dot tool, then keep it tiny. Top the group under a clear gloss coat, and seal the rim so chip damage starts later.
6. Matte Black Ghosts in Red Santa Hats
Flat black covers tips with a finish that absorbs light and stays even. White ghosts drift over dark ground in softly folded shapes. Red hats sit atop the ghosts, white trim plus small pom-poms. White flakes and dots drift between ghosts, falling like snow. Matte ground dulls shine, so white ghosts show up more. Small dots circle each ghost softly, while the black ground stays very deep and even.
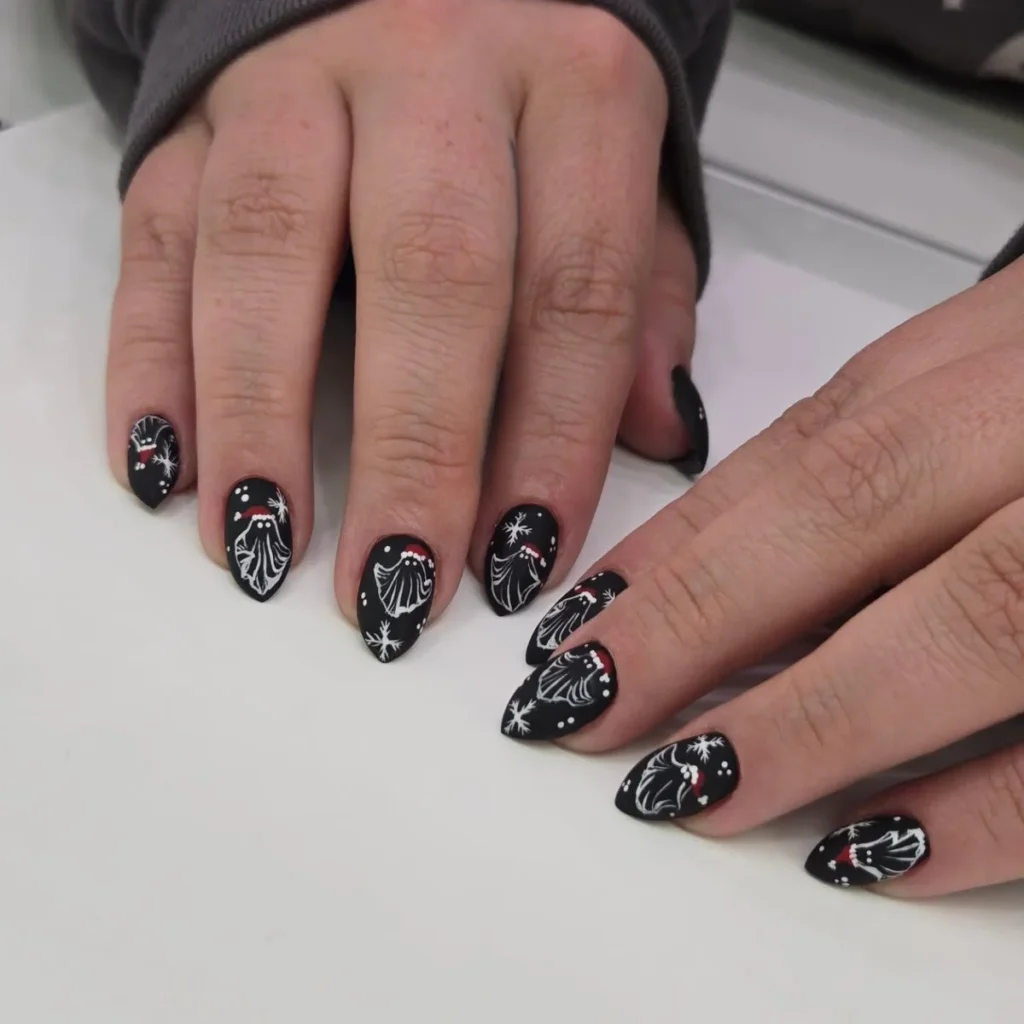
Draw ghost shapes in white polish using a slim brush. Set red hats on while the white coat stays damp, so trim edges melt in cleanly. Paint flakes using a dot tool, leaving uneven gaps between them, which reads as snowfall. Keep the base flat with a matte top layer, since shine would spoil that flat look. Coat the hats lightly, and seal the rim so chip damage starts later.
7. Blood-Drip Stripes over Black French Tips
Nude pink makes a soft base over most tips, under darker art. Black V tips cap the ends, each point sharp and clean. Flakes rest on two tips, red marks hidden behind their arms. Striped tips carry black bands with white, red drips trailing down. Green pine sits behind the group and gives a festive frame to the hands. Shine coats the set, and red drips keep their brightness over the stripes.
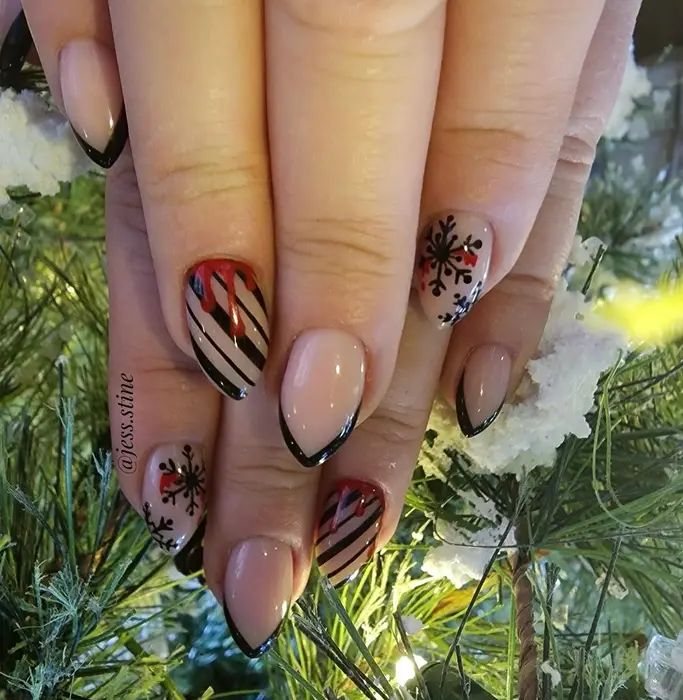
Use a stripe brush to form the dark tips, tracing the curve of each tip. Paint striped tips next, alternating two shades in tidy bands. Add red drips using a dot tool, letting them trail toward the tips. Draw flakes last, because wet paint would blur their edges. Seal under a clear gloss coat, and seal the rim so chip damage starts later.
8. Black Glitter Pentagrams and White Flakes
Dense black glitter packs tips with sparkling grains that catch light. White pentagrams rest in circles on two tips, pointed and dripping at the ends. Flakes spread across dark ground, each fine with sharp edges. Diagonal stripes run over one tip in tidy, even lines. Glitter in silver dusts the striped tip, while gloss lifts dark grains under bright lamps.
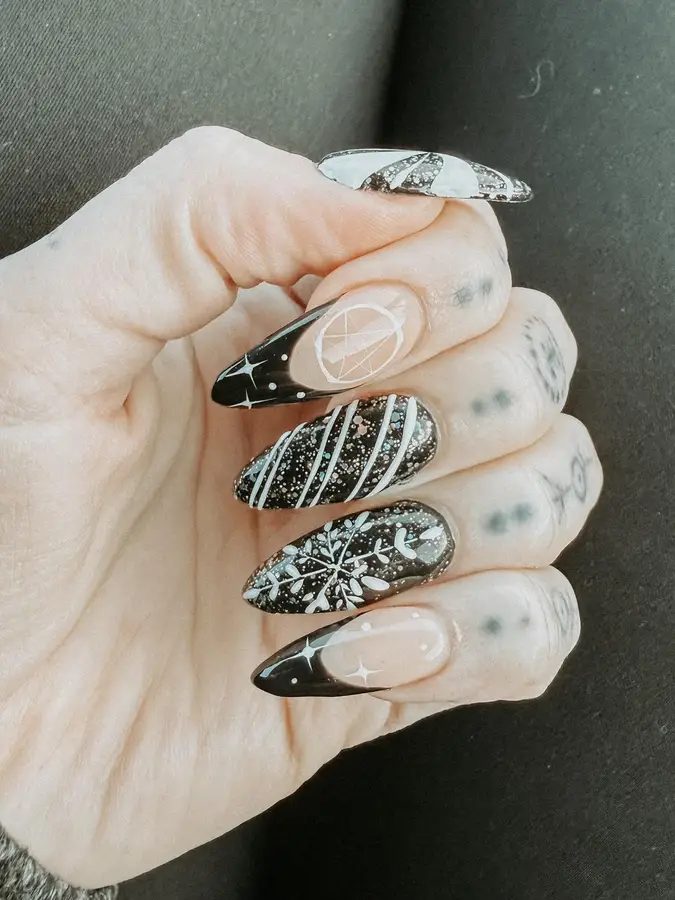
Cover tips with a dark shade in two thin layers, then wait until each feels dry. Push glitter onto the sticky coat using a flat brush, which keeps grains held fast. Draw pentagrams using a slim brush, and match the points in size. Add flakes and stripes after the glitter sets, because they rest over it. Seal under a clear gloss coat, and seal the rim to fight chip damage.
9. Chains, Pentagrams, and a Skull Snow Globe
Thin silver chains cross black tips in links that catch light. White pentagram covers a single tip, strong against red glitter. Skull inside a globe of snow fills one tip, red scarf below it. Dark face under a red hat shows red eyes glowing in black. Knit bands and flakes fill remaining tips, and the whole group stays full and dark.
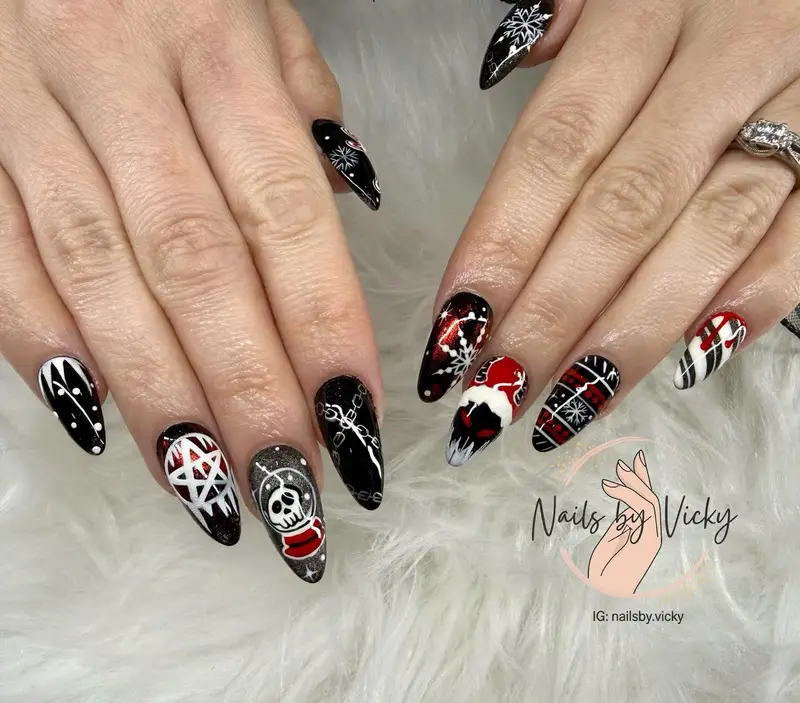
Map chain links first using a slim brush, loose and uneven in shape. Fill the pentagram after the chains, then add the globe skull on dry ground. Save the dark face for the end, because red eyes need pale edging to read. Add knit bands using a stripe brush, leaving even gaps between them. Seal under a clear gloss coat, and seal the rim so chip damage stays away.
10. Black French Snowflakes on Square Tips
Clear gradient shifts from a nude base to black at square tips. White flakes spread over black ends, fine arms ending in dots. Black flakes rest on clear tips, sharp over the sheer base. Diagonal stripes in silver with black run over two tips in strong bands. Gloss runs over the group, so dark and silver tones read bright in light.
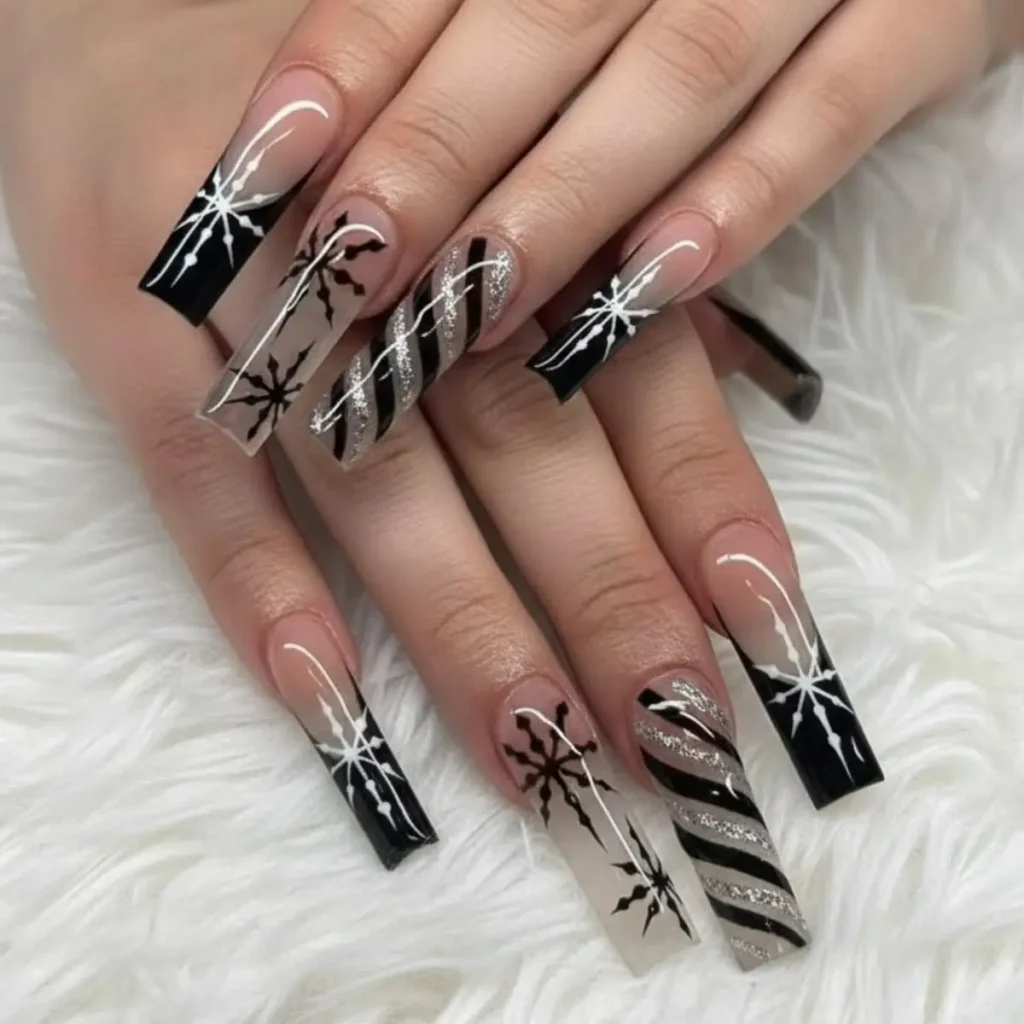
Tape black tips off to start, then coat nude bases in thin layers. Draw pale flakes using a slim brush, beginning at the middle of every flake. Add dark flakes over the clear tips, keeping dark ones smaller than pale ones. Paint slanted bands using a stripe brush, leaving even gaps between them. Seal under a clear gloss coat, and seal the rim to stop chips, because capped edges hold longer.
11. White Spiderweb Snowflakes on Black
Frosty line art spreads over black tips in frost and web patterns. Flake arms branch out as thin lines, dots marking the small joints. Glossy black fills gaps, so white lines shine over the dark. Sharp points frame tips, while lines keep a fine, even width. Only black and white appear here alone, and the design holds the whole group.
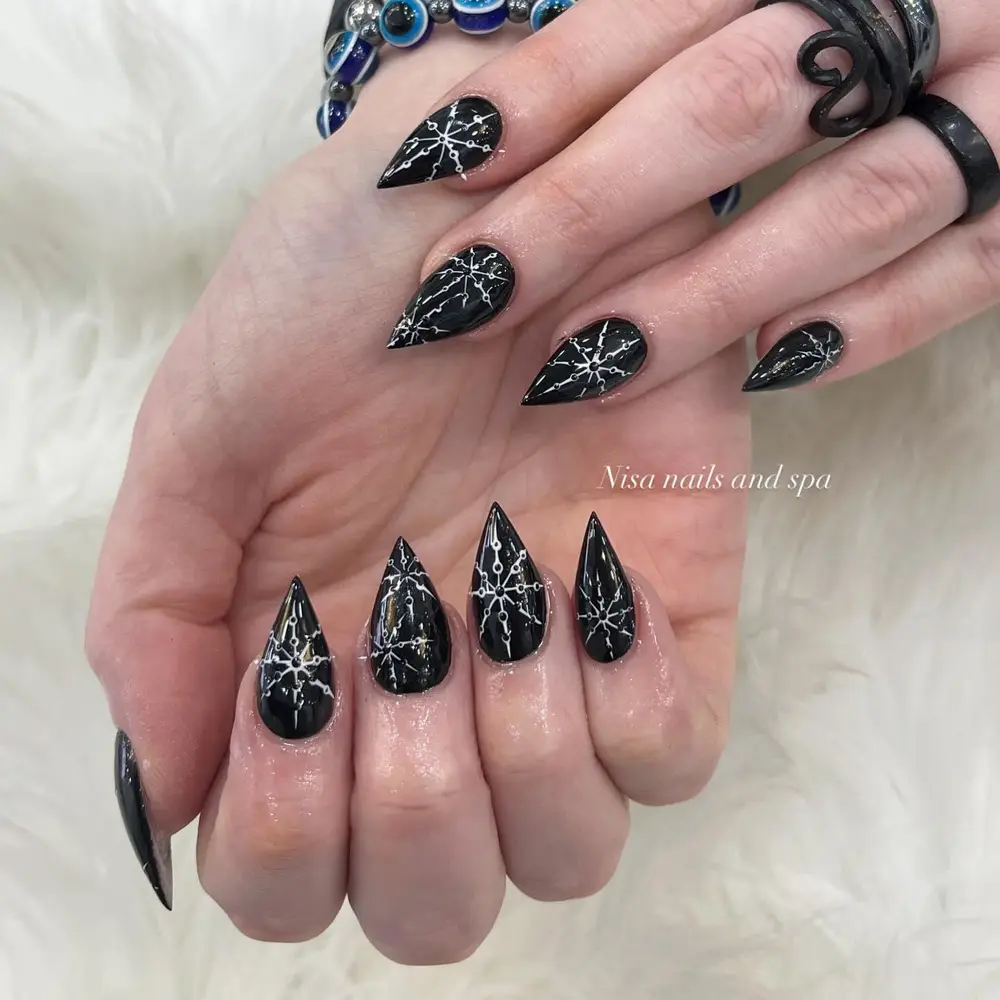
Sketch web lines first using a slim brush, with strokes thin and even. Grow flake arms out of a middle dot, adding joints next. Move slowly across each tip, because fine lines call for a calm hand. Leave gaps clean, so dark ground shows through between lines. Seal under a clear gloss coat, and seal the rim so wear starts later.
12. Gold and Black Ornaments on White
Shimmery white covers tips with frosty pearl glow. Black baubles hang on thin lines, gold hearts tucked inside. Single bauble shows gold with black stripes in strong, diagonal bands. Gold and black flake opens on the middle tip, leaf-shaped arms spreading out. Tiny speckles dust the pale base gently, and soft gloss keeps gold bright over white in light today.
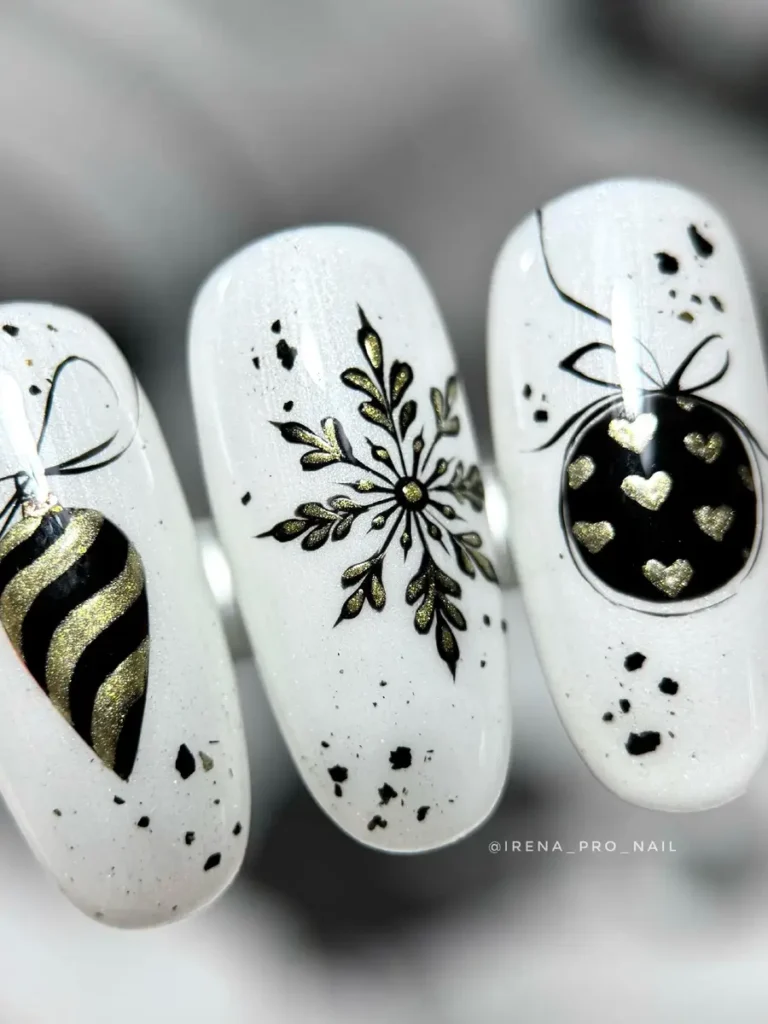
Outline bauble shapes first using a slim brush, neat and even in form. Fill black areas with thin layers, then set gold hearts inside. Paint flake arms using a slim brush, moving from center outward. Add speckles last using a dot tool, leaving uneven gaps between them. Seal under a clear gloss coat, and seal the rim to guard the art. Work slowly, so each bauble keeps a neat edge.
13. Haunted Tree with a Candy-Cane Heart
Thick red streaks trail down pale surfaces, glossy and heavy. Across one surface, a haunted tree in black carries red ornaments under a white star. Relief shapes a striped heart of red with white, lifting off the surface. Spiderweb lines join a peppermint swirl with an eyeball charm on another surface. Santa-hatted black cat plus a green wreath close the group.
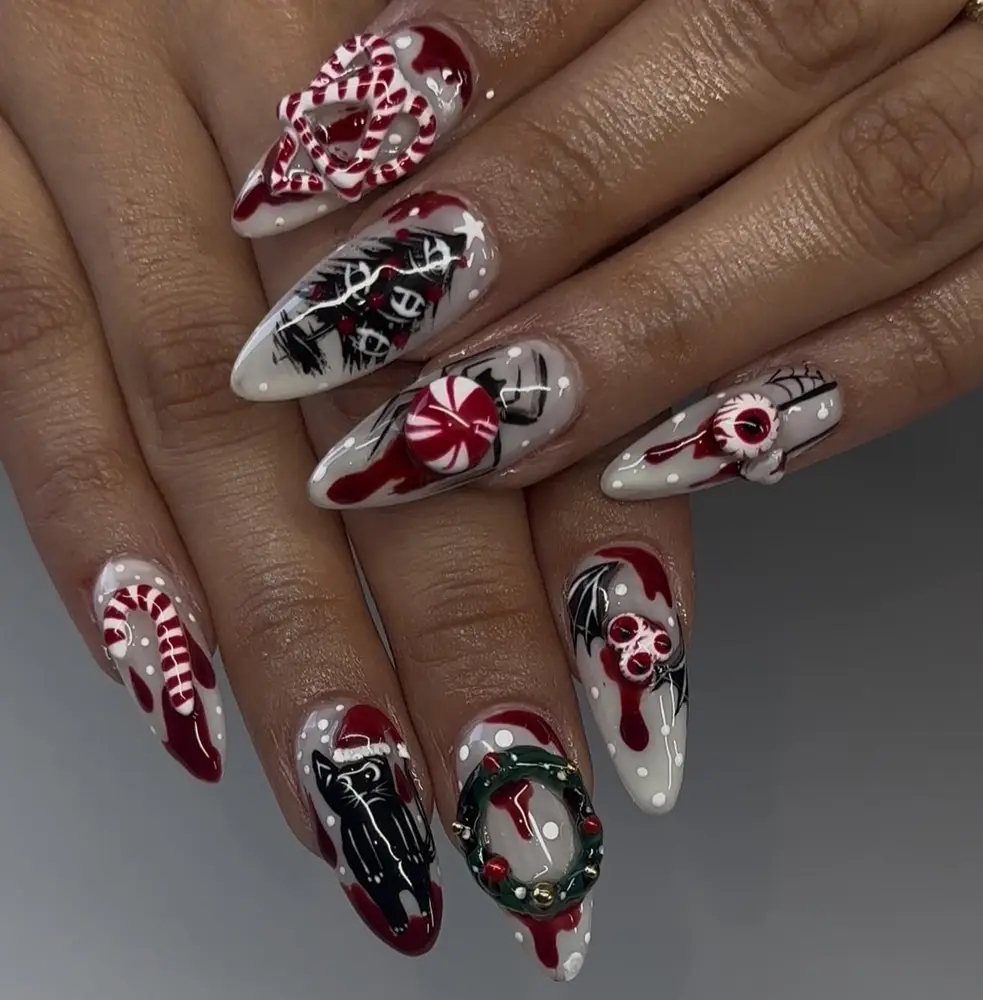
Set raised pieces with tweezers while the top coat stays wet, then wait until they set fully. Color the tree black before the ornaments, because red marks need dry ground. Add drips using a dot tool, and let each drip slide toward the tips. Save the wreath for the end, and keep its size small and centered. Seal flat tips only, because a top coat can gently flatten raised pieces.
14. Santa-Hat Skull with a Snow Globe
White faces with hollow eyes fill dark surfaces, skull after skull. Striped candy cane rests in the grip of one skull, red hat on its head. Inside a glass globe, another skull sits, red scarf tucked below the glass. Waving an arm, a white snowman with crossed eyes wears a red scarf too. Ornament shaped as a jack-o-lantern hangs near a flame in red, white flakes around it.
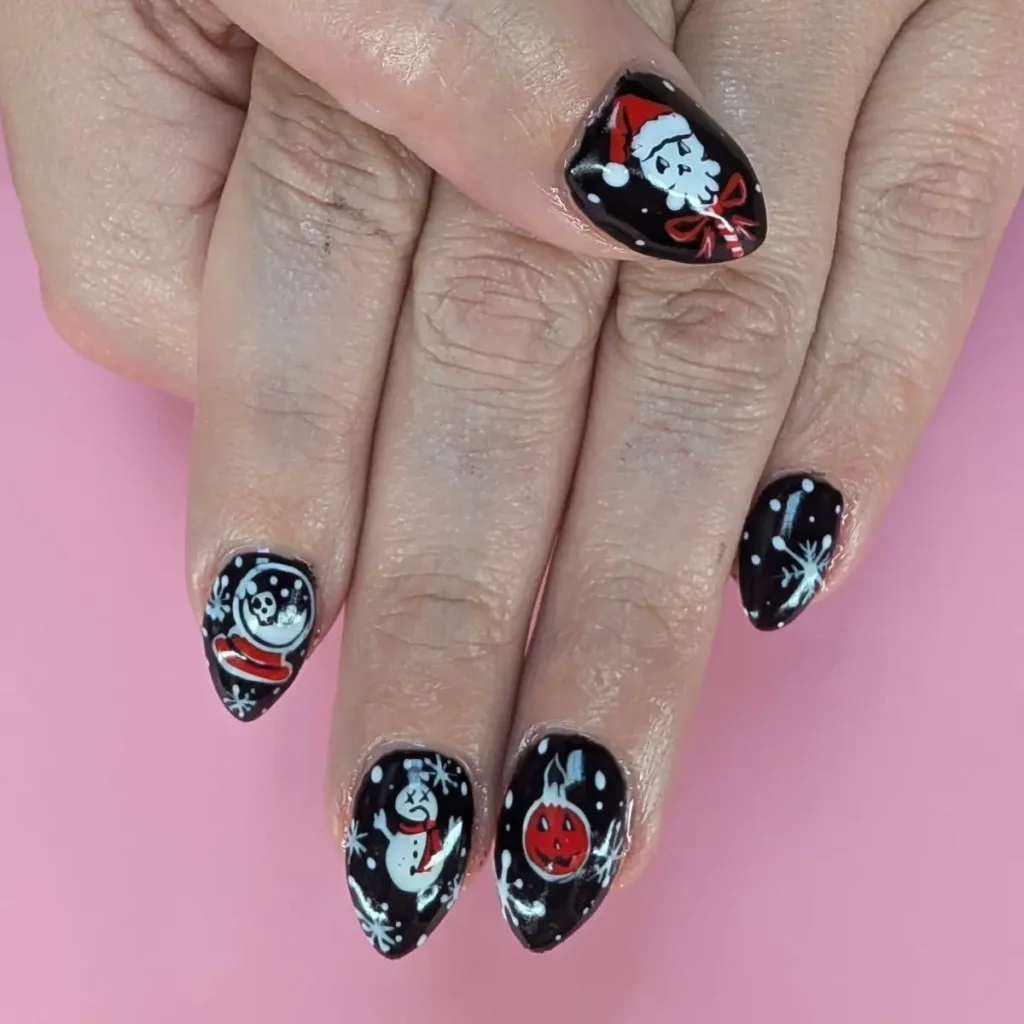
Paint dark ground in two thin layers, then wait until each feels dry. Draw skull faces in white polish using a thin brush. Save hats and scarves in red for the end, because they rest over the white. Make the snow globe broad, so the skull inside shows clearly. Cover the group under a clear gloss coat, and seal the rim so chip damage starts later.
15. Holly Chains and Skull Snowflakes in Red
Holly leaves in green spread with red berries over a dark green surface. Over the leaves winds a white chain, links strong with soft curves. One surface glitters red, white flakes on it with tiny skull faces. Another surface shows black stripes with white, red drips at its edges. Silver glitter plus a red ribbon finish the group with extra sparkle.
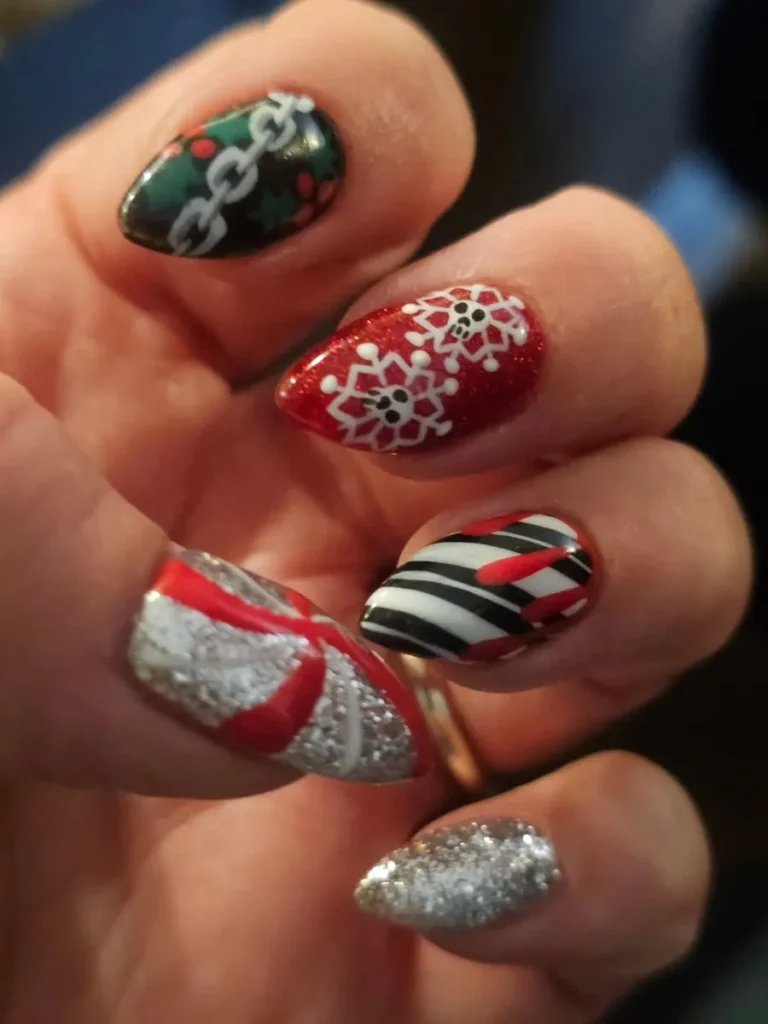
Place holly leaves using a small brush, and keep their points sharp and neat. Add berries using a dot tool, grouped in small clusters. Draw chain links after the berries, and fill a red tip with glitter. Stamp skull flakes after the glitter dries, because wet paint would blur their edges. Finish the group under a clear gloss coat, and seal the rim so chip damage starts later.
16. Peppermint Pinwheels and a Red Skeleton
Pinwheel peppermints spin bright across dark surfaces, swirling white with black. On one surface stands a red skeleton gingerbread, bones thin and white, belly stitched. Sad-faced white snowmen with crossed eyes sport red scarves. Candy stripes of black with white and red cross the remaining surfaces in strong bands. Gloss runs over the group softly, so red pops against black in light.
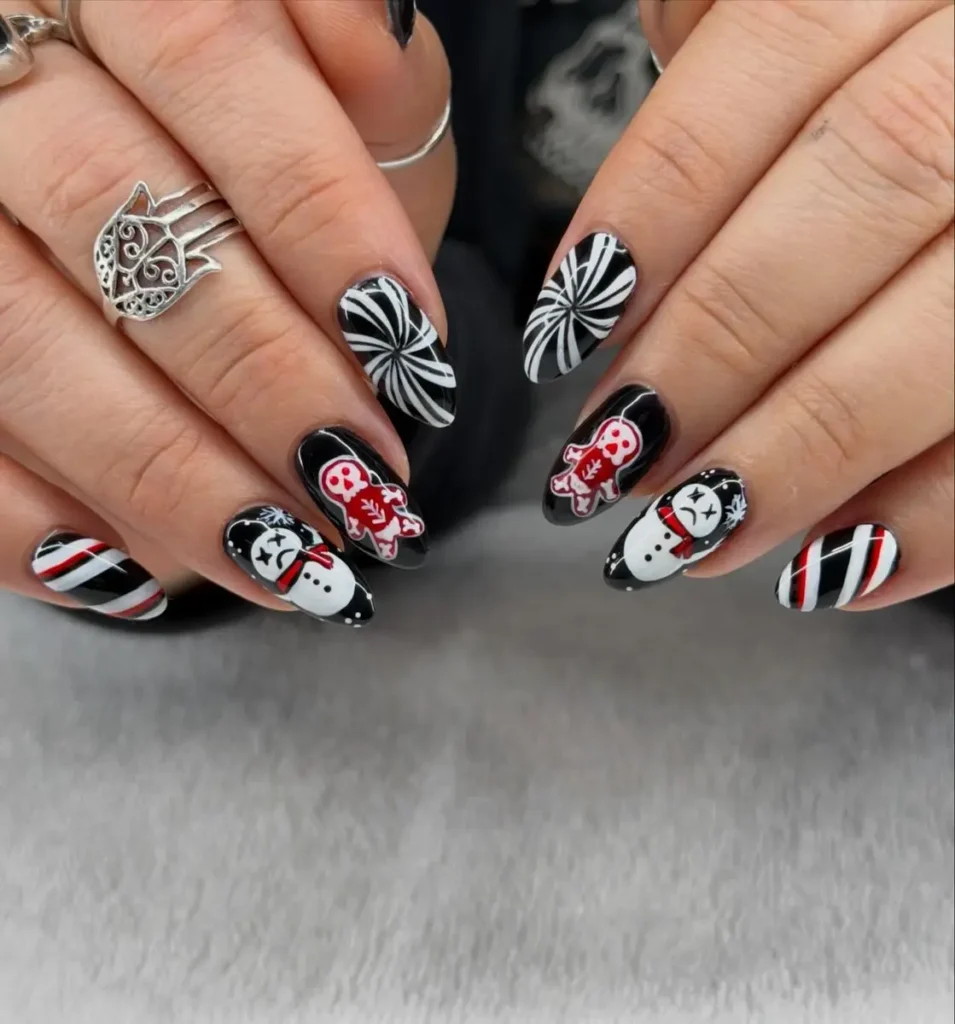
Swirl pinwheel bands using a stripe brush, moving from center outward. Sketch the skeleton after the pinwheels, and keep its bones slender and even. Add snowmen after the skeleton dries, because scarves need dry ground. Keep candy stripes even, leaving even gaps between them across each tip. Hold the art under a clear gloss coat, and seal the rim so chip damage starts later. Check stripes from a distance, so uneven bands show up early.
17. Candy Stripes with a Dark Santa Face
Diagonal stripes run across surfaces in black, white, plus red. Heavy glossy streaks of red trail down those stripes. White flakes on dark surfaces hold tiny stars between their arms. Dark face in a red hat shows glowing red eyes. Pale trim circles the hat, while the dark beard melts into shadow. Gloss runs over the group, and the stripes stay strong and bright.
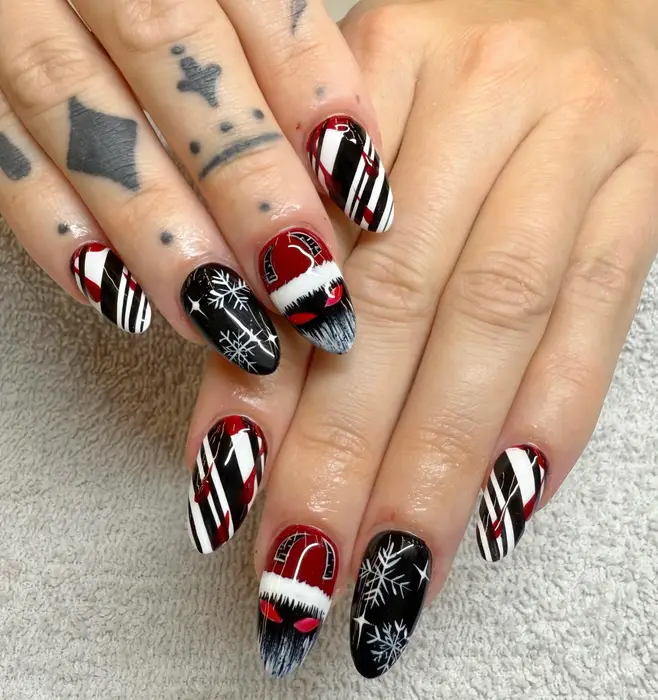
Paint striped tips to start, mixing three shades in tidy bands. Let red polish drip down the stripes using a dot tool. Draw flakes over dark tips using a slim brush. Sketch the face last, because red eyes need pale edging to read. Glaze the group under a clear gloss coat, and seal the rim so chip damage starts later. Keep drips thin, so they dry without pooling at the rim.
18. Gunmetal Cat-Eye Shimmer with Snowflakes
Dark silver glow sweeps soft gunmetal shimmer across surfaces. Bright stripe trails down each surface center, moving as hands turn. Large white flakes, sharply drawn, fill black accent surfaces. Tiny flakes settle on shimmer surfaces, so the group keeps its holiday link. Silver light pools near the ends, while dark ground stays deep and hazy tonight. Gunmetal glow feels cool and dark in low light.
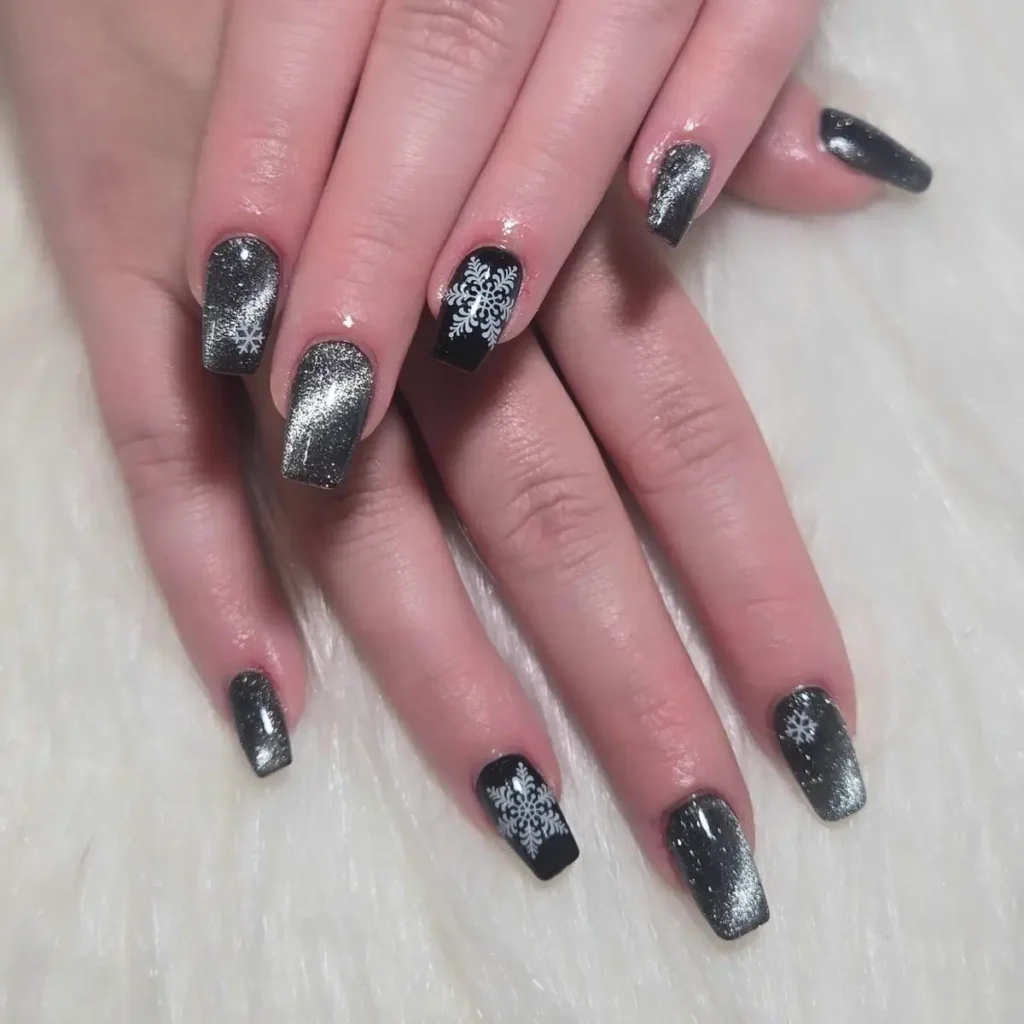
Wave a magnet above damp polish to draw a bright stripe. Tiny metal bits inside the polish answer the magnet, forming a light stripe. Handle each tip on its own, because the magnet shapes damp polish only. Hold the magnet steady in a single tilt for all tips, so stripes match. Add flakes using a dot tool, and keep each flake small and centered. Top it off with clear shine, then cap the rim to guard chips.
19. Cable Knit in Matte Black with Holly
Thick, touchable rows of raised cable knit cover black surfaces. Flat texture softens black tones and gives the group a fabric feel. Pressed into matte ground, a single surface shows a black flake. Holly leaves in green with a trio of red berries fill a clear surface. Yarn in green and red frames the hand, and the soft knit feels warm and handmade.
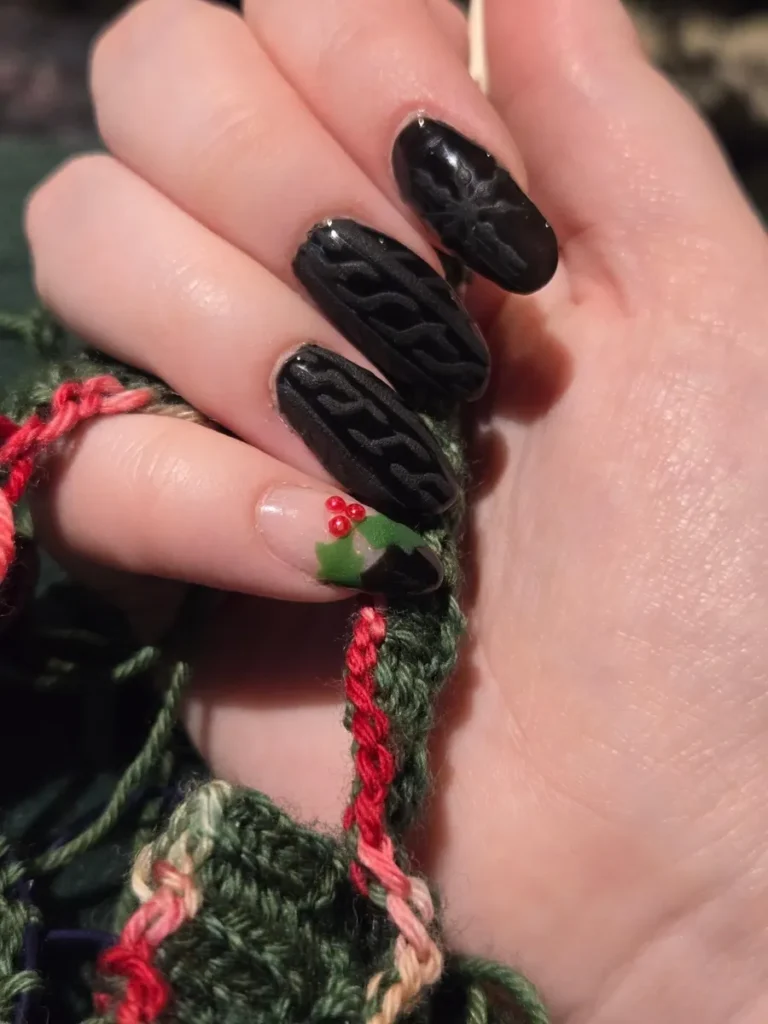
Build knit lines using a slim brush, then scatter matte powder over them. Keep black coats thin, since heavy layers bury the knit detail. Press berries in using a dot tool, leaving even gaps between them. Finish holly leaves after the berries, and keep their points sharp and neat. Seal solid tips only, because a top coat can gently flatten raised lines. Check the knit in daylight, so raised rows stay clear and even.
20. Short Matte Nails with a Ghostface Santa
Short matte surfaces mix black plus red plus white for a playful group. Red surface holds a white ghost face in a red hat. On a white surface stands a black tree, dotted with red plus white spots. Nordic stripes of black with white cross one surface in clean bands. One red surface carries a black starburst, while a holo-striped surface adds shine.
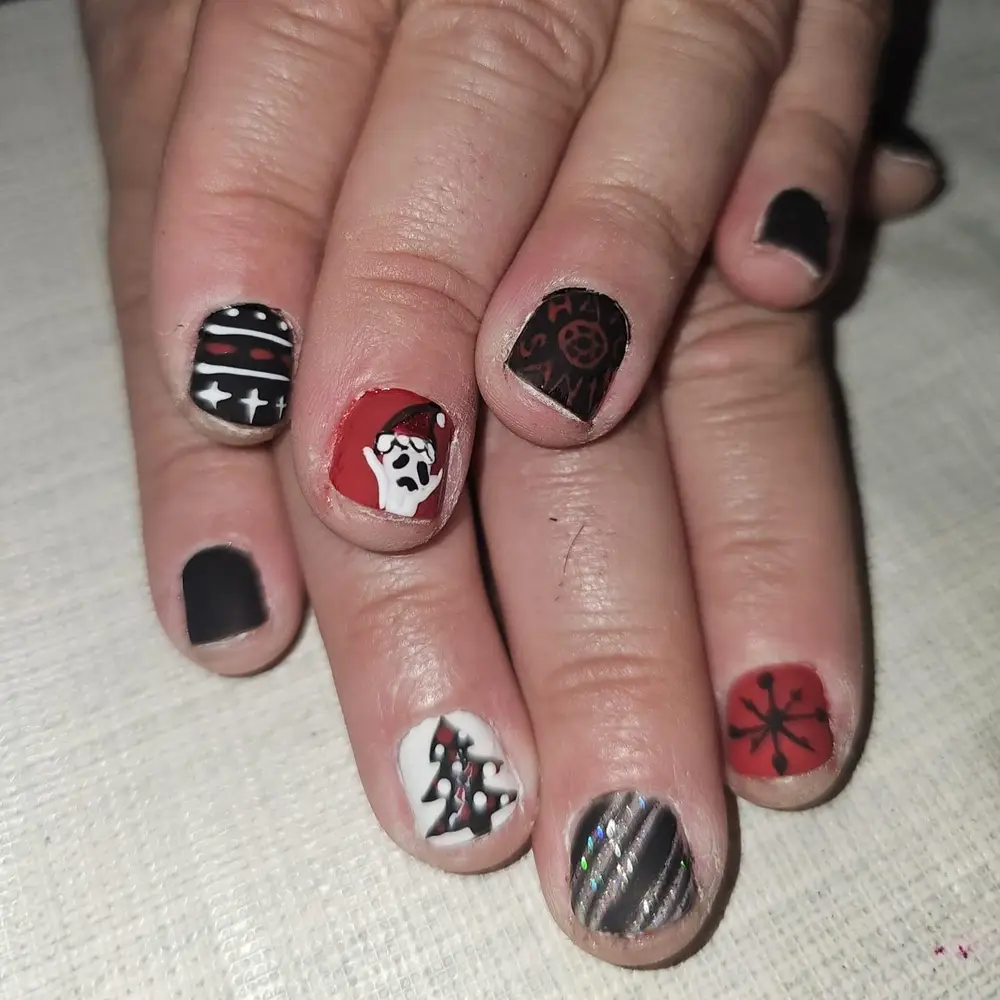
Start from a matte dark ground on most tips, then bring in red accents. Sketch the ghost face in white polish using a thin brush. Color the tree black over a pale tip, keeping it small. Save the starburst for the end, because wet paint would blur its edges. Seal flat tips only, because a top coat can mute the matte finish.
21. Eyeball Trees with Bone-White Gingerbread
Two surfaces glitter bright red with a dense, sparkling coat. Pink surfaces hold black trees with white eyeballs covering them, tiny gold stars above. Bone-white skeleton gingerbread men with dot eyes fill black surfaces. Across a pink surface bends a candy cane, black plus white. Small red dots scatter near the trees, so soft pink keeps a festive, dark mood.
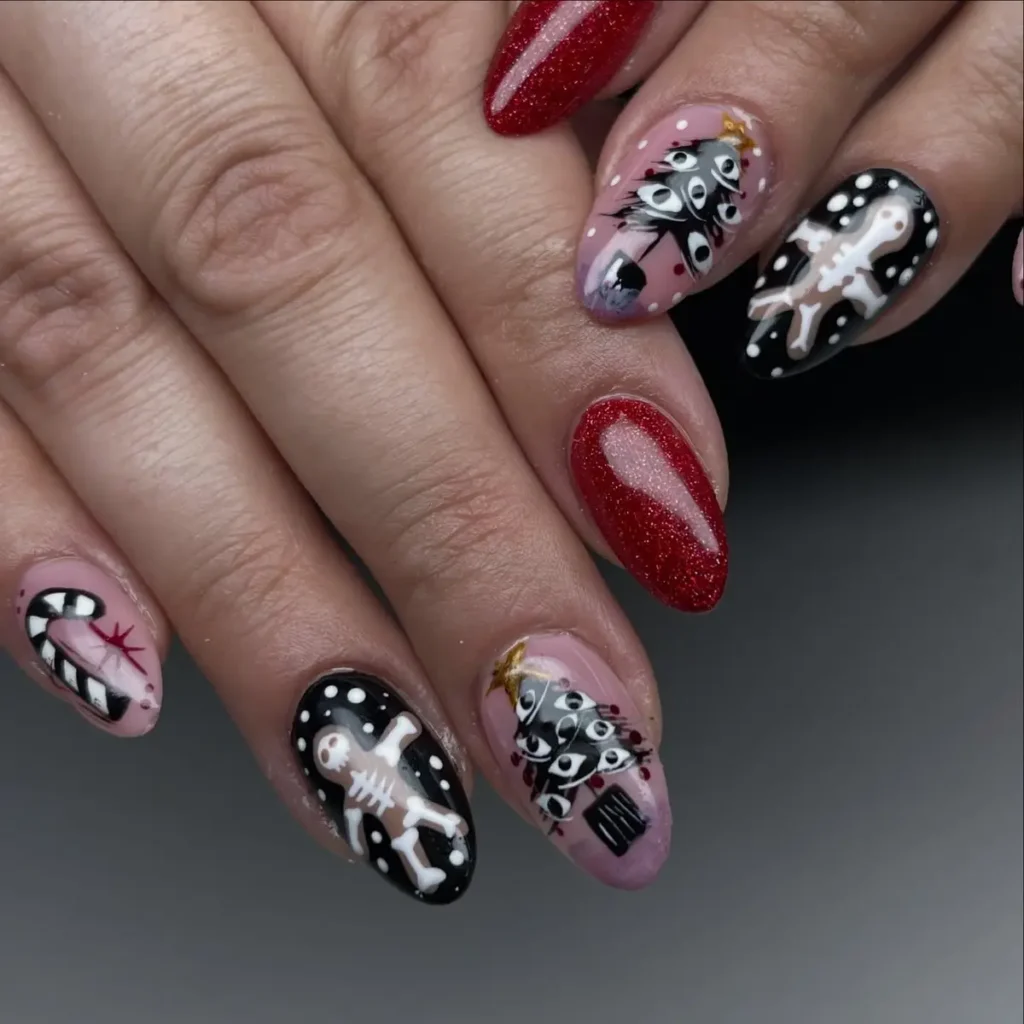
Dot eyeballs over the trees using a dot tool, and keep them uneven. Paint skeleton figures bone white, and set dot eyes on them after. Save the candy cane for the end, because wet paint would blur its edges. Pack red glitter into thin layers, and let each layer dry fully. Shield the group under a clear gloss coat, and seal the rim so chip damage starts later.
22. Blue Krampus on a Nude Winter Base
Pale nude gives a soft ground for painted figures. Across one surface leaps a blue Krampus, horns, red collar, and curling tail. Another surface shows a dark cloaked figure in a red hat. Small skull wearing a red hat rests on a third surface, red skulls nearby. Gem starbursts in red dot the group, so pale ground keeps a light, eerie feel.
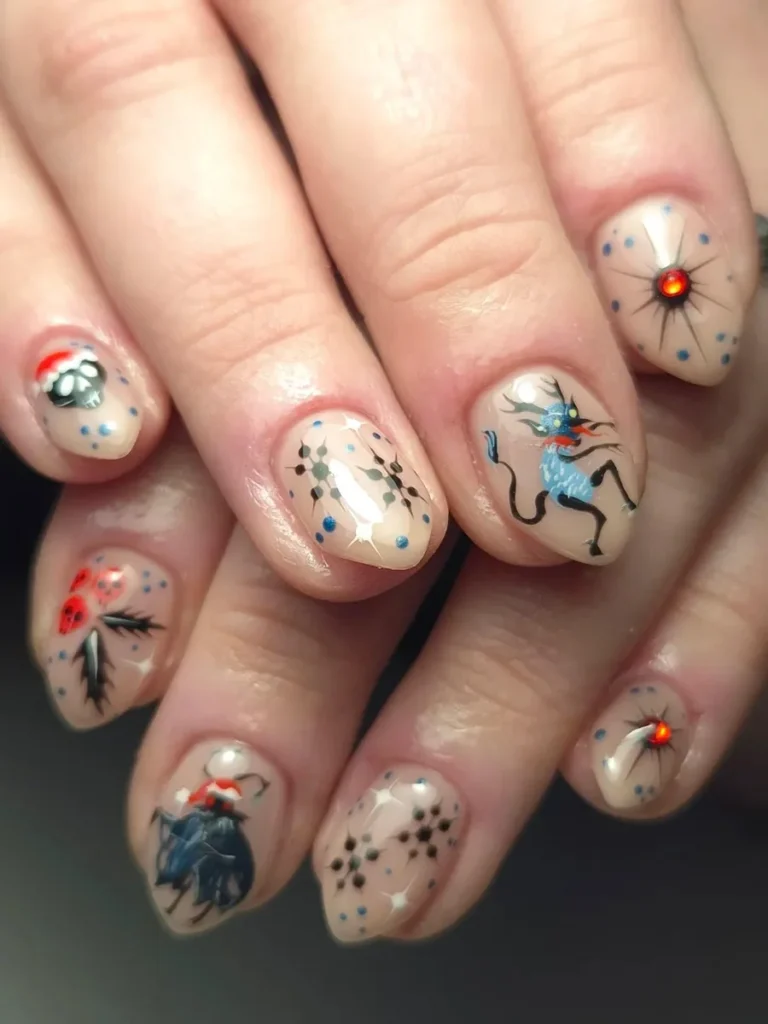
Outline the figures using a slim brush, and begin with the blue one. Save collars and hats in red for the end, because they rest over dark shapes. Leave the nude base light and sheer, so figures show clearly. Set red gems in place with tweezers into damp top coat. Coat the group under a clear gloss coat, and seal the rim so chip damage starts later.
23. Emerald Cat-Eye with a Deer Skull
Deep green glow sweeps emerald shimmer across surfaces. Bright stripe trails down each surface center as hands turn. Black surfaces hold a gold flake, fine leafy arms spreading. Deer skull fills one surface, red berries, plus white antlers. Starry black surfaces complete the group, gold dots tiny like night sky. Gloss lifts the green, and the gold flake stands out.
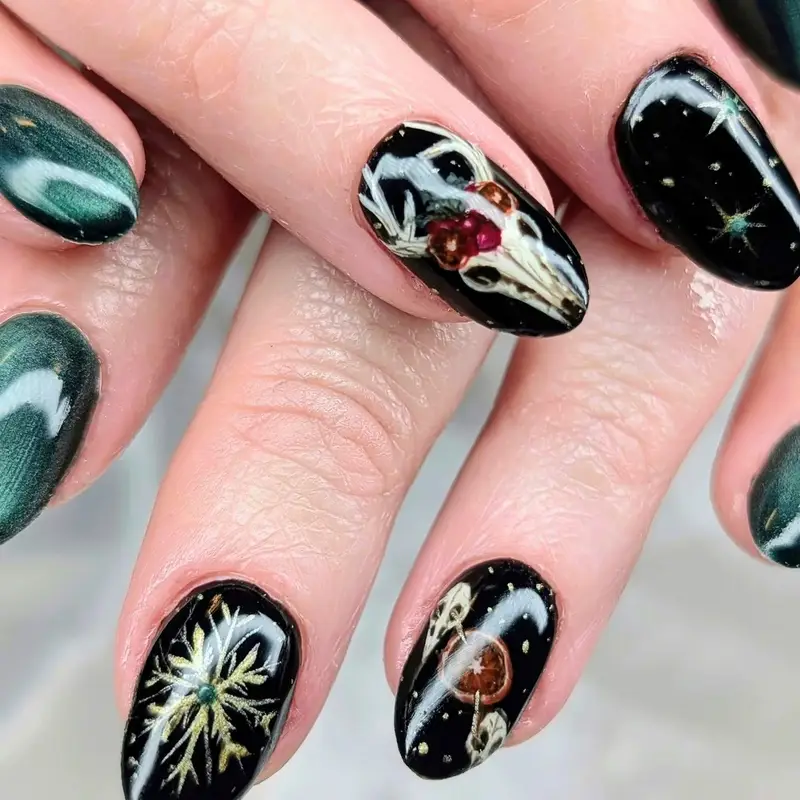
Sweep green magnetic polish over the tips, then bring a magnet near. Move tip by tip, because damp polish alone answers the magnet. Hold the magnet still briefly, and let the stripe set cleanly. Sketch the gold flake using a slim brush, beginning at the center. Seal every tip under a clear gloss coat, and seal the rim so chip damage starts later.
24. Matte and Gloss Black Snowflakes
Some surfaces wear flat matte black, soft, even, and light-absorbing. Glossy black flakes sit in the matte, strong and sharply drawn. White flakes bloom softly on glossy surfaces, fine arms ending in small dots. Matte beside gloss sits in pairs, and the two finishes answer each other. Flakes carry the whole group, with only black and white in view.
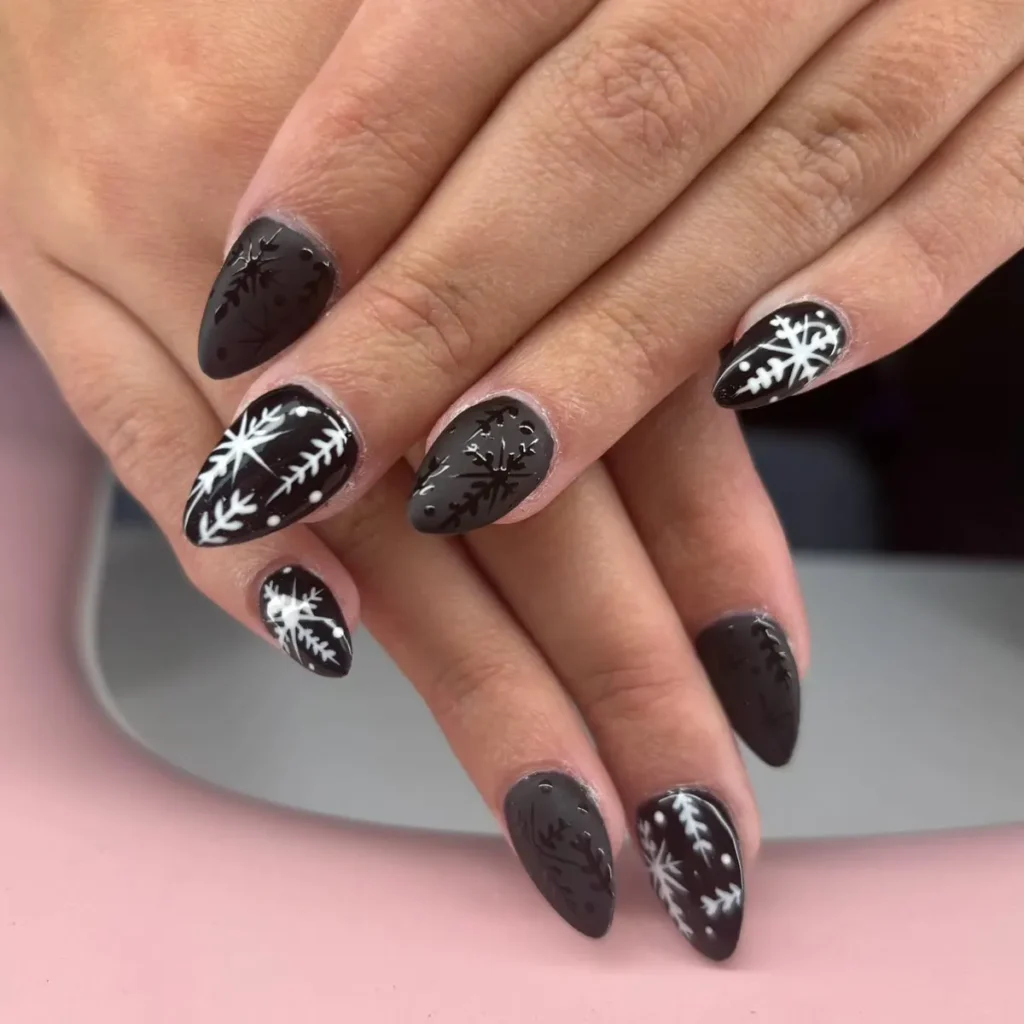
Divide the group between flat coats and shiny coats, and keep the split even. Paint pale flakes using a slim brush, opening each from its middle. Press dark flakes into soft matte before it firms up. Hold finishes apart, so contrast stays crisp. Seal shiny tips only, because top coats can mute the matte. Step back often, so the split between finishes stays clear.
25. Glitter Snowflakes on Glossy Black
Sharp surfaces shine, glossy black and mirror finish. White glitter flakes dust the black, arms sparkling, centers dotted. Stripes of glitter slant over two surfaces in strong, diagonal bands. Solid black surfaces balance glittered ones, while white sparkle pops. Rings in silver sit near the hands, while glitter catches light. Gloss moves along each surface, and black glows bright under lamps.
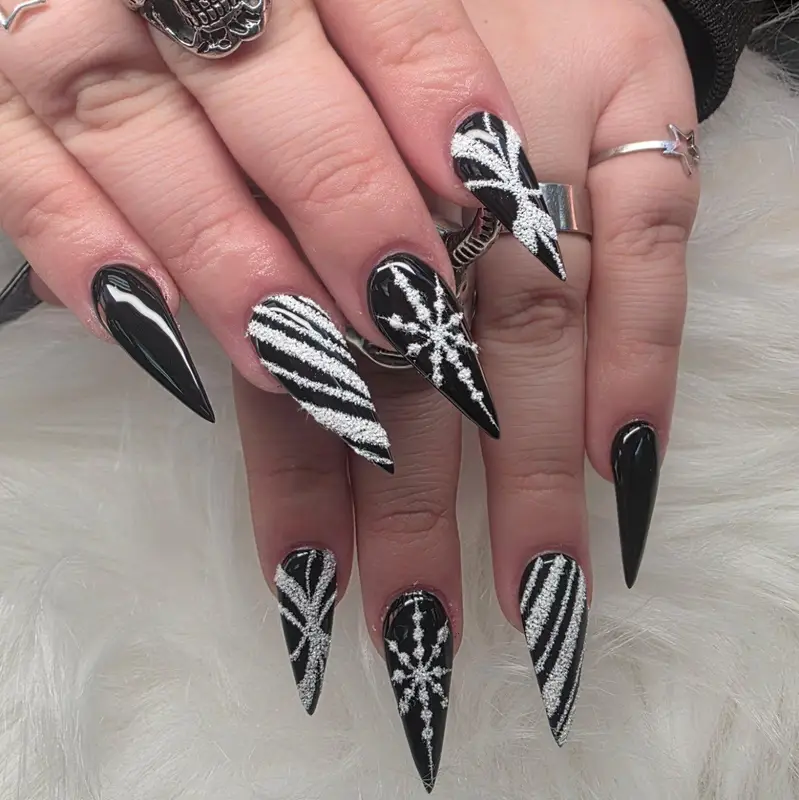
Dust glitter over dark ground while the coat stays tacky, then smooth it flat. Draw flakes using a slim brush, starting each at its middle. Paint slanted bands after the flakes, and keep each band even and clean. Add extra glitter near the tips, because stripes need more density there. Finish under a clear gloss top coat, and seal the rim so chip damage starts later.
Conclusion
Evenings at home are the best time to slow down and paint with care. Start with one hand, build the base in thin layers, and add the finest details last. A shiny seal over flat areas keeps contrast sharp, and a capped edge helps colour last through daily wear. Gothic Christmas nails look their best when the design is tidy, the finish is smooth, and the mood is yours. Gather a fine brush and a dotting tool, choose your favourite set, and enjoy the result.
