

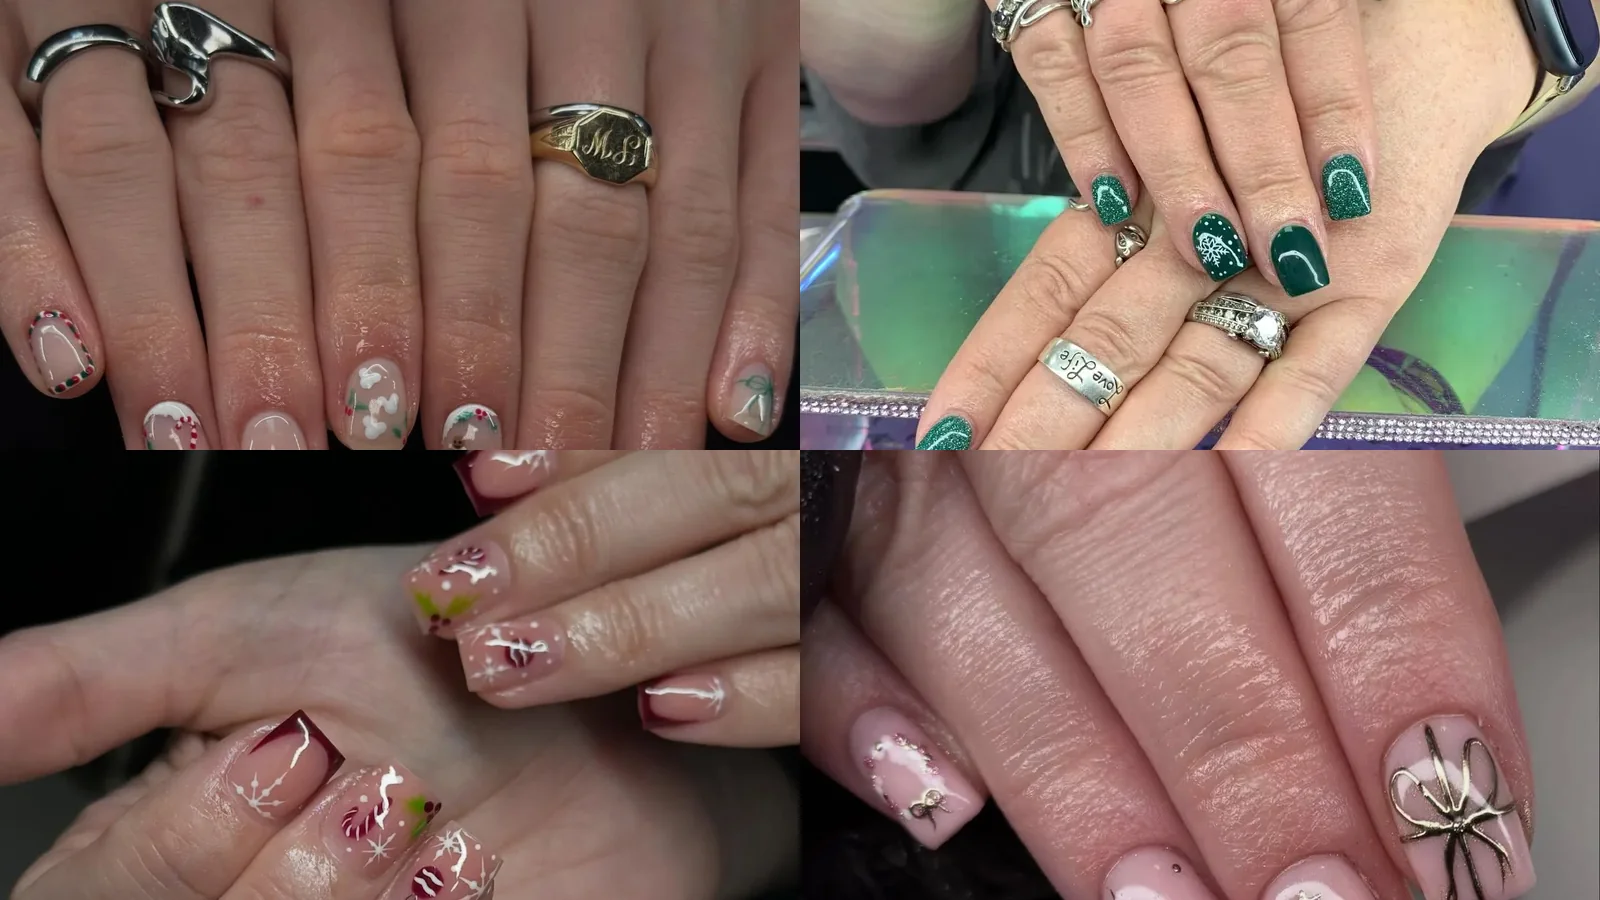
Short nails don’t need much to feel festive. A glossy red, a touch of glitter, or one plaid accent is usually enough, and the shorter length keeps lines cleaner than you’d expect. Short Christmas nails can stay quiet in sheer pink for the office or go bold in emerald sparkle for a party, so the right pick depends on where your December is headed. Plaid, candy stripes, snowflakes, and chrome all work on a small nail when the design stays simple. Choose by occasion, start with one look you can paint in a single evening, and finish with a good top coat so it lasts through the holidays.
1. Candy-Cane Borders with Gingerbread and Holly
Diagonal bands in red plus white frame a pair of nails on pale ground. Sheer nude shade covers every nail first, so art sits on a clean, light surface. Gingerbread figure stands on one nail, with dark buttons plus a curved smile. Green holly leaves plus red berries sit near a tiny green tree. White snowflakes rest near tips, and their pale arms lift the sheer ground.
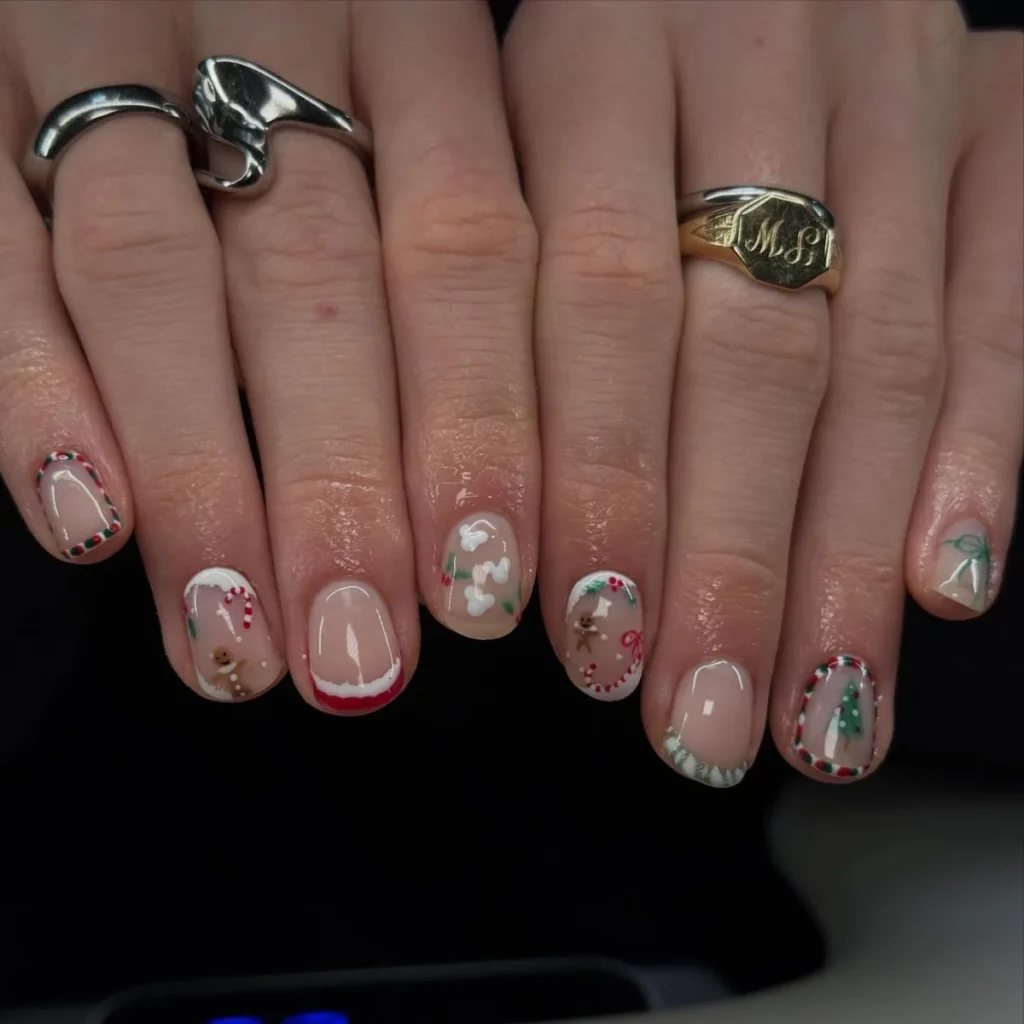
Begin with sheer shade in light layers, and give each layer time to dry first. Use a slim brush for diagonal bands, and keep each band even edge to edge. Sketch the small figure using dark dots as buttons, then add a curved smile below. Paint leaf sprigs in dark pine shades, plus small fruit for clear contrast. Close with a sealing coat, because flakes plus paint tend to lift at rims.
2. Pale Pink Nude with One Snowflake
Soft pink shade washes every nail with a pale, even coat of colour. Gloss gives pale shade a damp shine from base to end. One large white snowflake sits on the ring finger, with fine arms reaching wide. Small dots ring the flake, like frost scattered on glass. Pink plus white share the whole design, so one flake draws the eye first.
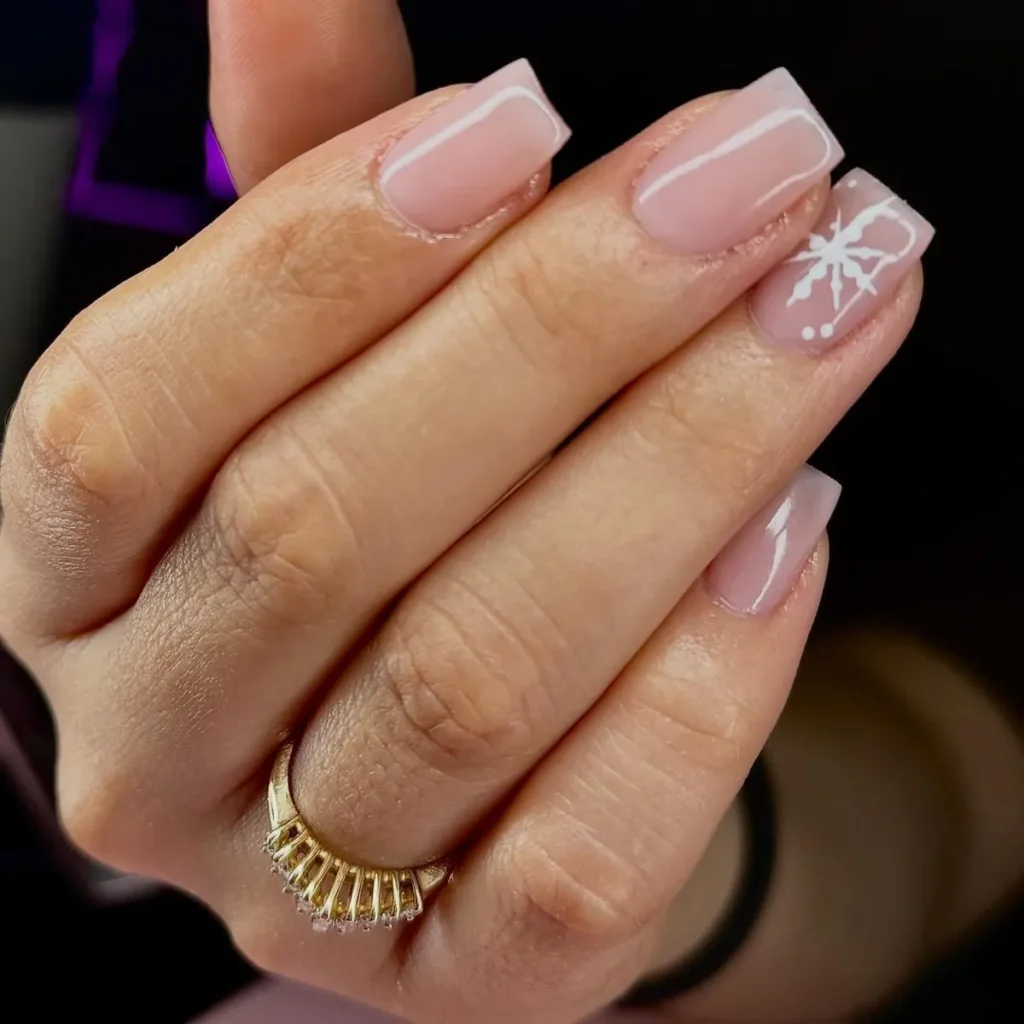
Coat pale shade in light layers, and give each layer time to dry first. Paint the flake using a slim brush, moving outward from the middle in even strokes. Add dots with a dot tool, keeping each dot small plus well spaced. Close with a sealing coat, because gloss tends to dull without a sealing layer. Mend chips at the tip edge promptly, because light shades wear fast.
3. White Winter Knit with Rhinestone Arc
Calm nude ground sits under white winter marks, and pale tones keep each mark clear. White diagonal stripes cross a pair of nails with crisp, even bands. Flakes rest on pale nails, plus small dots set between arms. Cable-knit pattern covers one accent nail, with raised twists in a woollen style. Tiny rhinestones arc near the cuticle, so light plays across the design all day.
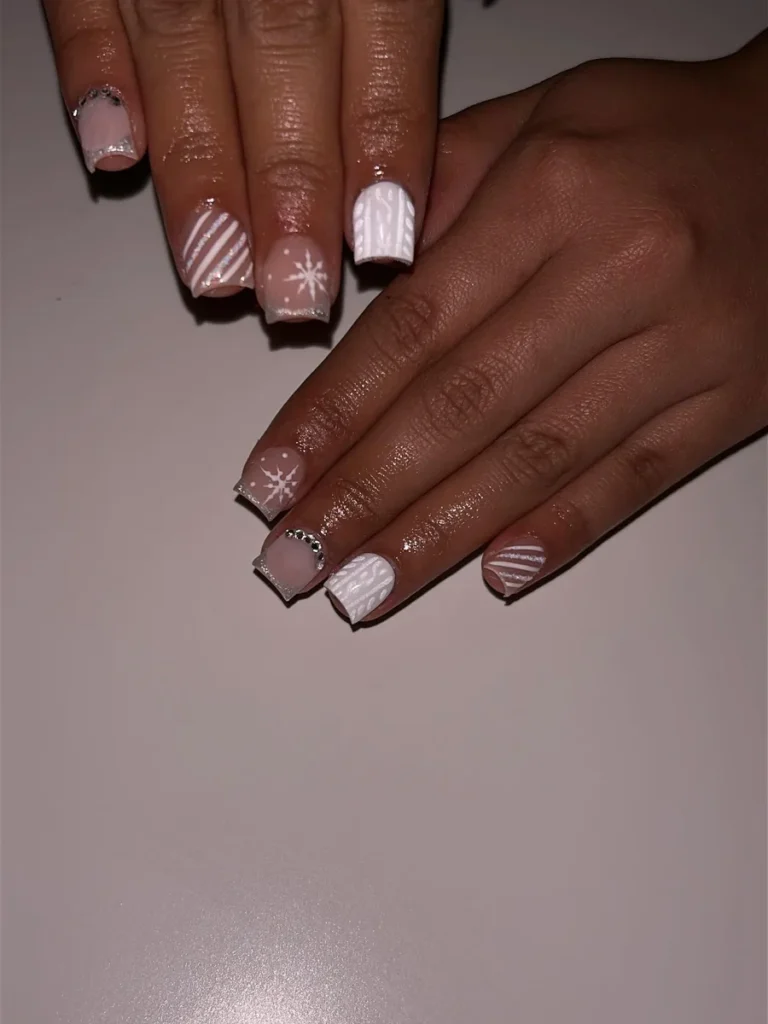
Cover nude shade in light layers, and give each layer time to dry first. Use a line brush for stripes, keeping bands straight and level across the nail. Draw flakes with white shade, beginning at the middle of each nail. Layer quick strokes for knit texture, until twists feel raised. Place stones by the skin edge using tweezers, and press each stone into wet sealing coat. Stones lift without a wet base, because the coat holds them down.
4. Red Glitter with Snowflake French Tips
Crimson glitter covers a pair of nails with a thick, bright sparkling coat. Red glitter tips shape a curved smile curve on pale nude nails. White snowflake sits on one bright glitter nail, clear against red ground. Shine locks the sparkle, and the design reads rich under indoor light. Gloved fingers hold the design up, keeping attention on nails alone.
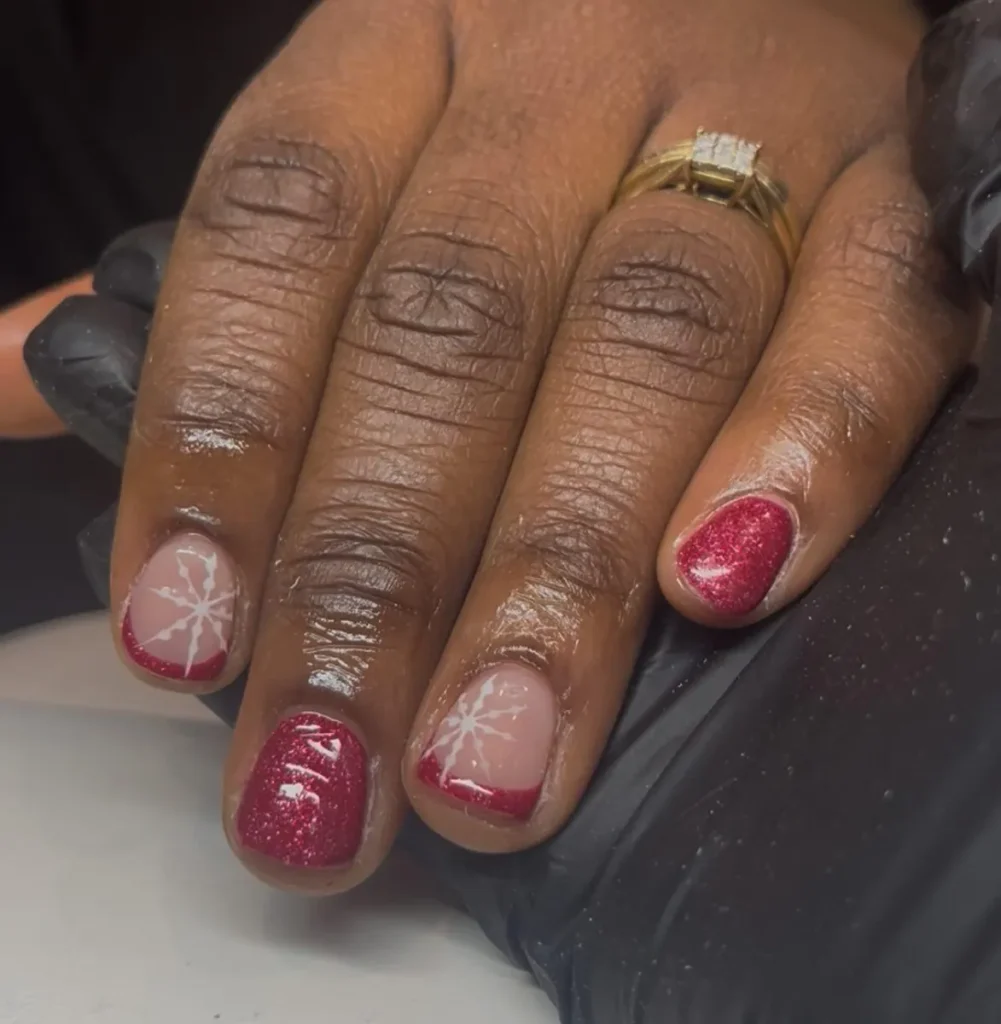
Work glitter shade in light layers, and give each layer time to dry first. Shape tips using tape for a straight edge, painting red ends in level layers. Paint the flake in white shade, keeping each arm even and centred. Press grains flat using a covered fingertip, so loose sparkle stays down. Finish with a top coat in a pair of layers, and seal the tip edge.
5. Emerald Glitter with White Snowflakes
Rich emerald glitter covers every nail with a dark green sparkle. Snowflakes in bright white spread over green, with varied sizes plus varied angles. Tiny dots fill gaps between flakes, like stars scattered on velvet. Dark base stays bright under shine, so each flake shows up clearly. Flakes stay crisp against green, with bare patches nowhere on the whole design.
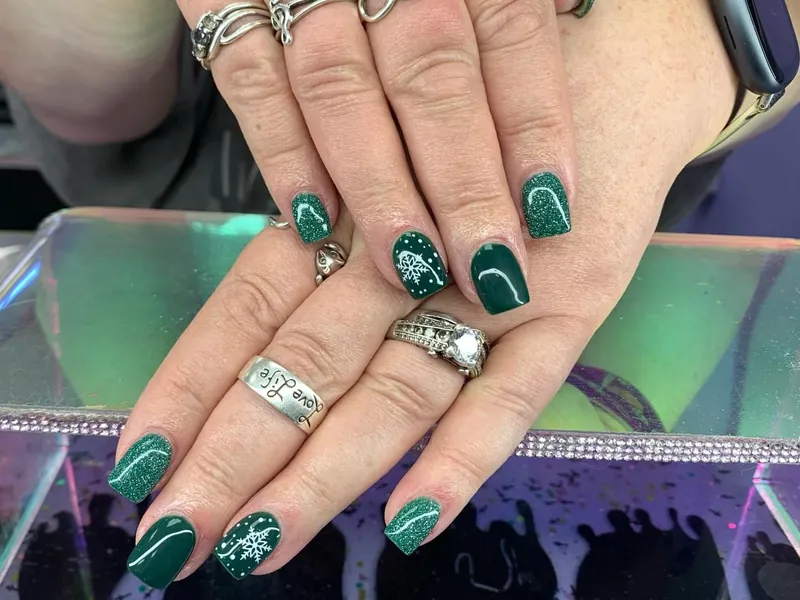
Spread emerald shade in light layers, and give each layer time to dry first. Pack glitter onto nails with a wide brush while the layer stays tacky. Draw flakes with white shade, keeping each arm even and centred. Add dots with a dot tool, and keep gaps wide between each dot. Close with a sealing coat, because glitter rims tend to catch and lift.
6. Red Glitter Ombre with Raised Snowflakes
Red sparkle at the rim meets pale pink in the middle, and the fade softens. Raised white flakes stand proud on red, with a rough, bumpy feel under touch. Outer rims hold most sparkle, while the pink middle glows in contrast. Each nail holds one strong flake, clear on the sparkling red ground. Pale pink lightens the middle, while red keeps the outer rim rich.
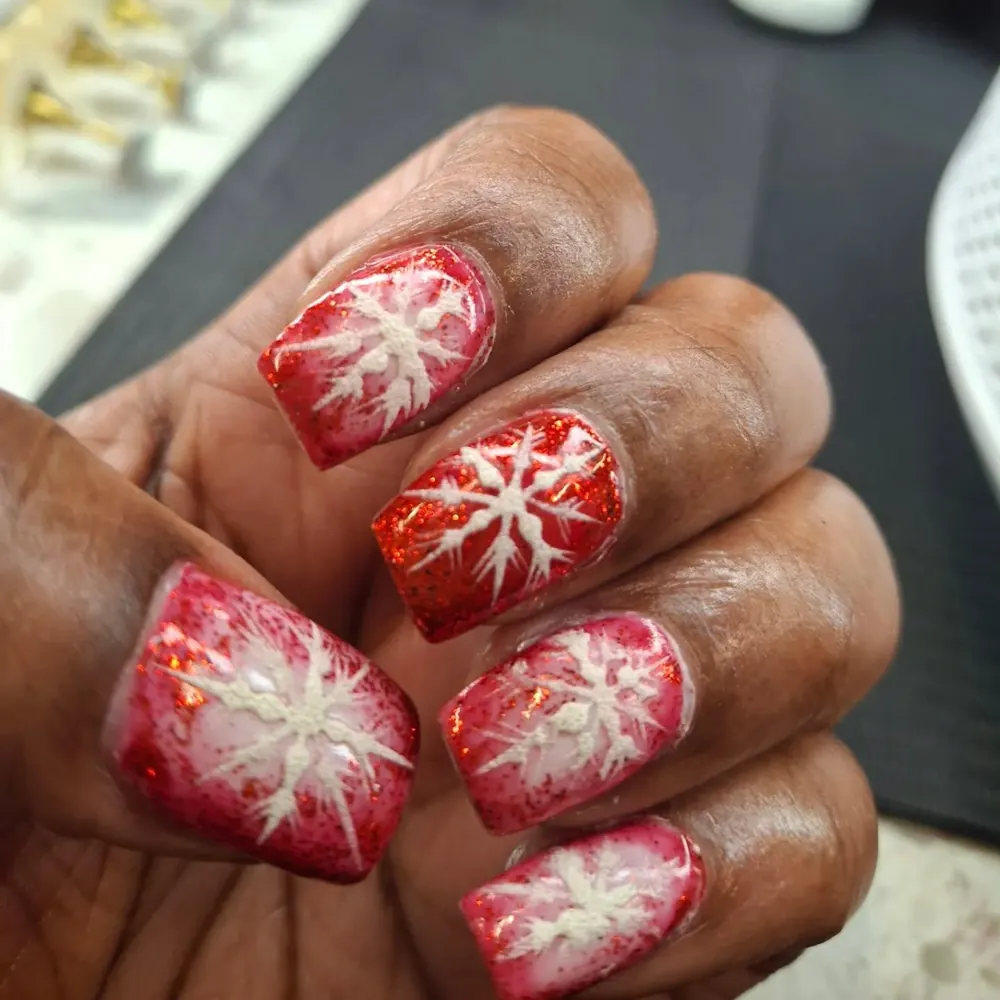
Start with the red shade in light layers, and give each layer time to dry. Use a sponge to press pink toward the middle, and fade the edge gently toward red. Layer thick white polish in dots until each flake stands proud of the surface. Press each flake down at its base, so raised art stays flat on fabric. Finish with a top coat in a pair of layers, and seal the tip edge for wear.
7. Milky Pink with Bright Red Tips
Light from shine gives this whole design a wet, shiny look all over. Milky pink shade covers every nail with a soft, pale wash. Bright red ends sit on every nail with a smooth, curved edge. On a pair of accent nails, white flakes sit crisp against pink. Pink plus bright red share the design, so tips catch the eye first.
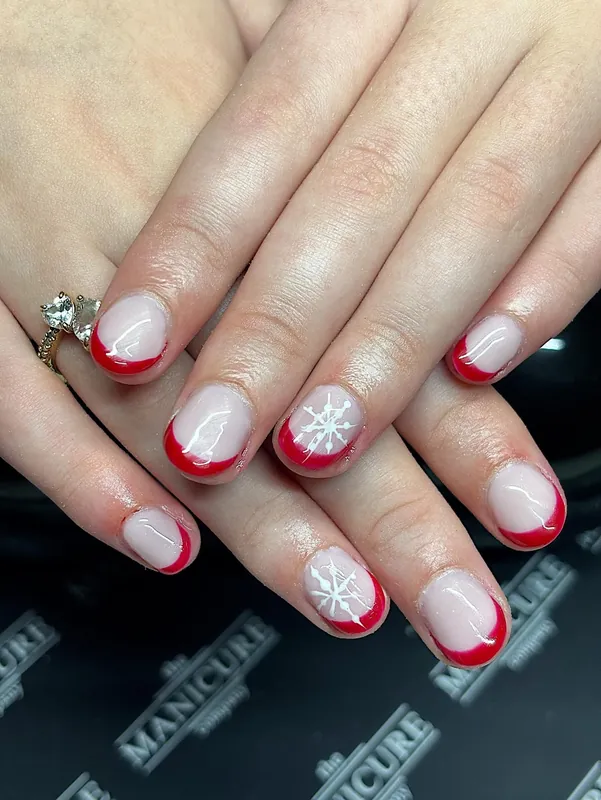
Use a line brush to shape each red end, and follow the natural curve. Paint pale shade first with light layers, then give each layer time to dry. Add flakes with white shade, keeping each arm even and centred. Wipe stray marks away with remover on a small brush before sealing. Finish with a glossy sealing coat, so shine makes contrast sharper here.
8. Festive Mix of Red Green White
Solids in red stand next to deep green nails, and the pair makes a rich mix. Flakes in white scatter over green, clear on the dark shade. White nail shows a candy cane, plus a tiny tree and small stars. Red, green, plus white share the design, and no colour takes over here. Shine locks the art in, and each nail gains a bright, smooth finish.
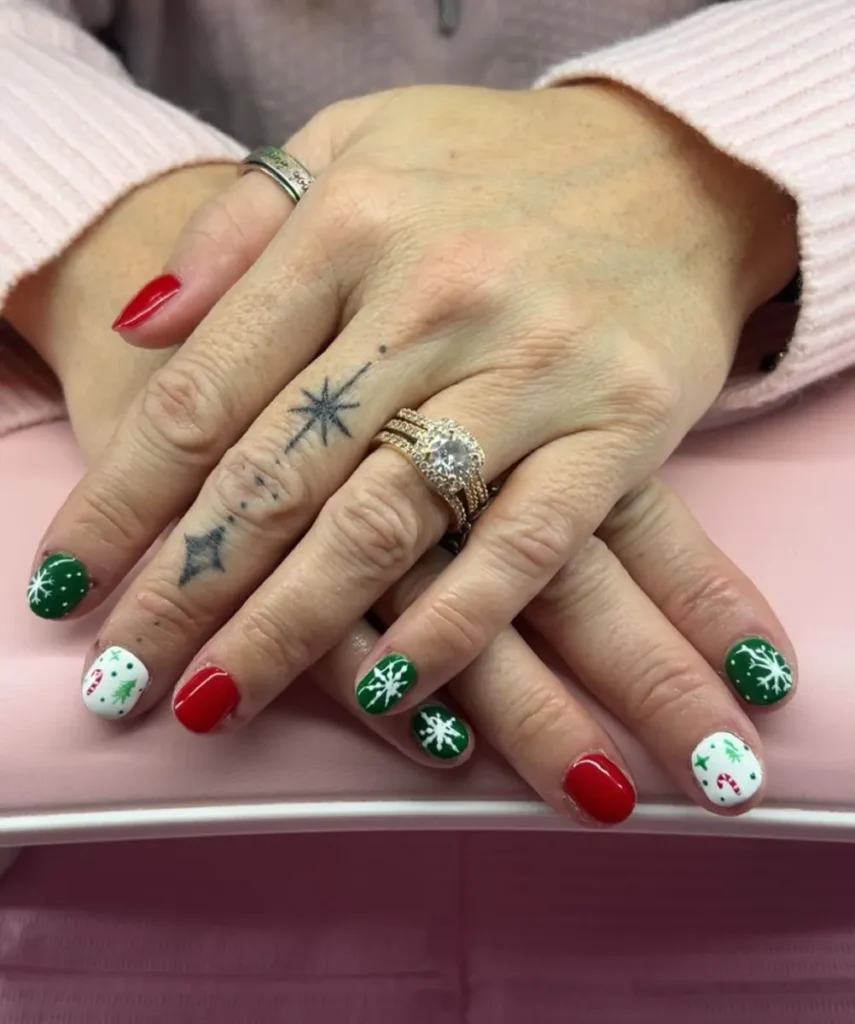
Swap one solid colour for a pale base, because the tree reads clearer on pale. Paint a single colour first, then give each coat time to dry before moving on. Cover solids first in light layers, keeping edges tidy plus clean. Draw flakes plus the tree using a slim brush, spacing art evenly across nails. Add cane stripes with red plus white, plus tiny stars, then finish with a top coat.
9. Sheer Nude Pink with Zigzag Trees
Pale nude-pink wash gives nails a soft glow with sheer colour. Flakes in white appear on several nails, clear on a sheer base. Zigzag trees climb nails with thin white lines plus tiny dots. Single star sits near a tip, and the design feels airy and light. Dots plus lines share space here, and pale art stays calm and clear.
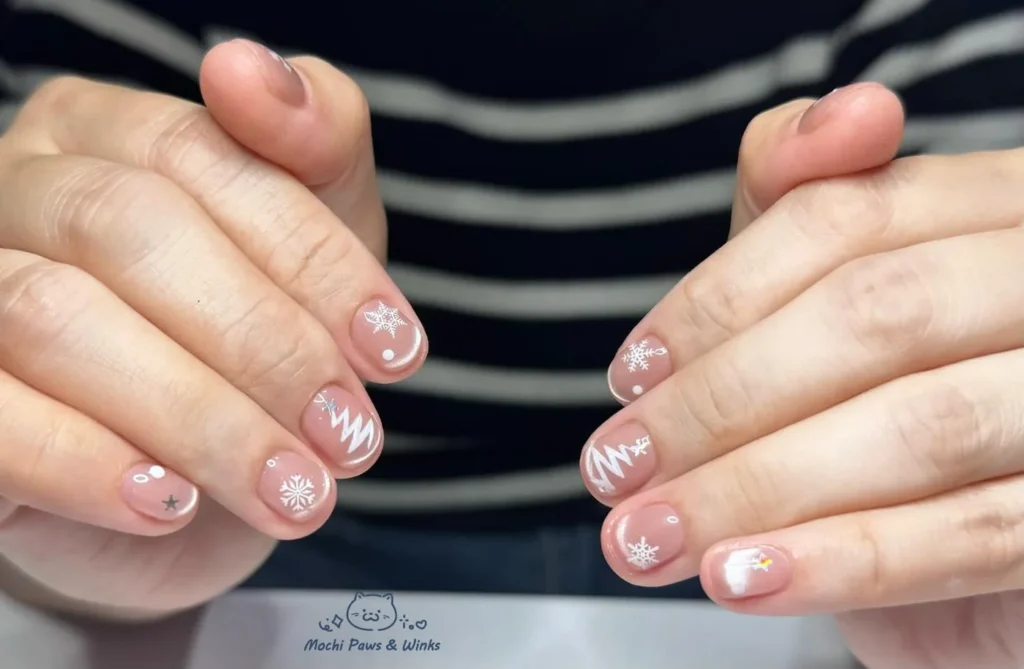
Choose a glossy sealing coat for this sheer base, because sheer shade shows every ridge. Sprinkle glitter onto the sheer base in light layers, then give each layer time to dry. Draw flakes with a line brush, beginning at the middle of each nail. Leave zigzag lines loose and freehand, for a soft ripple effect. Put extra glitter at tips, because the fade needs density in that spot.
10. Deep Red with Candy-Cane Stripes
Deep red shade covers most nails under a glossy coat, while red glitter fills a pair of accents. Candy-cane stripes turn in a diagonal line over pale nails with red plus white. Flakes in white sit on red, clear on the dark shade. Shine moves over each nail, and the design reads rich plus bright. Dense sparkle on accents lifts deep red without crowding it.
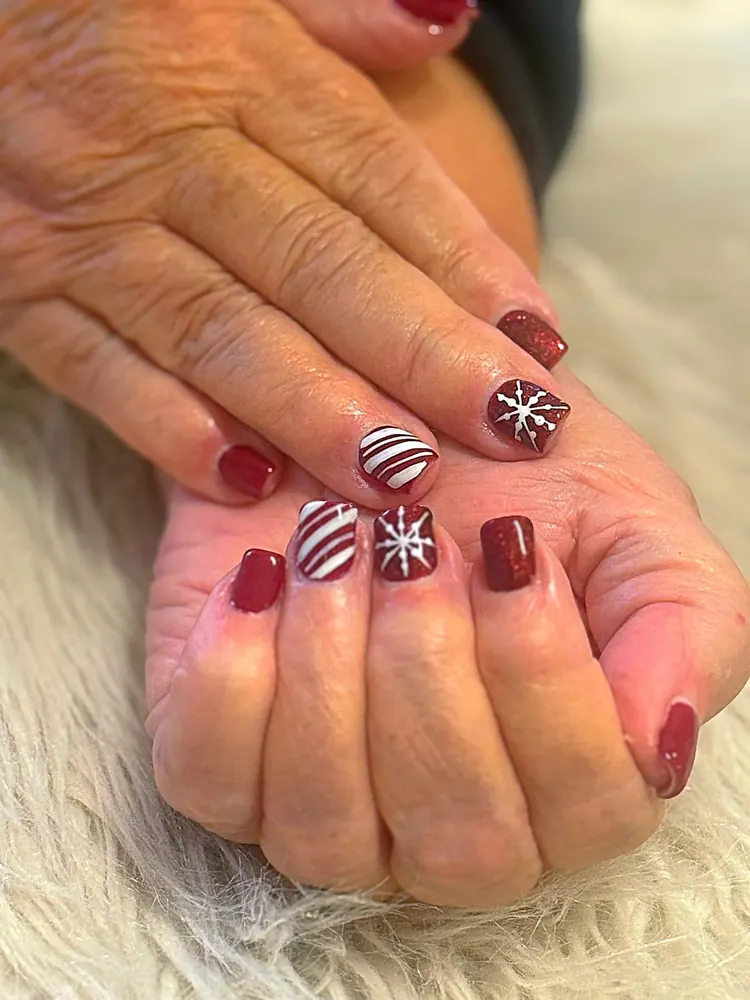
Try pale flakes on red nails first, and keep striped nails pale for contrast. Begin with the deep shade in light layers, then give each layer time to dry. Paint stripes with a line brush, alternating red plus white bands. Pack glitter onto accent nails using a wide brush while the layer stays tacky. Draw flakes with pale shade, keeping arms level and centred, then finish with a top coat. Flakes lift without cover, because the coat holds them down.
11. Near-Black Burgundy with Green Tree
Burgundy in a wine-dark tone coats every nail under a rich, glossy shade. White nail shows a green tree, plus tiny gold dots beside it. Gold snowflake with fine, sharp lines sits on another dark nail. White plus gold cut the dark tone, and the tree draws the eye first. Shine gives burgundy a wet look, and edges stay tidy and smooth.
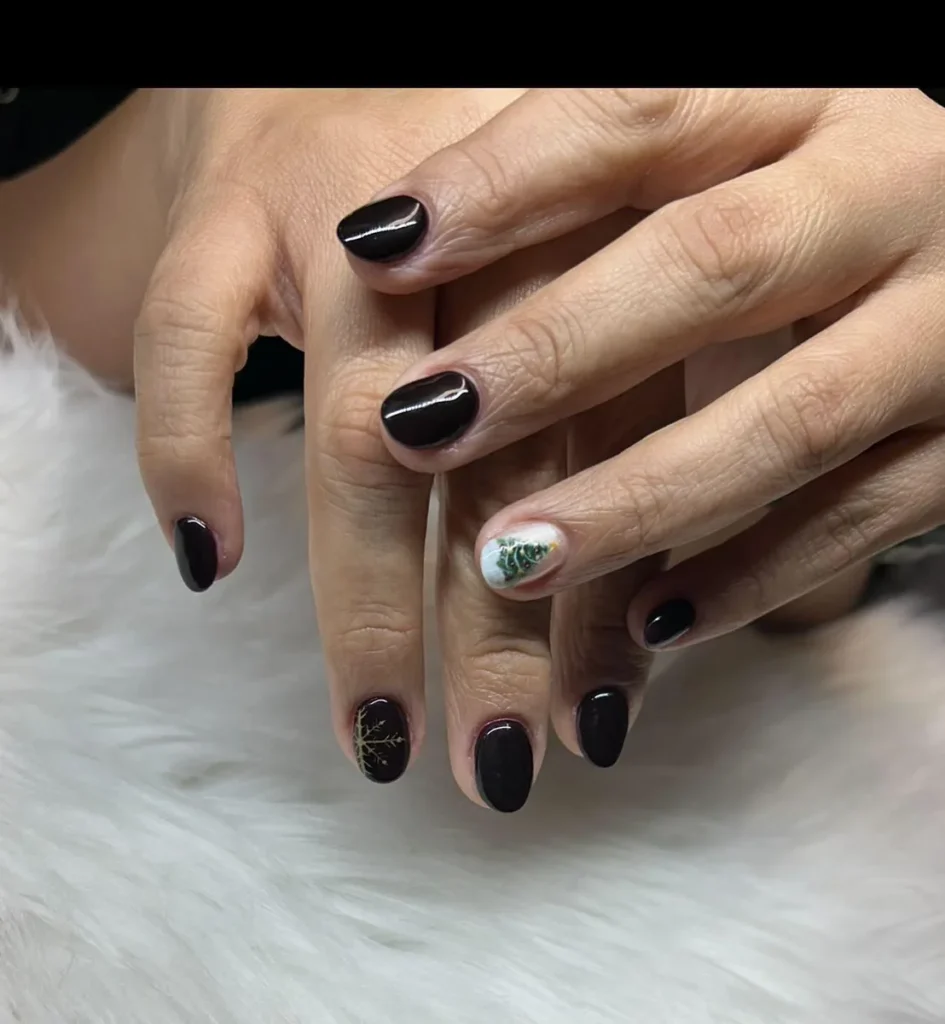
Avoid painting the tree too wide, because a wide tree tends to crowd the white nail. Spread wine shade in even layers, then give each layer time to dry. Draw the tree using a slim brush, beginning at the trunk, then adding branches. Add gold dots using a dot tool, and set them level across the green. Paint the flake with gold shade, keeping each arm thin and centred, then finish with a top coat.
12. Candy Mix in Red Silver White
On one white nail, a red snowflake shows fine, crisp arms. Red solids stand next to nails with silver glitter, for a bright candy look. Candy-cane stripes with red plus white run diagonally over a pale accent nail. Silver sparkle catches light, and red looks warmer and brighter. Every nail shows a different pattern, and the whole design stays lively and varied.
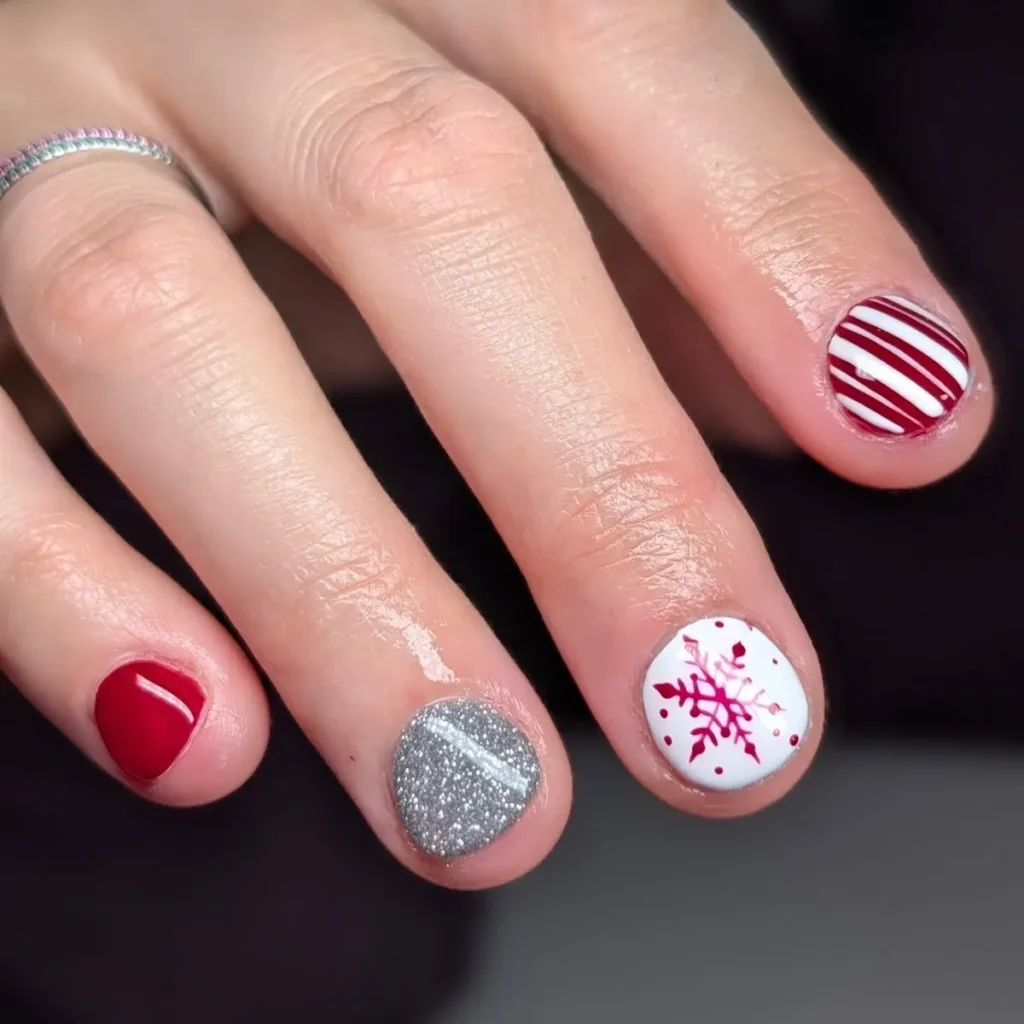
Check the tip edge each day, and mend small chips at once. Paint a single shade first, then give each coat time to dry before moving on. Cover red solids first in light layers, keeping edges tidy plus clean. Pack glitter onto silver nails using a wide brush while the layer stays tacky. Paint the flake in red, keeping arms even, then add stripes with a line brush. Stripes lift without cover, because the coat holds them down.
13. Burgundy French Tips with Holly
Tips in wine-dark shade sit on nude nails, curved and deep at the edge. Flakes in white plus starbursts appear over a pale nude ground. Candy cane in red plus white sits on one nail, plus green holly leaves beside it. Ornament in gold hangs by the cuticle, plus a red bow, white dots beside it. Nude plus burgundy share the design, and tips catch the eye first.
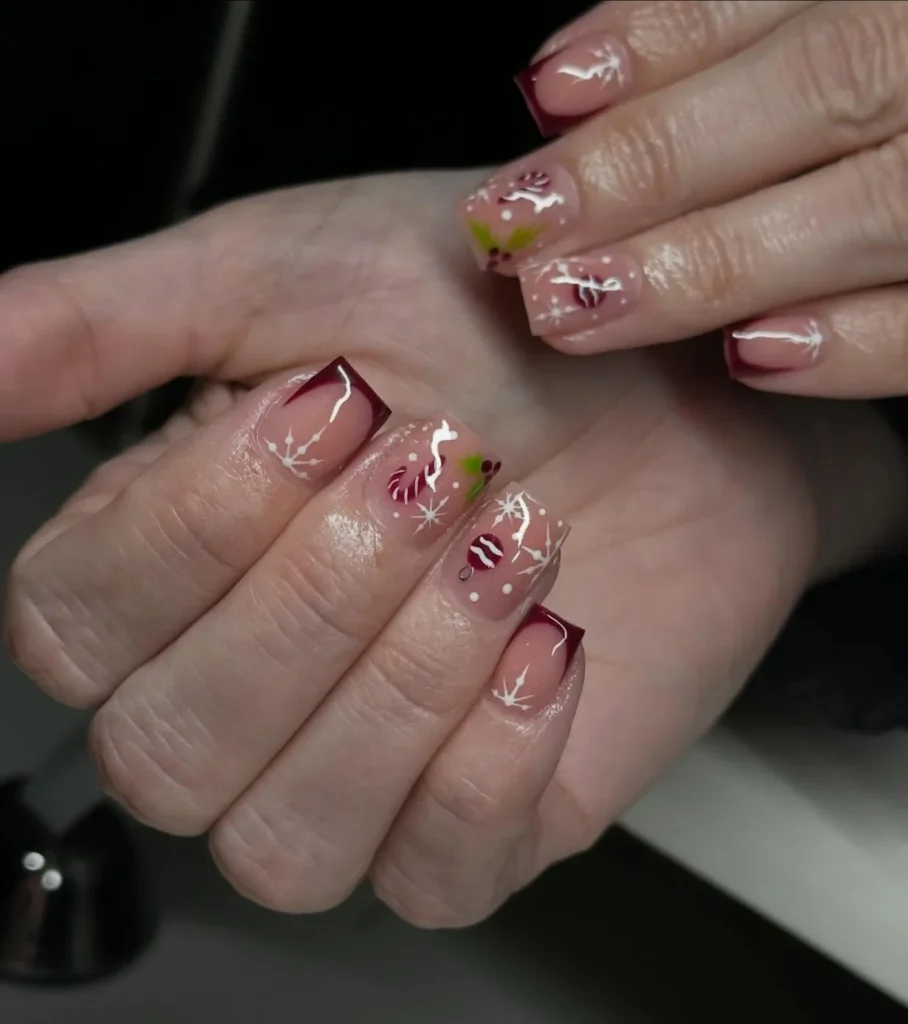
Begin with nude shade in light layers, then give each layer time to dry. Form wine-dark ends using a line brush, along each nail’s own curve. Paint flakes plus the cane using a slim brush, with art spaced evenly across nails. Add green holly leaves near the cane, and tiny red berries in colour. Place the ornament using tweezers, and press it down into a wet sealing coat. Ornaments lift without a wet base, because the coat holds them down.
14. Gingerbread Men with Plaid and Peppermint
Men wearing Santa hats, small and smiling, appear on glitter nails, rosy cheeks below hats. Plaid in red plus green runs over silver glitter, checked in a grid. Candy cane curls over a glitter nail in dark green, pale stripes along it. Snowflakes in red glitter shine near a peppermint swirl with red plus white. Every nail tells its own festive story, and the design feels rich in play.
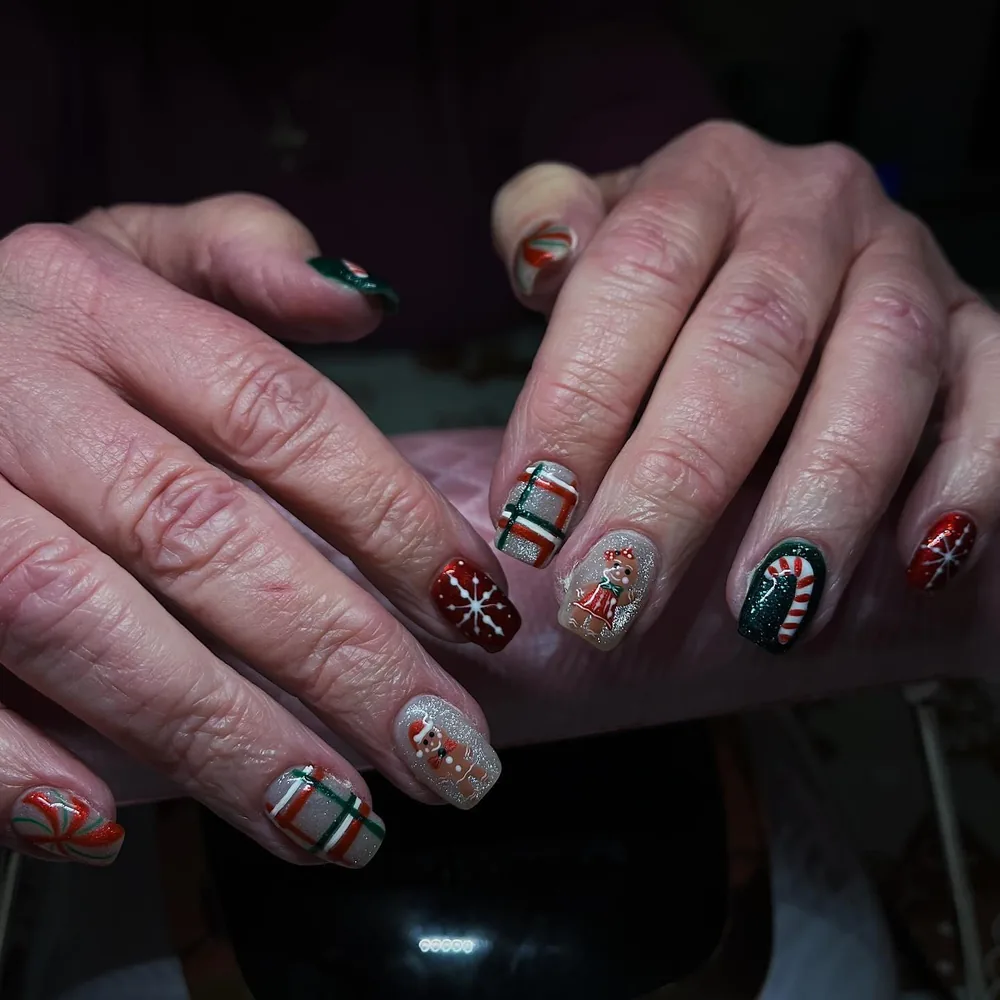
Draw plaid lines with a slim brush, crossing green across white with level gaps. Sketch little men first with pencil lines, then fill each shape with colour. Paint the cane with red plus white, curving it gently down one nail. Add hats plus cheeks using small dots, and keep faces sweet and small. Finish with a top coat, so tiny details stay safe under cover.
15. Green Plaid with Candy-Cane Stripes
Grid in checked plaid sits on half the nails, crisp and green in lines. Lines in red plus white run over green, even, tidy, and well spaced. Stripes like candy canes turn down red nails with strong diagonal bands. White stripes slice through red, and the pattern shows up clearly. Green plus red share the whole design, and extra decoration stays away.
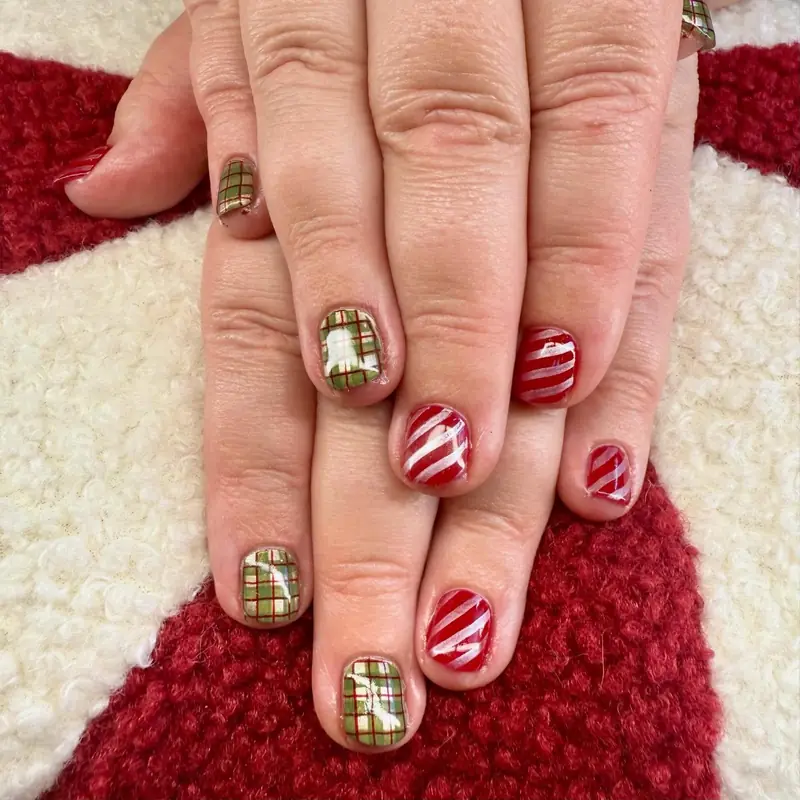
Trade a wide band for a narrow one on one nail, and the grid gains a lighter rhythm. Draw the plaid grid first using thin lines, then colour green around those lines. Lay white lines across green ones, keeping gaps level across the nail. Paint stripes with a line brush, switching shades in level bands. Wipe edges clean, so lines stay sharp, then close that plaid nail last.
16. Sage Plaid with Sequin Stripes
Sage plaid in muted tones sits on pale nails, small red bows on each crossing. Stripes like candy canes in red plus green turn down nails with diagonal bands. Sequin stripes in silver sit beside the plaid, and catch light from each side. Shimmer in champagne fills a pair of accent nails, soft with a golden glow. Plaid, stripes, plus shimmer share the design, and the look stays calm and wintry.
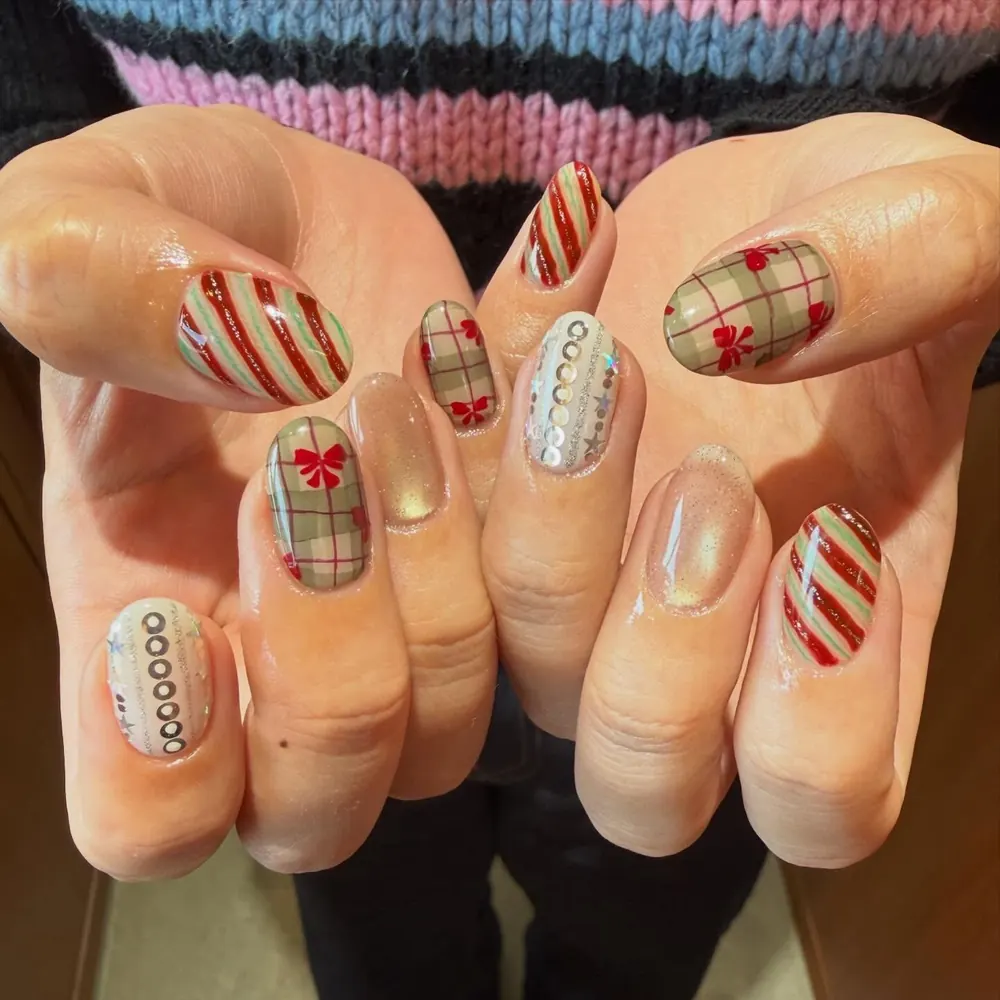
Choose a sealing coat after sequins, because tape edges tend to lift without cover. Tape off grid lines first, and colour each cell using metallic polish. Alternate plaid bands, keeping wider bands near the outer rims. Paint bows using a thin brush, then set each bow at a crossing. Add sequin stripes last, and press them down into a wet sealing coat.
17. Pale Pink with Gold Bows
Every nail starts with blush pink, thin and sheer under gold art. Outline in gold shows a bow on one nail, with thin metallic lines. Tree made of dots rises on another nail, in pink, white, plus gold. Starbursts in gold spread over pale pink, and catch light from every side. Bows in gold sit small near cuticles, and the design feels airy and light.
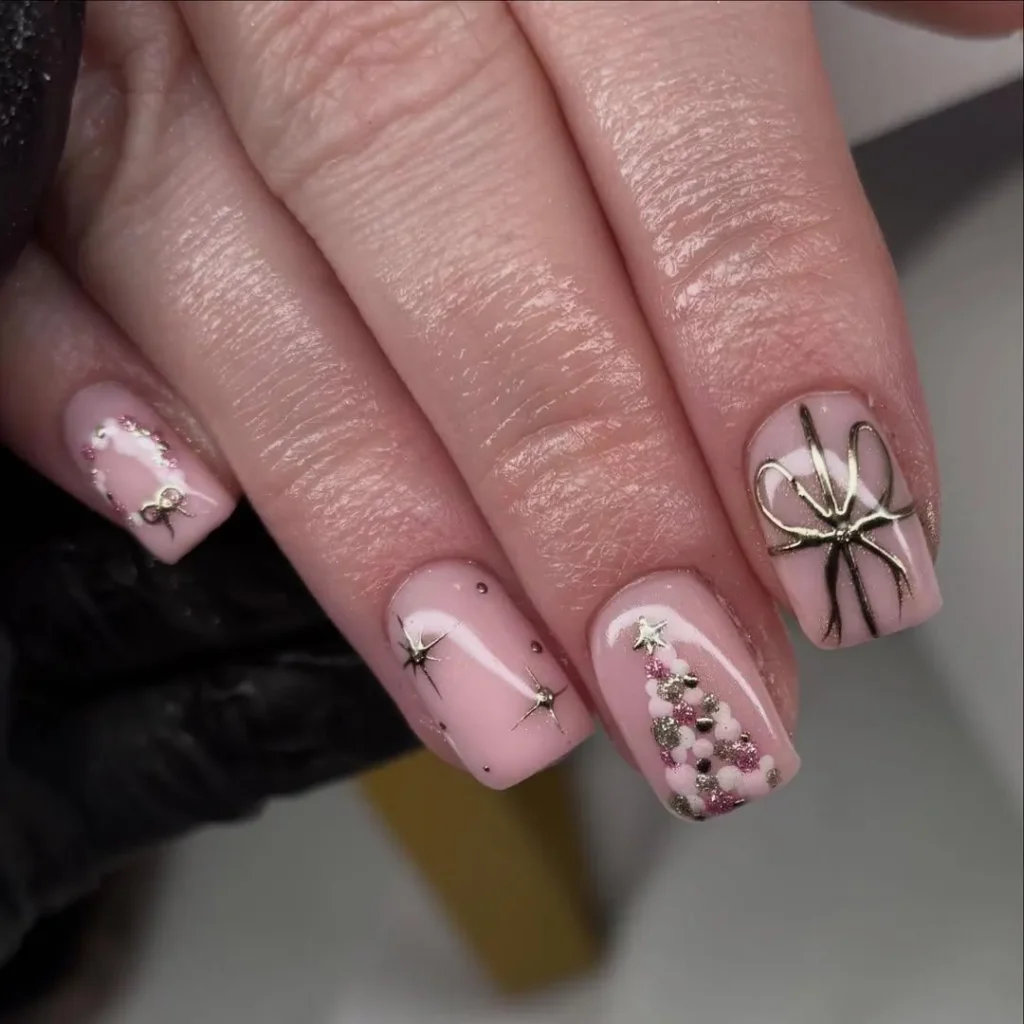
Try the dotted tree on one nail only, and keep other nails plain for balance. Paint blush shade first in light layers, then give each layer time to dry. Form the bow outline using a slim brush, keeping loops level and neat. Build the tree with dots in rows, layering blush, ivory, plus gilded specks. Add starbursts using a dot tool, and keep gaps wide between each one, because crowded art blurs.
18. Bows with Pink Plaid Trees
Bows in white sit on crimson nails, each holding a pink dot in its centre. Plaid in pink runs over white nails, with red plus black lines. Trees in pink, tiny and pale, stand near dark dots among them. Canes in candy style turn down pink nails, and the design feels sweet and warm. Red, pink, plus white share the design, and the look stays bright and lively.
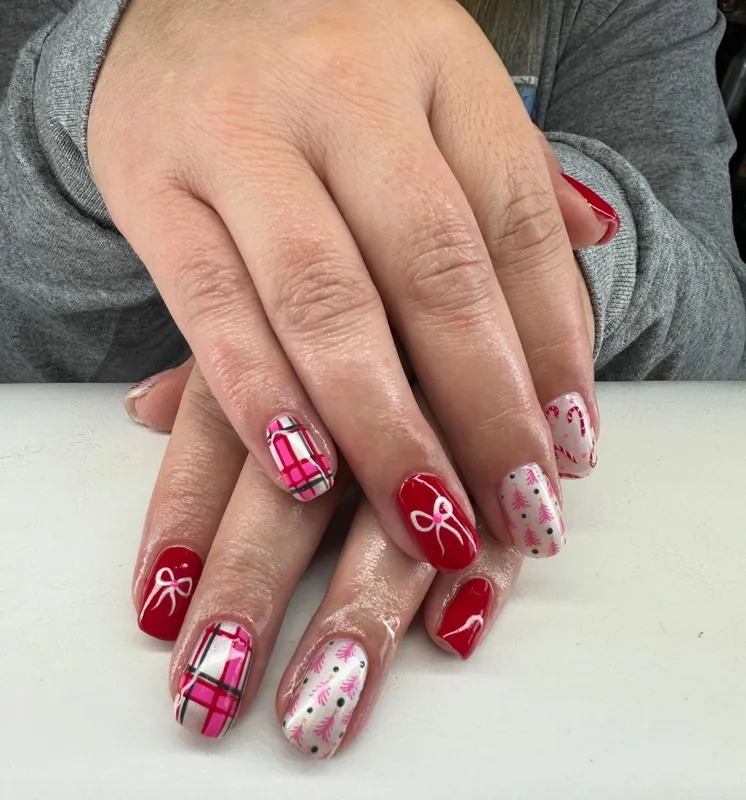
Cover crimson first in light layers, then give each layer time to dry. Draw plaid using thin lines, and cross crimson over ivory with level gaps. Paint bows with a slim brush, adding one blush dot on each centre. Add trees using small strokes, and set dark specks between branches, then close with a sealing coat. Avoid crowding the plaid with extra art, because crowded lines tend to blur at rims.
19. Green Chrome Stripe Edged in Gold
Stripes in chrome run over nude nails, bright green with a mirror shine. Green moves from sage toward bright lime as light shifts across the design. Lines in thin gold edge each stripe, holding green with warm metal. Nude shade shows between stripes, and the design stays calm and tidy. Light slides over chrome all day, changing green from soft toward vivid.
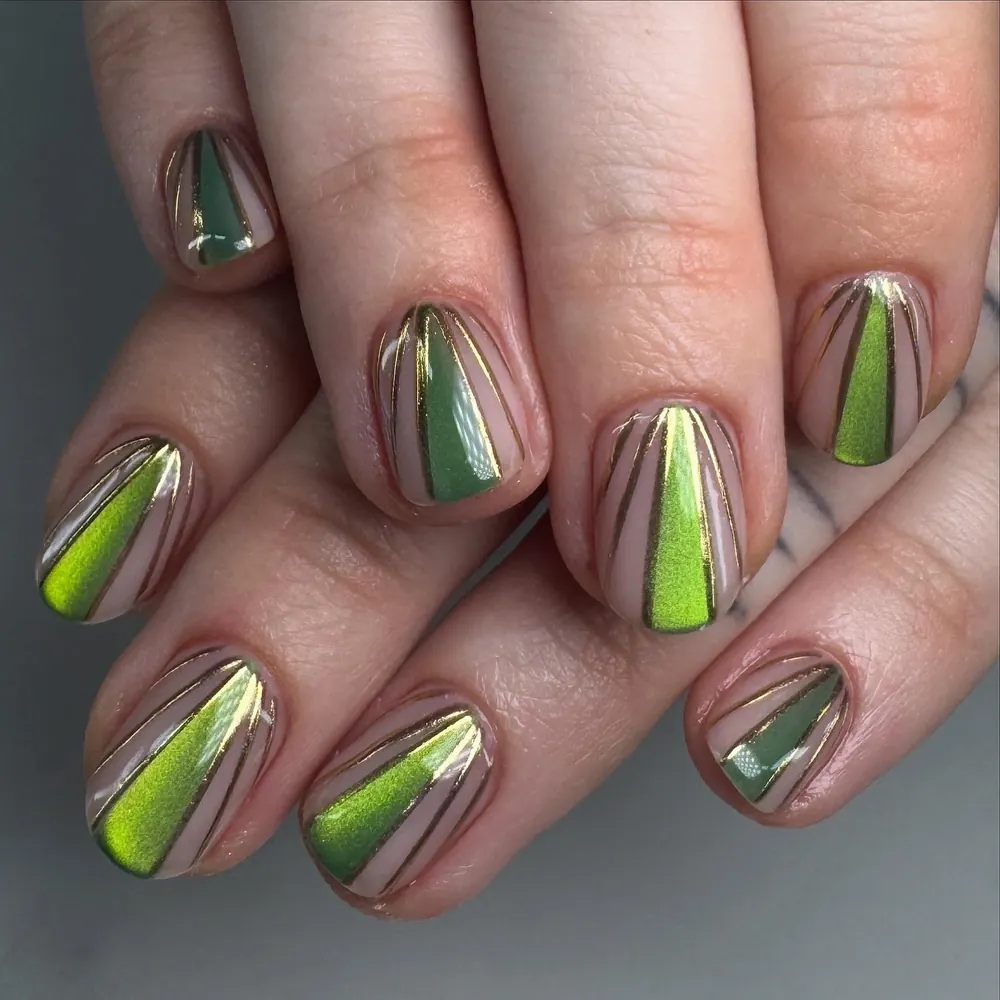
Keep base pale and dry before powder, because a deep base tends to turn shine grey. Press mirror powder onto the dry base using a soft pad, and seal it fast. Buff powder in a single direction only, for an even finish without streaks. Paint gold edges using a slim brush, keeping lines thin plus straight. Close with a glossy layer, and avoid matte, which dulls mirror powder.
20. Gold Chrome with Green Glitter Pieces
Chrome in metallic gold covers several nails, warm and bright with a mirror shine. Pieces in green glitter scatter over sheer nails, moving from lime toward deep emerald. Glow in rainbow tones shifts with light across the accents all day. Sheer shade shows between gold, and the design stays airy and light. Gold plus green share the design, and warmth, shine, plus contrast follow.
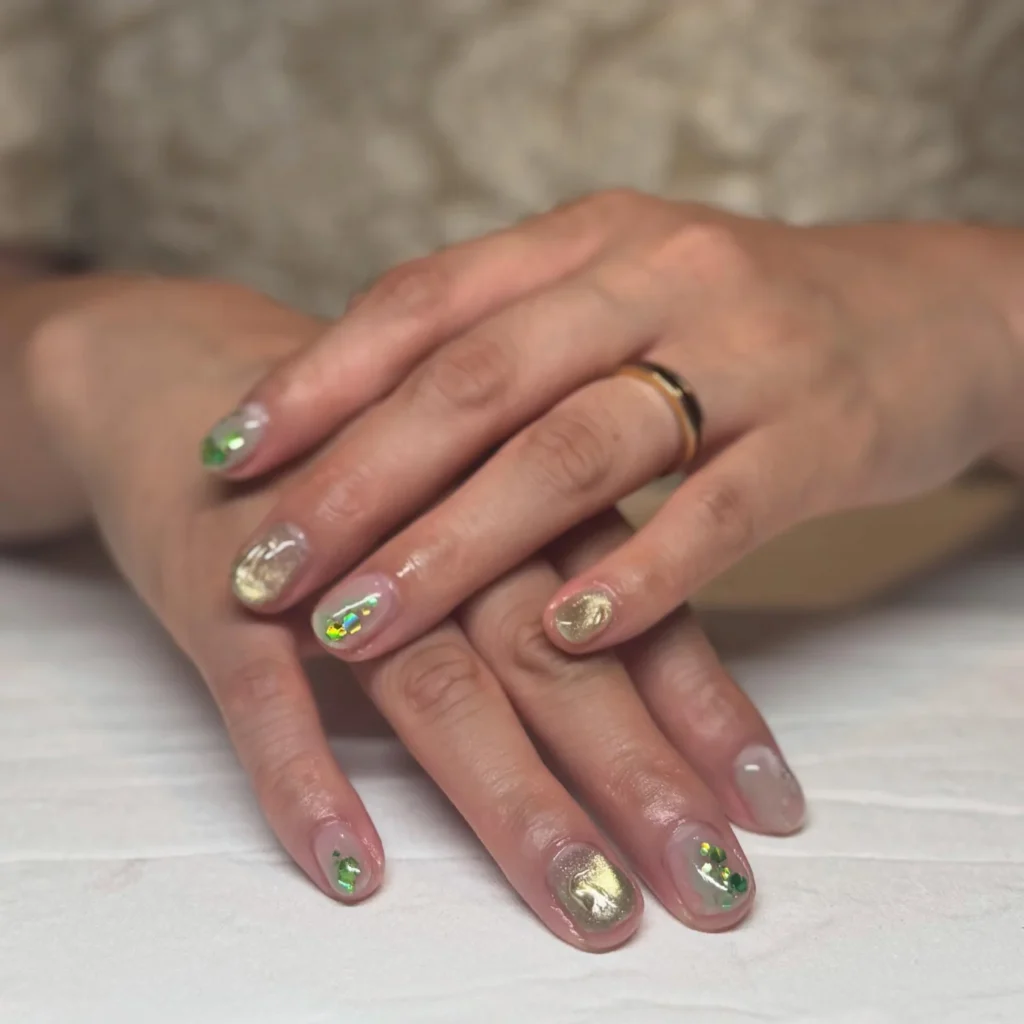
Start with gold chrome, then add green sparkle while the sheer coat stays tacky. Press mirror powder on a tacky coat using a sponge, and seal it fast. Pack green sparkle on sheer nails using a wide brush while the layer stays tacky. Sprinkle pieces over wet shade, and keep gaps wide between each piece. Use a clear base, because a dark ground dulls the mirror finish, then finish with a top coat.
21. Matte Burgundy with Glossy Tips
Burgundy in flat, velvety tones covers every nail, with light absorbed at the surface. Tips in glossy wine-dark shine cap each nail at the end. Tone stays deep plus even over the whole design, and no shine breaks the surface. Flat finish dulls shine, and glossy tips gain contrast from it. Warm wine tones lift the whole design with a cosy, festive feel.
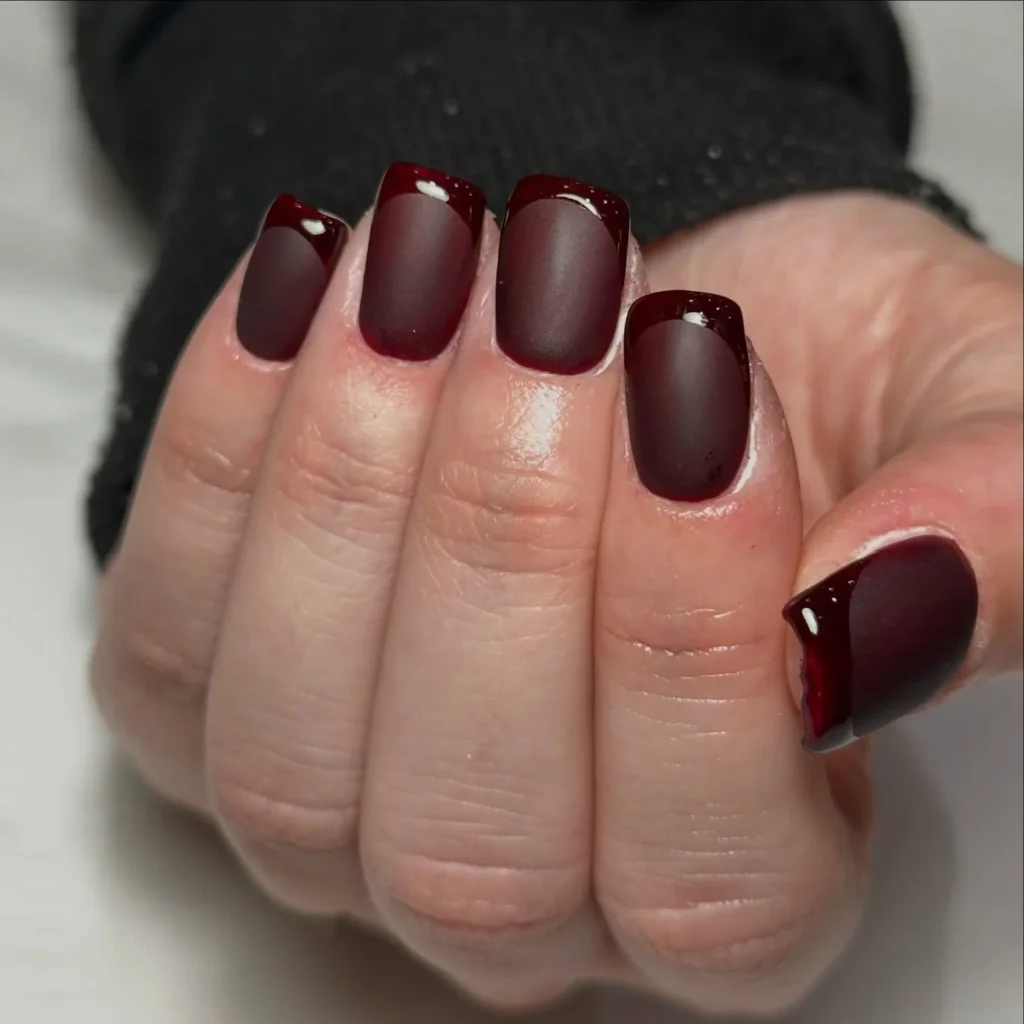
Use a flat sealing coat last, so gloss stays off the velvety look. Paint wine first in light layers, then give each layer time to dry. Form glossy ends using a line brush, along each nail’s own curve. Keep oils away from tips, for shine that holds its place. Mend chips at the tip edge quickly, because deep shades wear fast.
22. Burgundy and Stormy Green Confetti
Green in stormy tones covers a pair of nails, dark and muted in shade. Burgundy in deep tones fills the rest, rich and glossy in a wine-dark coat. Confetti glitter in full covers one accent nail, in red, green, plus gold. Flecks in green, gold, plus pink glitter sit near tips on burgundy nails. Tones in muted shades keep the design calm, and confetti adds sparkle here.
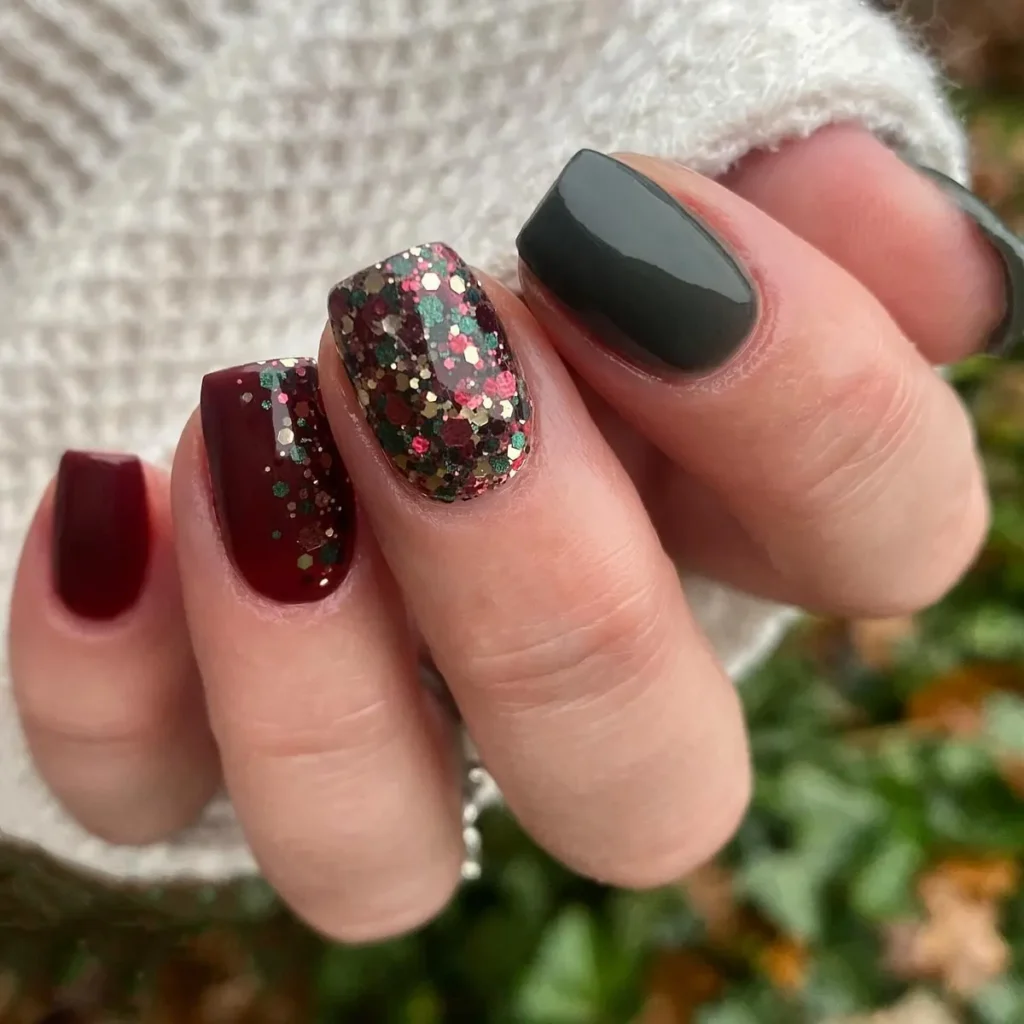
Swap the confetti nail for plain burgundy on a quiet day, and the design still reads festive. Layer the wine shade in light coats, then give each coat time to dry. Paint stormy nails next, and keep colour level across each nail. Sprinkle confetti glitter onto wet shade, and space pieces evenly across the nail. Add flecks with a dot tool, press them down, then finish with a top coat. Flecks lift without cover, because the coat holds them down.
23. Red Plaid Hearts with Snowflake
Red shade covers thumb plus pinky with gloss. Pale shade covers three middle nails, sheer and glowing. Arms in white spread from a snowflake over the middle nail. Lines in red plus white run over the ring finger, neat as plaid. Heart in red sits small in the middle of the grid. White heart, tiny and pale, sits by the pinky tip. Dots in red, green, plus white line the index nail.
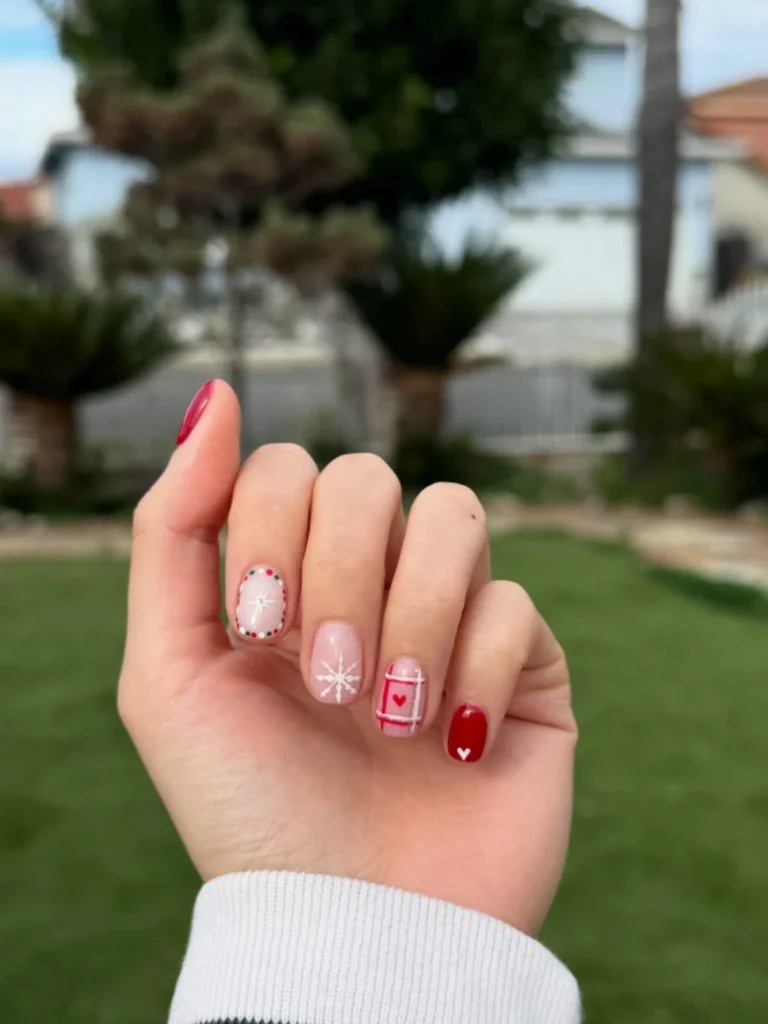
Pick a top coat last, so thin lines stay safe from chips. Paint red first in light layers, then give each layer time to dry. Add the pale base once the red dries, with edges neat and tidy. Paint the flake using a slim brush, moving outward from the middle. Draw the grid using a line brush, and cross red onto white. Form each heart using a dot tool, and press one dot into its point.
24. Emerald Glitter with Tree and Bow
Glitter in dark green covers nails, dense and sparkling with a bright shine. Silver glitter fills a pair of accent nails, cool and bright with a metallic gleam. Nails in white hold a green tree, plus a bow in red and green. Green plus silver share the design, and the tree catches the eye first. Shine locks the glitter in, and each nail gains a wet, smooth finish.
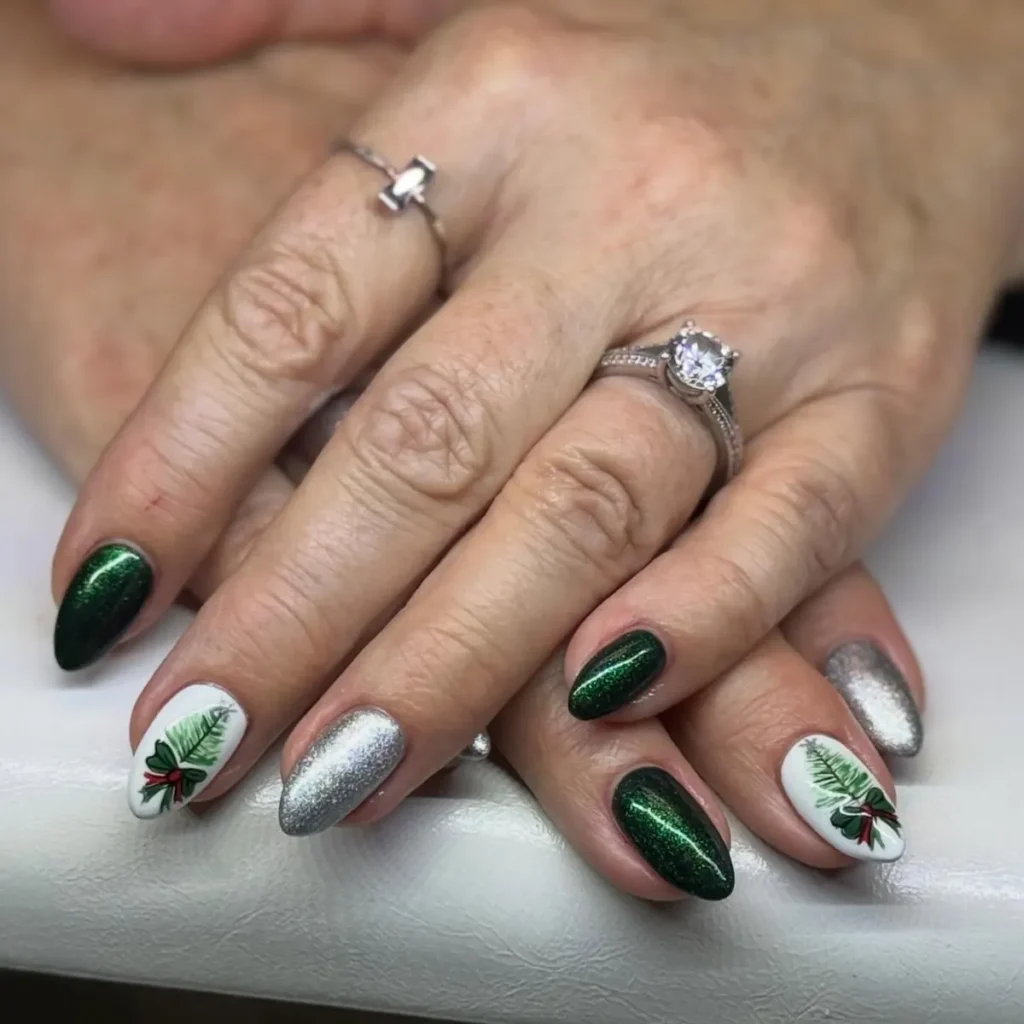
Pick a smaller bow on the tree, and green branches stay the clear focus. Pack glitter onto green nails using a brush while the layer stays tacky. Draw the tree using a slim brush, beginning at the trunk, then adding branches. Paint a bow in crimson plus pine, with tiny dots as berries and leaves. Scatter silver sparkle over accent nails, spacing grains evenly, then finish with a top coat. Grains lift without cover, because the coat holds them down.
25. Burgundy Solids with Pink Polka Dots
Dots in polka style sit on pale pink nails, with burgundy, white, plus black spots. Burgundy in deep metallic tones fills the rest, rich and glossy with shine. Dots change size and spacing, and pink looks playful and bright. Burgundy plus pink share the design, and warmth plus contrast follow. Shine locks the dots in, and the pattern stays crisp, easy to read.
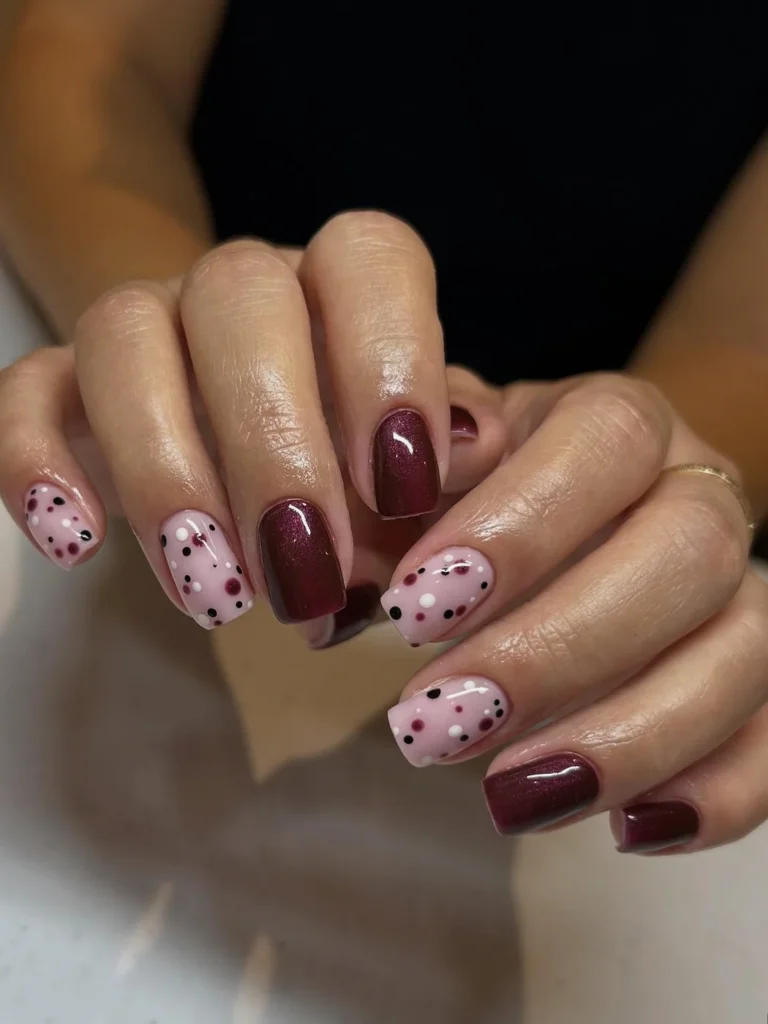
Avoid placing two large dots side by side, because paired dots tend to crowd pink. Lay the wine shade in light layers, then give each layer time to dry. Paint blush nails next, and keep colour even across nails. Add dots with a dot tool, and vary size plus spacing for play. Use black, ivory, plus wine dots by turn, and let no pair of nails match. Close with a sealing coat, because dots tend to lift at the rims.
Conclusion
Thin layers, a single accent, and a sealing coat keep a small design neat through daily wear. Paint each base in light layers, allow time between them, and clean stray marks before sealing. Short christmas nails last longer when glitter stays on one finger and raised art stays flat. Press loose sparkle down using a covered fingertip, because rough rims tend to catch on fabric. Seal the tip edge with each sealing coat, then check tips each morning and mend chips at once. Pick the calmest base first, paint it today, and add one accent after the base feels dry.
