


Red, green, and gold have carried Christmas manicures for decades, and they still look best when the design stays calm. Nude and pink bases keep colour clear, while plaid grids, tiny trees, bows, and candy stripes add personality on just a few fingers. That is why easy Christmas nails work so well: a glossy solid, a dotted accent, or a thin glitter edge instead of crowded artwork. Whether you want a polished winter manicure for the office or a playful holiday nail idea for family dinners, each look here keeps the polish simple, the finish glossy, and the effort low from the first coat to the last.
1. Nude Pink Nails with Metallic Star Decals
Every surface shows a pale pink base with a soft shine from base to tip. Pairs of small four-pointed stars sit on each surface in green, gold, and dark red. Gold shapes catch light first, while green and red shapes add color between them. Placement shifts from one surface to the next, so no pairing repeats across the set. Ready-made stickers keep each star crisp, flat, and even under gloss.
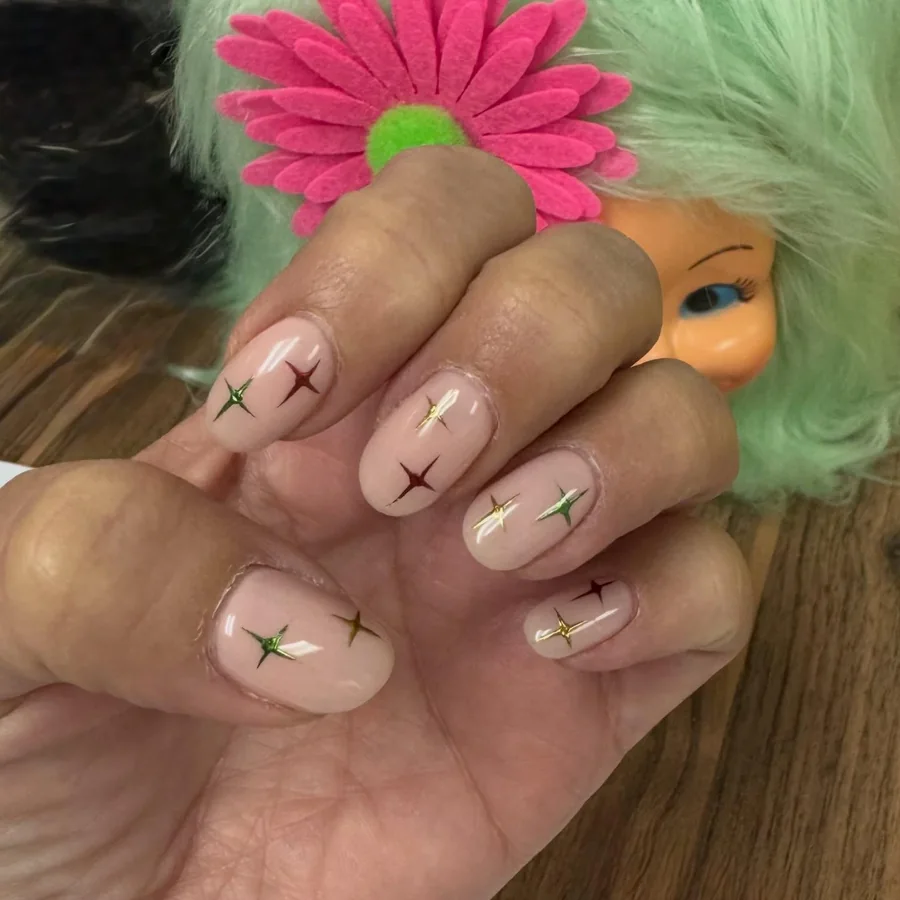
Mix the three metallic shades across the set, and keep a pair on each surface. Swap a gold star for a green or red star when one surface needs more balance. Press each sticker down after the base has dried, and smooth its edges flat with a fingertip. Cover the stickers with clear topcoat, because unsealed edges peel away during wear. Keep spare stickers and a little top coat nearby, so a slipped star can go back on fast.
2. Red Glitter Nails with Snowflake Tree and Bow
Rich red glitter spreads in a dense coat with strong sparkle on each surface. White snowflake arms open wide on one surface, crisp against the red ground. Green tree rises on a nearby surface, finished with a small gold point at its top. Red and white bands slant across a further surface in a candy-cane line. Green bow curls neatly on another surface, while white and green lettering forms HO HO across the thumb.
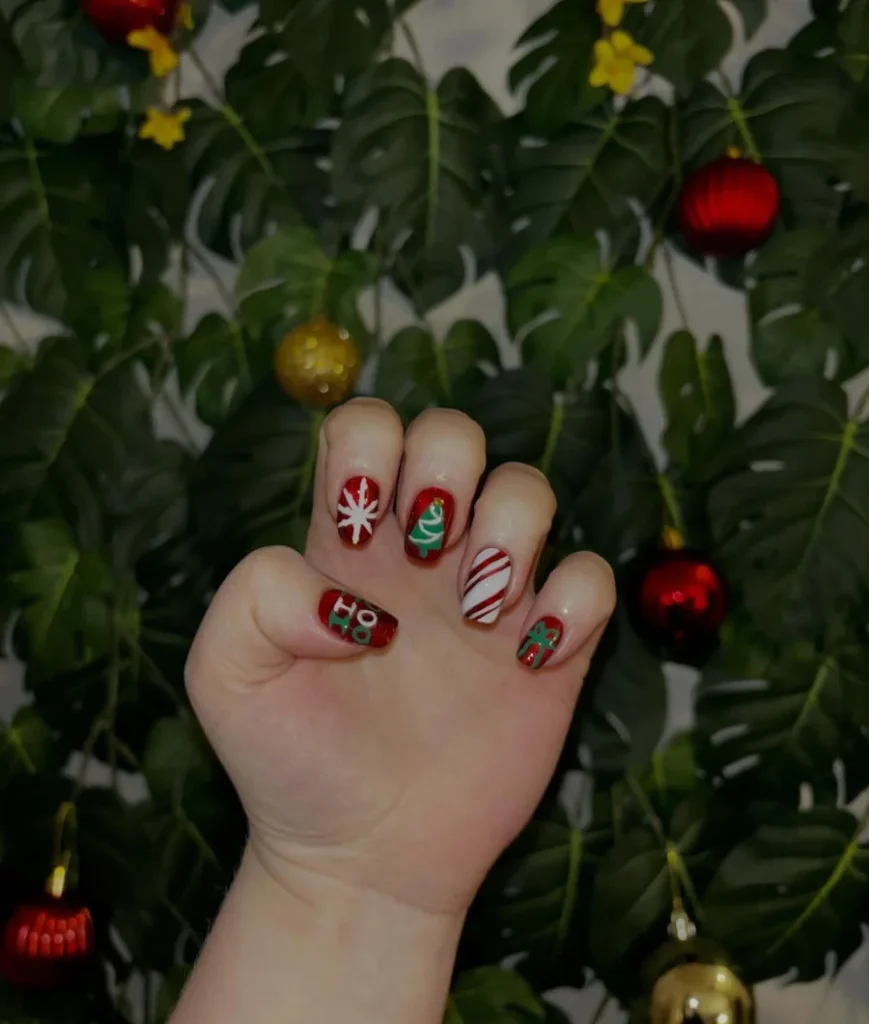
Build the red glitter in light layers, and wait until each layer feels dry before the next one. Use tape guides for the striped surface, so bands stay straight and evenly spaced. Shape the tree in short strokes using a fine brush, moving from tip toward the base. Leave bow and lettering until the end, because damp lines smudge under a brush. Finish with clear topcoat over the whole set, and run it over each tip for extra cover.
3. Pink Nails with Snowflakes Reindeer and Candy Stripes
Smooth pink spreads in a soft, glossy layer across each surface. White glitter flakes dust two surfaces with fine sparkle against the pink ground. Brown and white bands wind across a further surface in a slanting candy-cane line. Reindeer face sits on another surface, with dark eyes, a brown nose, and fine antler lines. Pink and white divide the set, so the mood stays sweet and calm.
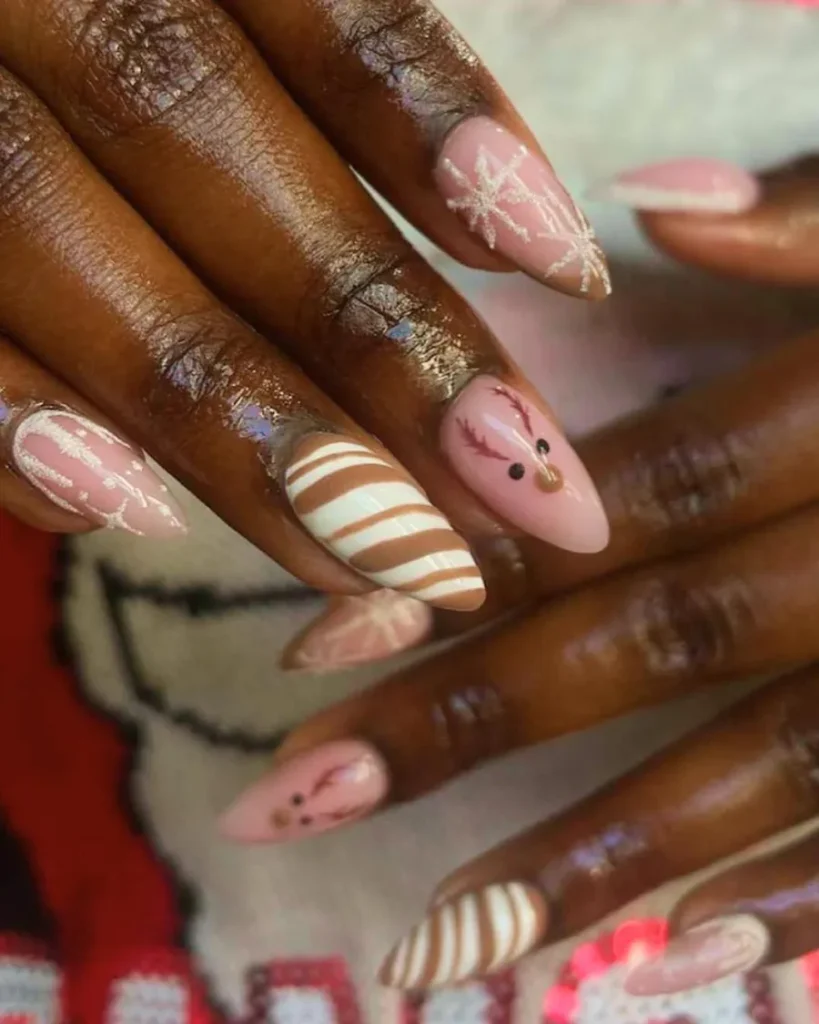
Keep the reindeer face small and centered, so it stays clear without crowding its surface. Try a single snowflake on each pink surface, and leave more pink showing. Use a striping brush for the bands first, and keep their spacing even from edge to edge. Form eyes and nose using a dotting tool, then draw antlers in fine lines using a fine brush. Add flakes only after the base has set, because damp color smears under pressure.
4. Glossy Red Nails with Scattered Gold Dots
Bright red spreads under a deep, glossy finish across each surface. Small gold dots scatter unevenly, with clusters near some tips and single dots elsewhere. Some surfaces hold only one or two dots, while others carry a loose group near the tip. Gloss runs in a sharp line down each surface, so the red reads rich and warm. Gold dots lift the red, and the pairing keeps the mood bright and festive.
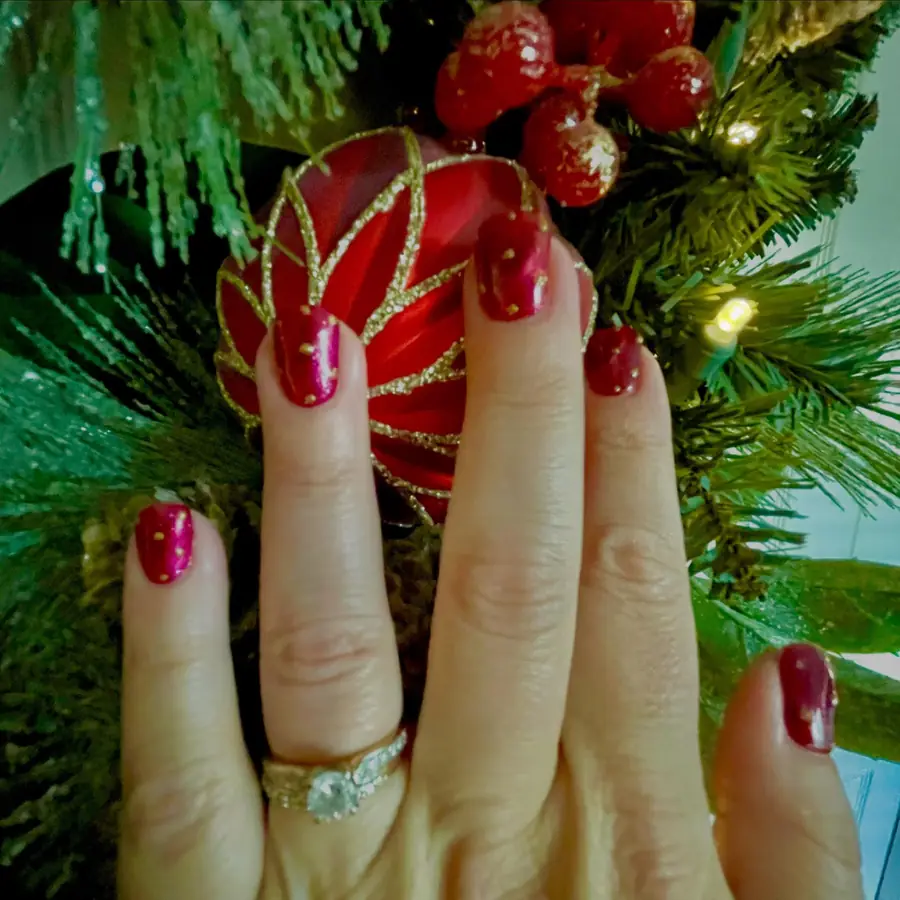
Work in light layers of the bright shade, and wait until each layer has set before the next. Dip a dotting tool in gold color and press small dots onto the surface with a light touch. Vary the spacing from surface to surface, so no two patterns match exactly. Avoid crowding dots near the cuticle, because a packed edge looks heavy and lifts sooner. Seal with clear topcoat, and wipe stray dots from skin right away before they dry.
5. Candy Swirls Bows and Wreaths on Nude
Sheer nude pink gives a soft, pale base with a light shine on each surface. Candy-cane swirls curl near the tips in red-white bands. Red bow outlines loop on a pair of surfaces, thin and neat over nude. Green wreath rings a further surface, and a tiny red bow sits where the ring closes. Solid bright red surfaces carry raised dots, so the set keeps a textured edge.
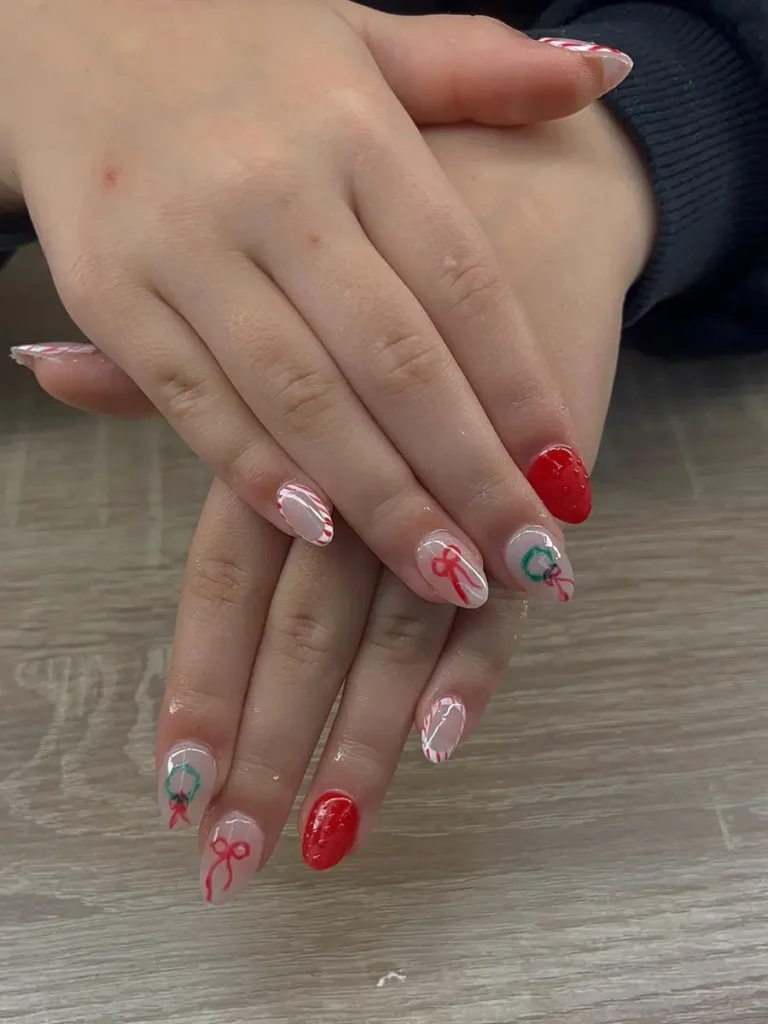
Build the sheer base in light layers, and wait until each layer has set. Curve each swirl around the tip using a striping brush, and keep the bands smooth. Draw bow loops with the same brush, keeping each loop loose and even. Paint the wreath ring in green first, then set a red bow where the ring meets. Seal the set with clear topcoat, because raised dots catch on fabric without a smooth cover.
6. Red French Tips with Gold Dots on Nude
Pale nude pink lies in a sheer, glossy wash across each surface. Curved red tips edge each surface with a clean line over pale ground. Small gold dots follow the smile line in an even arc. Red tips shine over nude ground, so contrast reads sharp and clear. Gloss covers base to tip, while gold dots flash when hands shift.
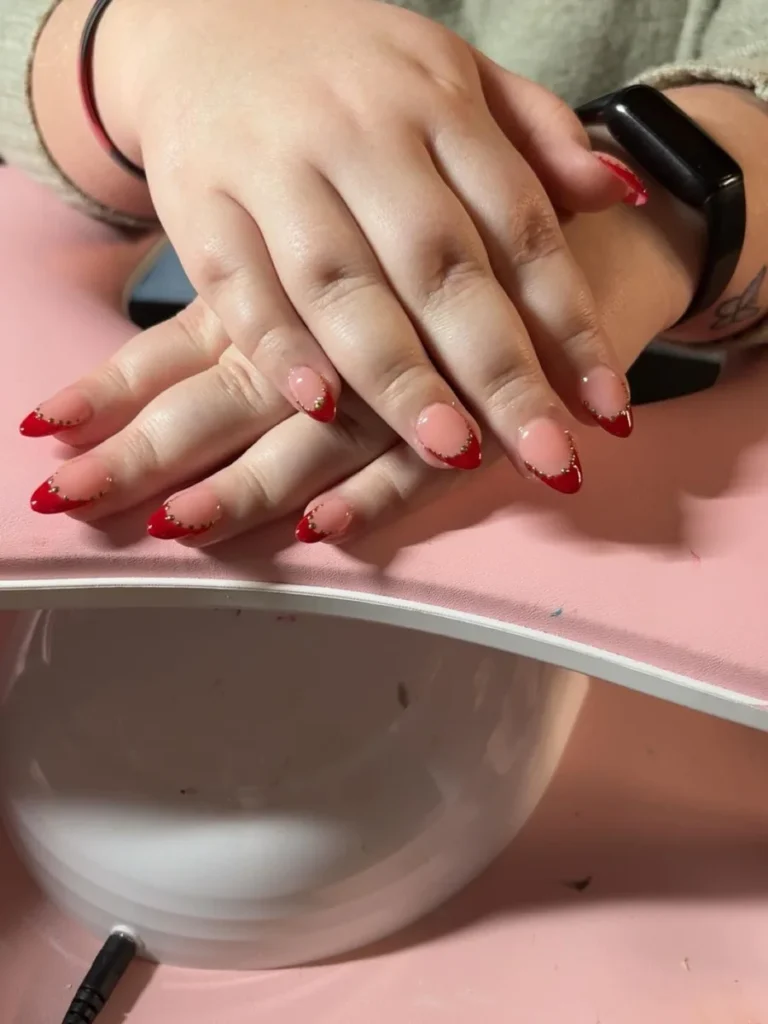
Paint the nude base first in light layers, and wait until each layer has set. Shape each red tip using a striping brush, following the curve of its surface. Set gold dots using a dotting tool, spacing them in a neat arc along the smile line. Wipe stray marks away with remover on a flat brush before sealing the set. Finish with clear topcoat over the tips, because dark color chips first at the edge.
7. Dotted Borders Wreath and Bows on Nude
Nude pink gives a soft, pale base with a light shine on each surface. Solid bright red covers a single surface under a glossy finish. Green wreath shape rests on a further surface, and a small red bow sits beneath the ring. Red bow outline loops on another surface, thin and neat over the nude ground. Small red and white dots circle the edges of a pair of surfaces, which gives a playful mood.
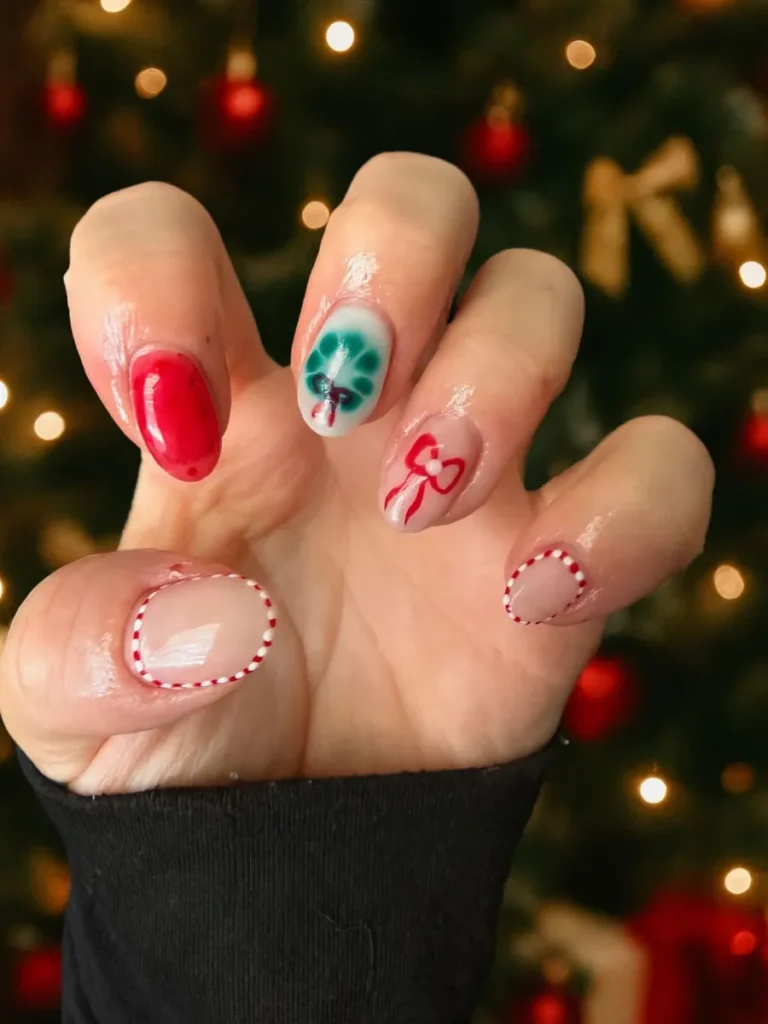
Trace the borders using a dotting tool, switching between red and white dots. Paint the solid surface first, then add the wreath shape in green. Draw the bow outline using a fine brush, keeping each loop loose and open. Keep the wreath small and centered, which leaves room for the bow below it. Lock the look with clear topcoat, and run the seal over each tip for cover.
8. Deep Red Nails, Gold Lines, Stars and Bow
Rich deep red spreads under a glossy finish across each surface. Fine gold lines bend across the red in arcs and loose loops. Gold glitter fills a single surface, with red stars and small dots scattered over it. Bow outline in gold ties a further surface like a gift, neat and fine. Warm shine runs through the pairing, with red ground and gold marks side by side.
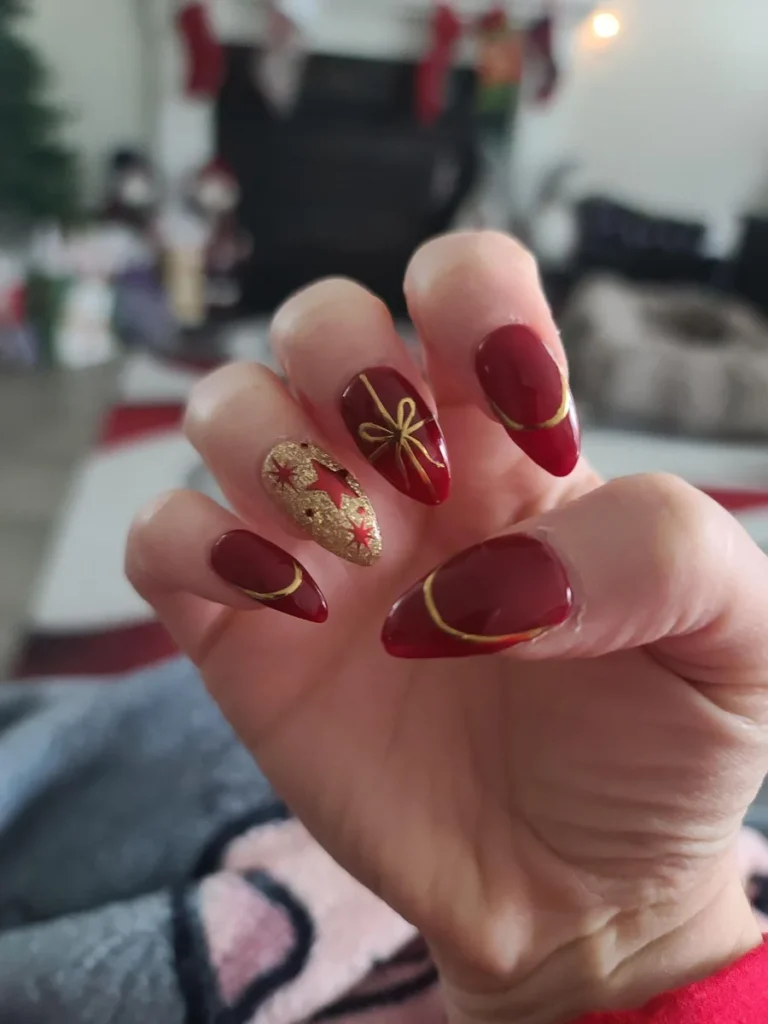
Lay the deep shade down in light layers, letting each one set before the next. Swap the glitter surface for a plain gold line surface when the set needs less sparkle. Use a striping brush for arcs, and keep each line light and even. Press glitter into the accent surface using a flat brush, then set stars with tweezers. Finish with clear topcoat, because glitter edges catch on fabric without a smooth cover.
9. Pale Pink Nails, Lights, Bow and French Tips
Light pink spreads in a soft, glossy layer across each surface. Dark wire bends down a single surface, and red and green bulbs hang along its length. Red and green bow loops sit on another surface, centered on a small gem. Two surfaces end in red and green tips, each edged in the opposite color. Starburst in red and green opens on the thumb, which keeps the set lively.
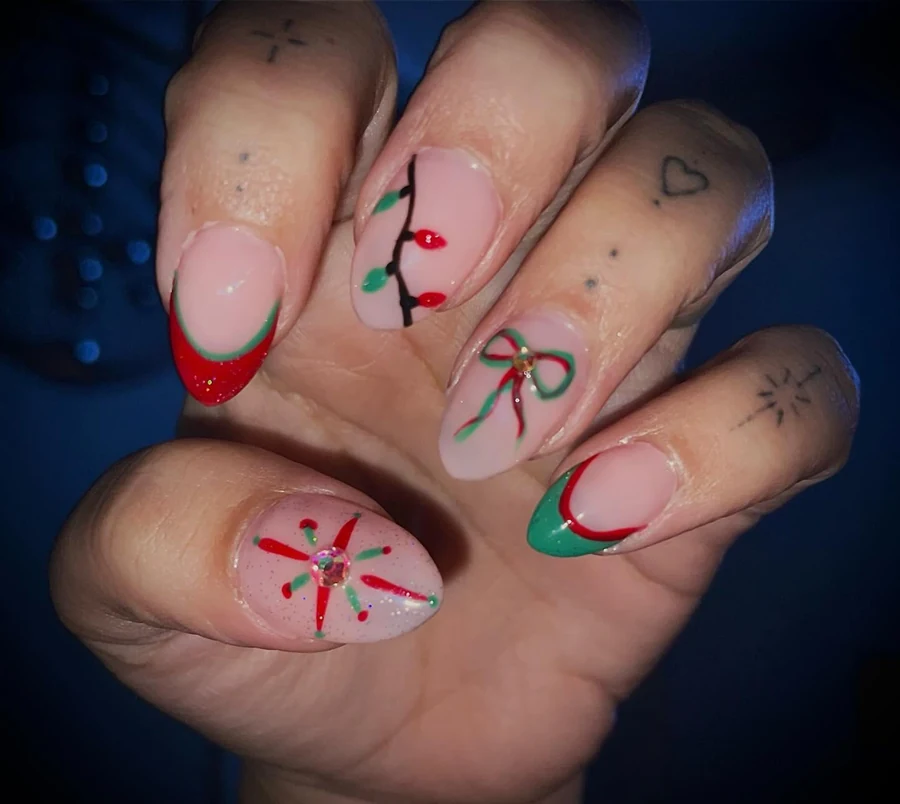
Begin with the wire, using a thin brush to keep its line wavy and loose. Dot bulbs along the wire using a dotting tool, switching between the two colors. Paint the bow in a pair of loops, then press a single gem into its center. Shape the tips with tape, so each edge stays crisp and neat. Choose a glossy topcoat for the finish, because a raised gem catches fabric when left bare.
10. Nude Nails with Tiny Tree Reindeer and Snowflake
Sheer nude gives a pale, glossy ground on each surface. Small green tree rises on a surface, dotted with red ornaments. Santa-hat tip in red-white sits on a further surface, neat and small. Other surfaces carry pudding with holly, a candy cane, a white snowflake, and a reindeer face. Some surfaces stay plain nude, which lets the tiny motifs show up more clearly.

Outline each motif in fine lines first, then add color inside the shapes. Try the tree on a different surface as a variation, and move the snowflake to its place. Work the tree first, because later motifs sit in front of it. Space ornament dots unevenly using a dotting tool, which gives a natural spread. Seal flat surfaces only, because a thick seal can blur small painted lines.
11. Dark Green Nails, Polka Dots and White Bow
Very dark green covers three surfaces under a deep, glossy finish. Its color reads almost black, with only a faint pine tone at the edges. Pale surface carries white polka dots in even, neat rows. White bow loops on another nude surface, thin and neat against the pale base. Dark and pale sit side by side, so the dots and bow stand out clearly.

Apply the dark shade in light layers, letting each one set before the next. Use a dotting tool for the polka pattern, and keep each dot even. Shape the bow using a fine brush, starting from a pair of loops and tails. Move the bow to another surface if the set needs balance, and check the spacing first. Finish with a glossy topcoat, because dark color shows chips sooner than pale color.
12. Glossy Bright Red Nails in One Solid Color
One bright red coat spreads evenly over every surface. Its tone runs deep and warm, with a wet shine that runs from base to tip. No pattern breaks the surface, which leaves the red to carry the design alone. Light moves down each surface in a sharp and glossy line. Red sits strong beside pale skin, and gloss keeps it rich and lively.

Use light coats only, because thick layers leave streaks on dark color. Run seal over each tip with every coat, because tips wear first. Wipe skin around each surface right away, so edges stay sharp. Smooth the surface lightly before the last coat, because bumps stand out more on red. Use gloves during rough tasks, and refresh worn tips when wear shows.
13. Snowflake Accents on Glossy Red Nails
Crimson red covers every surface in one glossy, even coat. Wet shine covers each surface with a bright, mirror-like gloss. Each ring finger holds one white snowflake, with fine branching arms and tiny dots. White stands out sharply against the red, which makes each snowflake clear at a glance. Other surfaces stay plain red, while a dark wood backdrop lifts the glow of the color.
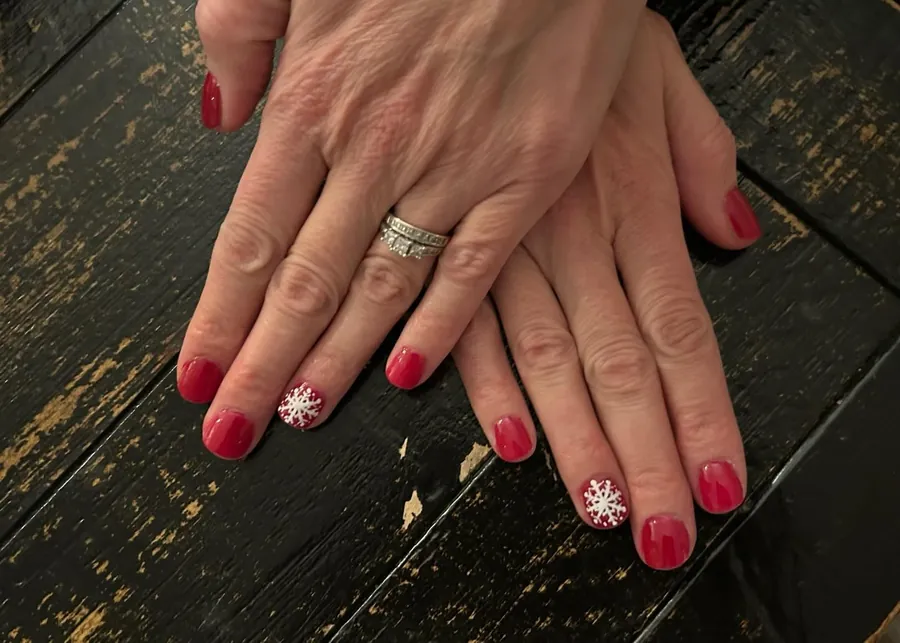
Begin with light coats of red, letting each dry before the next. Draw the snowflake on a ring finger using a fine brush, with arms spreading from a center dot. Keep each arm light and even, which holds the shape crisp. Add tiny dots between the arms for a frosty finish. Finish with a glossy topcoat, and run it over each tip for extra cover.
14. Red and Green Polka Dots with Tiny Trees
Cherry red surfaces carry white dots in even, neat rows. Deep green surfaces hold matching white dots on a rich, dark base. Pale pink surfaces show tiny trees in red-green, with dots scattered around them. Each tree uses red, green, and white in a small, simple shape on pink. Red, green, and white run through the set, with dots that tie the colors together.
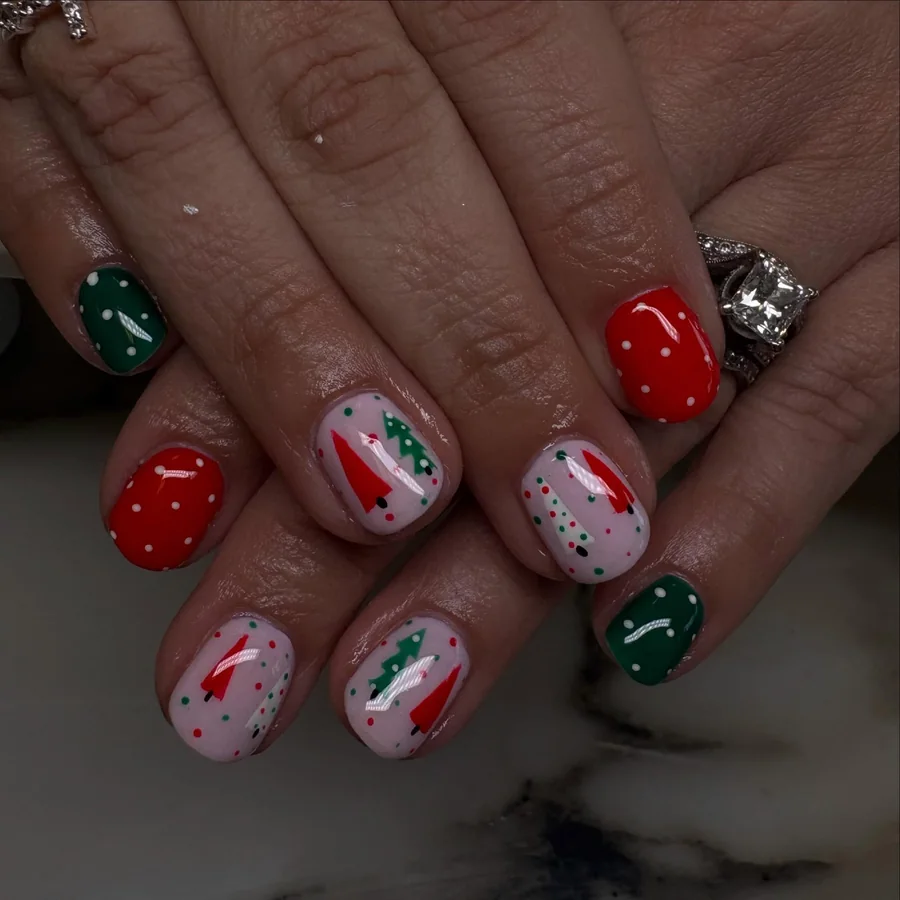
Open with red and green surfaces, then add white dots using a dotting tool. Use a thin brush for tiny trees, starting from a trunk and branches. Keep each tree small, which leaves room on its surface without crowding. Spread dot colors across the set, and change the spacing from surface to surface. End with clear topcoat over the set, and seal each tip to guard against chips.
15. Sheer Nude Nails with Confetti Glitter Tips
Clear nude wash covers each surface with a pale, glossy glow. Confetti glitter in red, green, and white gathers thick at the tips. Hexagon and circle pieces catch light, with white dots scattered between them. Glitter thins toward the cuticle, which leaves the base calm and clear. Color stays densest at the tips, where the shine turns bright and playful.

Sprinkle glitter over a sheer base in light layers, letting each one set before the next. Swap some hexagon pieces for circles when the tip needs a softer spread. Flatten the pieces with a fingertip, because loose grains stand up and snag. Add more glitter at the tips, which makes the gradient denser there. Tidy the cuticle line with a small brush, then seal with top coat for a smooth cover.
16. Skittle Nails in Nude Pink Red and Magenta
Shades change from surface to surface, running from nude beige to deep magenta. Soft pink and bright red sit beside pale nude and deep magenta. Holographic glitter flakes cover every surface, flashing gold, pink, and silver. Flake size varies, which makes some surfaces sparkle more than others. Gloss locks the flakes in place, while colors shift as hands move. Each surface keeps its own shade, so the set feels varied and lively.

Choose a different shade for each surface to build this skittle set. Paint light coats of each shade, and wait until each layer has set. Add a glitter coat while color feels tacky, which helps flakes hold in place. Flatten flakes with a fingertip, because raised bits catch on fabric. Finish with a glossy topcoat, because loose flakes need a smooth seal.
17. Pink White Nails, Trees, Bows and Plaid
Blush pink covers most surfaces under a glossy, even finish. Green tree sits on pink, topped with a red star. Red bow curls on pink, thin and neat. White surfaces hold red-green dots, plus a plaid grid in red-green. Santa-hat tip in white and red caps a further surface, which keeps the set festive. Pink ground fills most surfaces, while white ground holds the grid and dots.
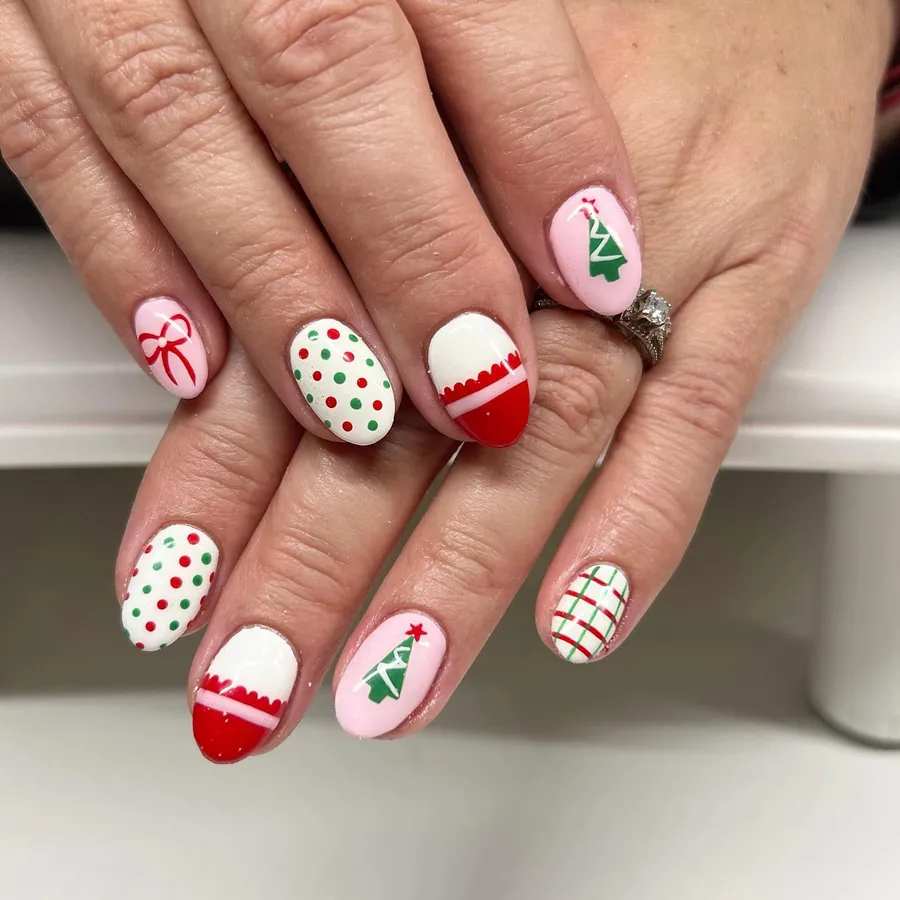
Map the plaid with thin lines first, then fill each square with color. Try plaid on a pink surface as a variation, and move the dots to a white surface. Work the tree first, because the star sits on top of it. Use a dotting tool for the polka pattern, and space each dot evenly. Finish with clear topcoat, because tiny details wear fast when left bare.
18. Soft Pink Nails with Stripes and Gold Glitter
Rosy pink covers most surfaces under a smooth, glossy, even finish. Diagonal white stripes cross one surface, with fine gold glitter between them. Gold glitter fills a further surface under a dense, sparkling, even finish. Pink and gold run through the set, which keeps the shine soft and warm. Stripes stay crisp against pink, while gold glitter catches light as hands move.
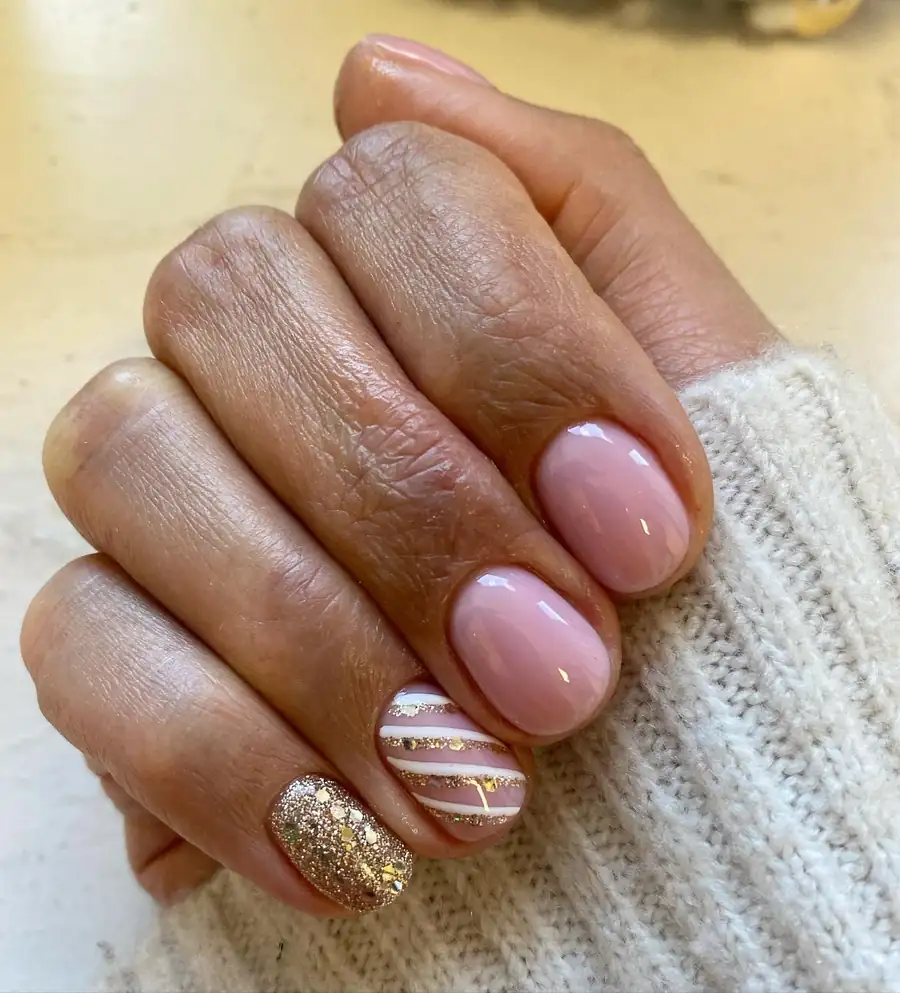
Use tape guides to stripe the accent surface, which keeps bands even. Lay the pink base down first in light layers, letting each one set. Press gold glitter into the accent surface using a flat brush. Avoid pulling tape after the color sets, because lines blur once the surface dries. Top the stripes with clear coats, and run the seal over each tip for cover.
19. Burgundy Nails with Gold Glitter Gradient Tips
Deep burgundy covers each surface under a rich, glossy finish. Gold glitter rises from tips, dense at edges and thin near bases. Glitter catches light when hands move, which makes the burgundy glow warm. Color shifts from dark wine near the base to bright gold at the tip. Burgundy and gold run through the set, with a fade that keeps it calm.
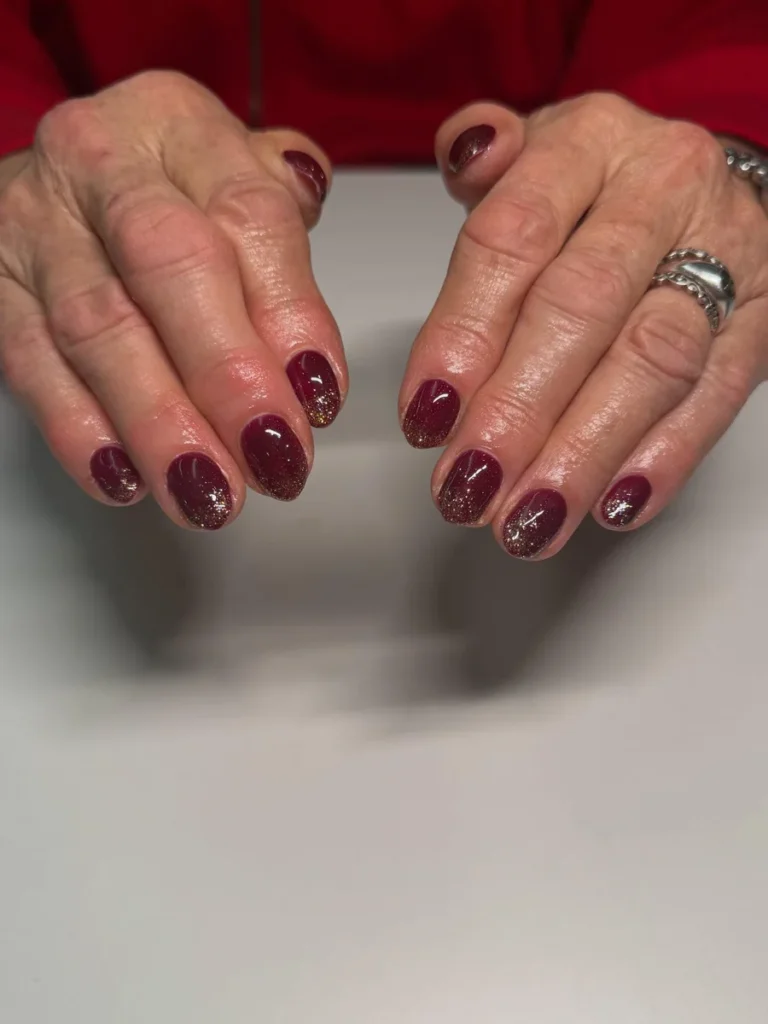
Dab gold glitter onto the tips with a sponge, adding more near the edge. Paint light coats of deep shade first, and wait until each layer has set. Repeat dabbing until the fade looks even, because light layers build the color best. Use a fresh sponge often, so a dry one never leaves patchy color. Finish with a glossy topcoat, and seal each tip to guard against chips.
20. Crimson Glitter Nails with Gold Leaf Sprigs
Dense red glitter covers each surface under a rich, sparkling finish. Gold leaf sprigs open across a pair of surfaces, fine and branching. Leaf veins shine in light, while red glitter glows beneath them. Sprig by the cuticle sits low, while the other sprig sits near the tip. Red and gold run through the set, which makes leaves look warm and bright.
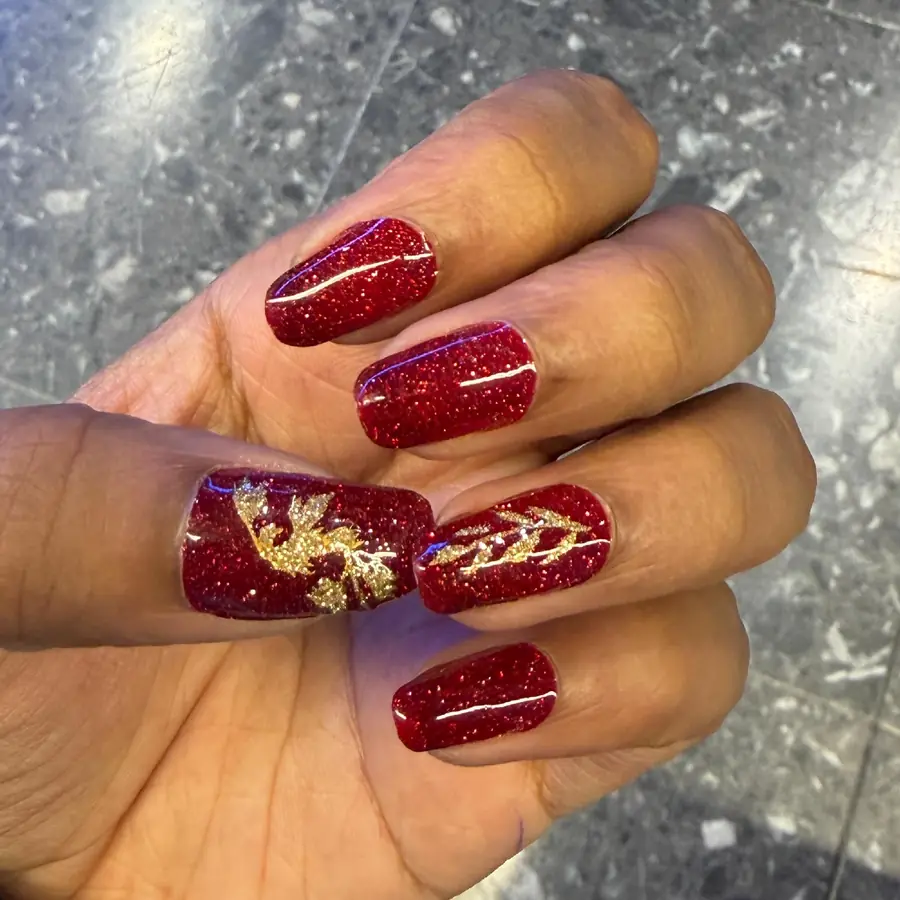
Lay red glitter down in light layers, letting each layer set before the next. Shape sprigs using a fine brush, working outward from a stem. Set gold foil bits on wet polish for leaves, then smooth them flat. Keep each sprig small, which leaves room on its surface without crowding. Finish with clear topcoat, because foil edges lift fast when left bare.
21. White Stars Glitter Tree and Red Tips
Nude pink gives a soft, pale, glossy base on every surface. White star sparkles dot several surfaces in a crisp, four-pointed shape. Gold glitter tree rises on a further surface, with white swirls curling around it. Multicolor glitter fills a single surface in a dense coat that shifts under light. Red French tip in a deep shade caps a further surface, which keeps the set balanced and calm.

Use a dotting tool to scatter stars, spacing them unevenly across surfaces. Shape the tree using a fine brush, and curl white swirls around its branches. Press glitter into the accent surface using a flat brush. Form the red tip with tape, which keeps its edge crisp and neat. Finish with clear topcoat, because loose glitter edges catch on fabric.
22. Gold Bows and Starbursts on Red Glitter
Dense red glitter spreads over some surfaces in an even, sparkling coat. Nude surfaces hold gold bows in fine, tidy lines over pale ground. Gold starbursts open on a pair of surfaces above red glitter tips. Each bow loops in gold, centered on a small red knot. Red and gold run through the set, with bows that stand out most.
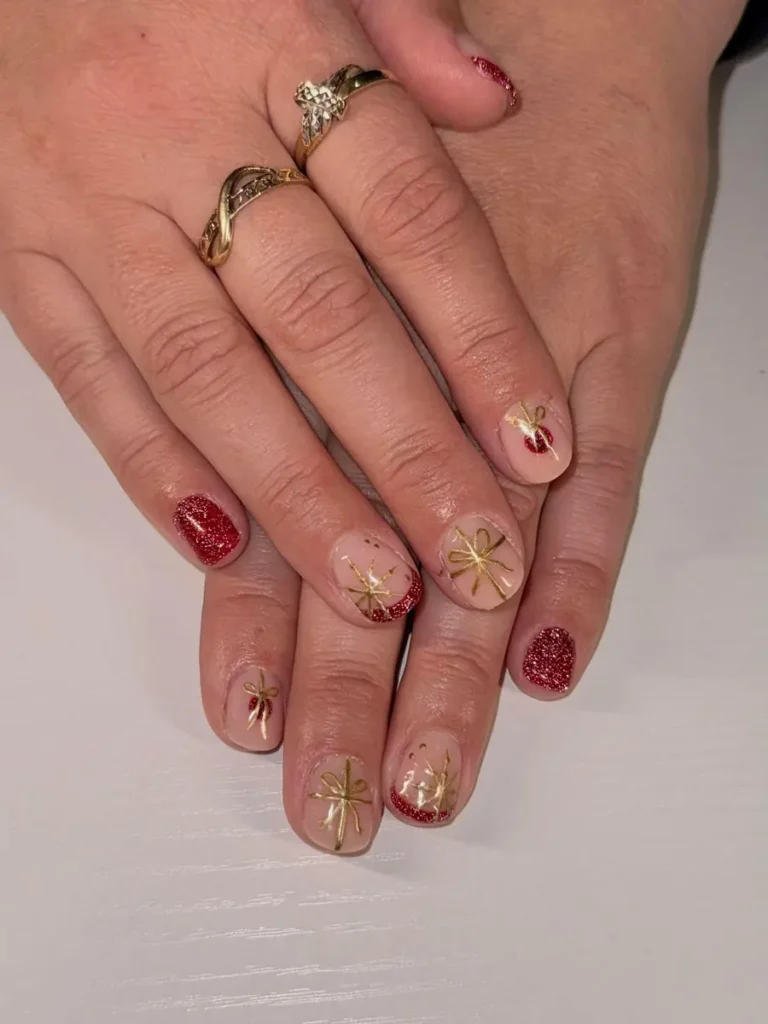
Set gold bows in place using a fine brush, keeping each loop loose. Swap a gold bow surface for a starburst surface when the set needs more sparkle. Paint the red glitter surfaces first, and wait until each layer has set. Start each starburst at a center point, which keeps its arms even. Leave red glitter tips until last, because damp glitter shifts under a brush. Top the set with clear coats, and seal each tip for cover.
23. Deep Red Nails with White Speckled Nude Accents
Dark red covers most surfaces under a deep, glossy finish. Sheer nude surfaces carry white speckles that look like fresh snow on glass. Speckle size shifts across the set, with larger dots near tips and smaller dots below. Red and nude run through the set, which makes speckles read bright and clean. Gloss runs from base to tip, and the deep red stays rich.

Mix dark surfaces with nude ones to keep the balance even. Paint light coats of dark shade first, and wait until each layer has set. Flick white polish off a brush for speckles, which lands them unevenly. Test the flick on paper first, because drops can land too large. Choose a clear topcoat to finish, and seal each tip for a smooth shine.
24. Bright Red Nails with Gold Glitter Ring Fingers
Cherry red covers most surfaces under a bright, glossy, even finish. Gold glitter fills ring fingers under a dense, sparkling, even finish. Glitter moves between gold and silver while hands shift in warm light. Red and gold run through the set, with glitter accents that stand out most. Gloss runs from base to tip, and the bright red stays vivid.

Coat the red surfaces first in light layers, and wait until each layer has set. Try the glitter on a middle finger as a variation, and keep red on the ring fingers. Press glitter into the accent surfaces using a flat brush. Flatten glitter with a fingertip, because raised bits catch on fabric. Seal with top coats to give glitter a smooth cover.
25. Green and Red Dotted Nails with White Bows
Gold dots sit on red surfaces in even, neat rows. Green surfaces hold matching gold dots over a deep, rich ground. Nude surface wears a dotted border in red-green, with a pair of white bows inside. Red glitter fills a single surface, dense and sparkling, base to tip. Gold, red, and green run through the set, with dots that tie the colors together.
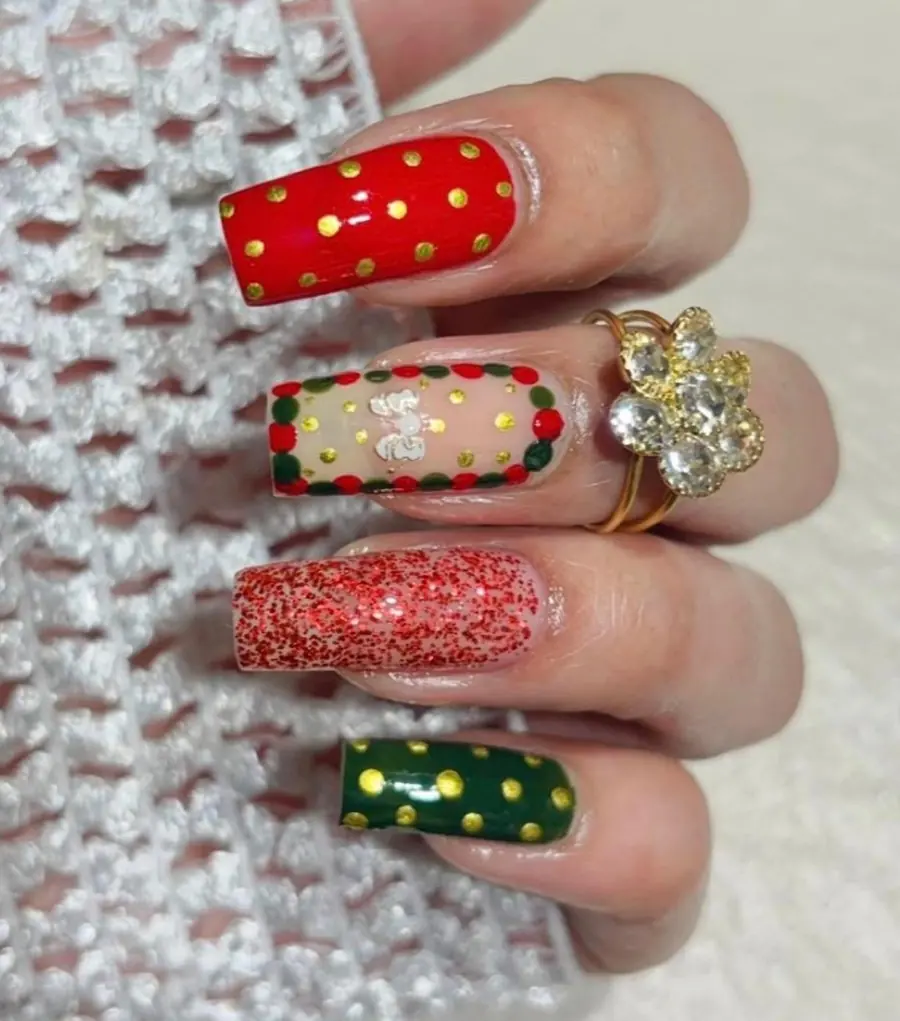
Start with the dotted border, then fill each dot using a dotting tool. Use light coats for solid red and green surfaces, and keep each layer thin. Draw the white bows using a fine brush, starting with a pair of loops. Avoid adding glitter before the base has sealed, because loose glitter shifts on a damp surface. Finish with clear topcoat over the set, and seal each tip against chips.
Conclusion
Colour does the heavy lifting here, so choose your main shade before anything else. Cherry red feels classic, emerald feels rich, and gold or soft pink keeps things gentle for work days. Easy Christmas nails look their best when only a few fingers carry the detail and the rest stay plain. Finish with a glossy top coat, cap the free edge, and refresh the seal after a few days of wear. Whichever elegant holiday manicure you pick, the goal is the same: clean lines, bright colour, and hands you enjoy looking at all month.
