

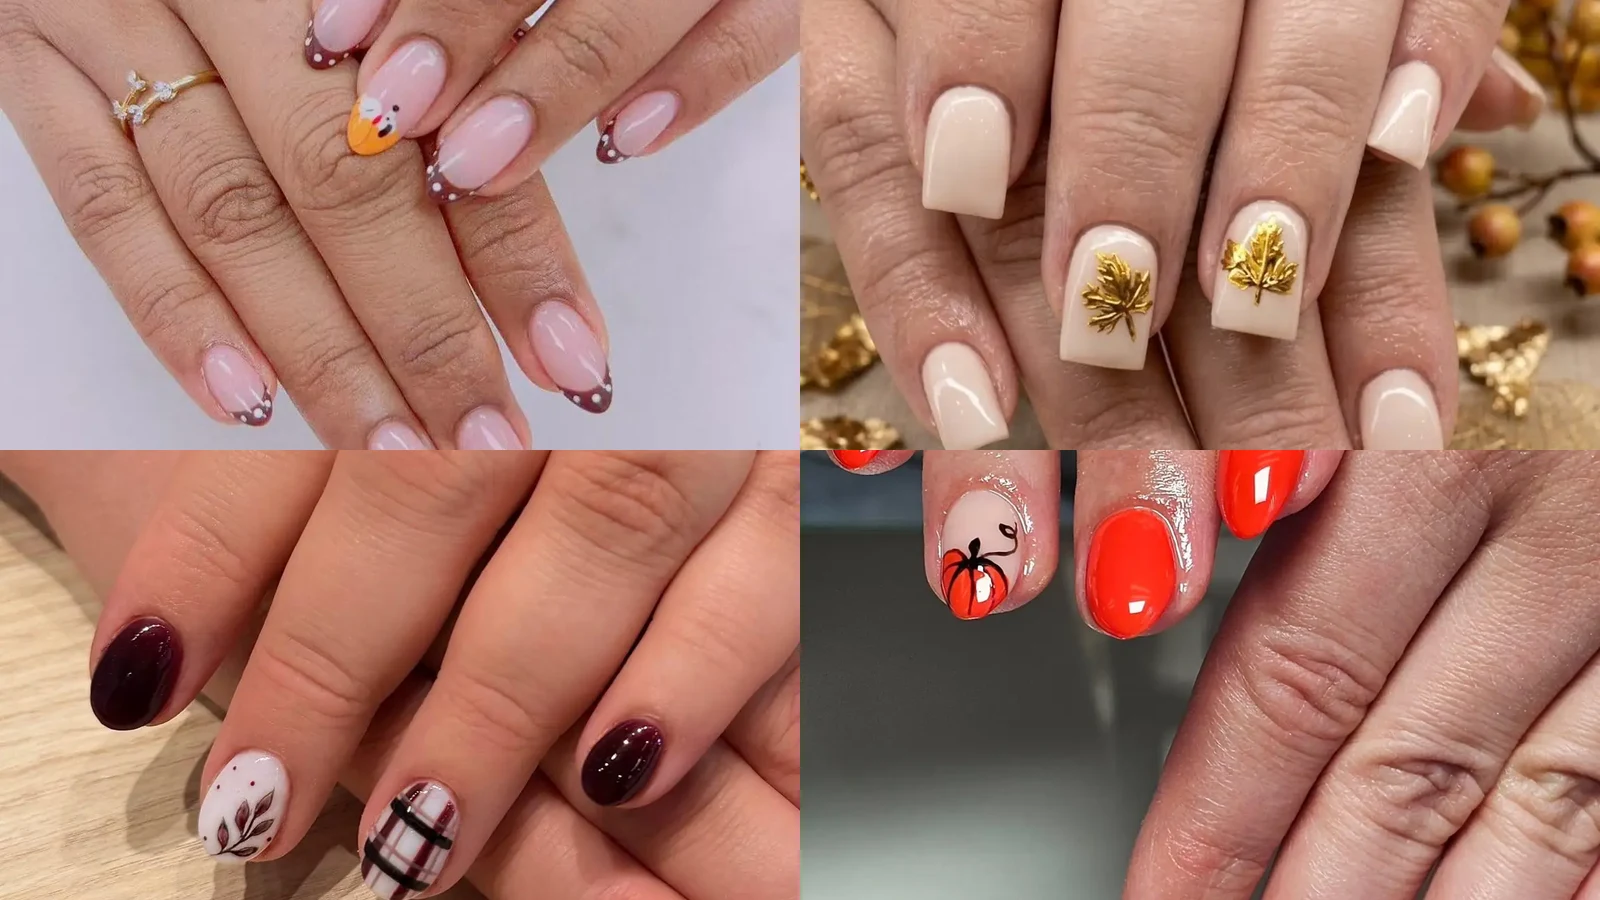
Holiday manicures do not need a full harvest scene on every finger. When thanksgiving nail art simple enough to finish in one sitting is the goal, a single pumpkin, maple leaf, or turkey face on a quiet base does the job. Sheer pink, nude, and cream polish leave plenty of room, while burgundy, burnt orange, and brown supply the harvest color. Gold foil and glitter work best in small amounts, and plaid, checkerboard, or ombre tips add variety without crowding the nail. Every idea below keeps most of the surface open, so small wobbles stay hidden and each motif is easy to read.
1. Pink Dotted Turkey Tips
Soft pink meets harvest orange on these tips, where small turkey faces sit with white eyes, yellow beaks, and red wattles. Dots in burgundy follow the French tip line over the sheer pink, leaving much of each nail bare and glossy. Near the cuticle, gold dots add a quiet glint without crowding the faces. Orange and burgundy supply the harvest feel.

Two thin coats of sheer pink, each allowed to set, build the base without streaks. Add the burgundy dots using the biggest dotting tool while the tip line is still wet, then switch to the smallest tool for eyes, beaks, and wattles. Dry every color before the next. Have a slightly wet cotton tip handy for stray dots. Skipping the drying pause is the usual mistake, since wet yellow and red smear into each other. Finish by sealing the tips.
2. Autumn Heart Stem Column
Gloss catches the raised edges of four hearts stacked down the center of each nail. Brown, burgundy, orange, and yellow repeat in that same order, which gives the column a steady harvest rhythm. Underneath, sheer nude polish fills the rest, and clear space on both sides makes the column feel intentional and quiet. Warm shades against pale nude read soft rather than busy.
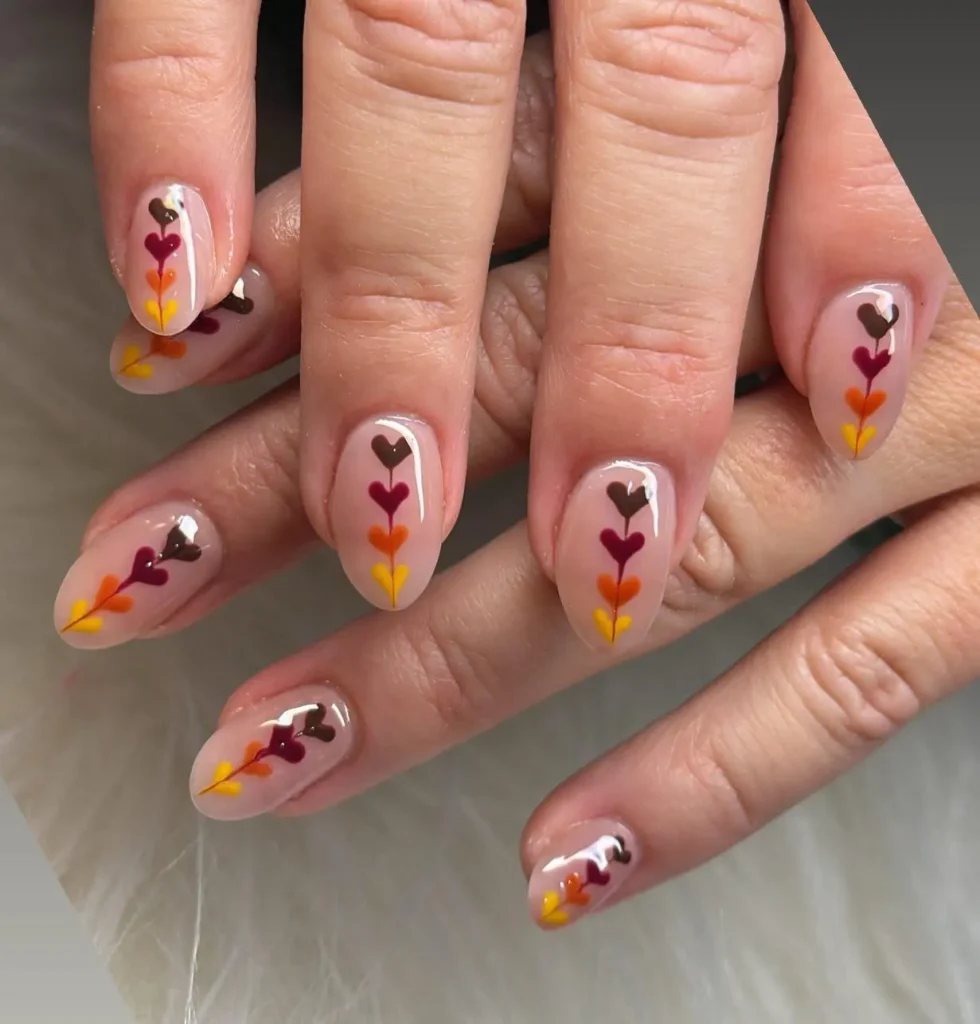
Hearts start as two joined dots from a medium dotting tool, with a liner brush pulling each tail downward. Work one color at a time down the center, and clean your dotting tool before each new shade so edges stay crisp. Equal polish on every dot keeps the hearts the same size. Because the column is narrow, it shows any drift off center, so brace your forearms on a desk while painting. Add top coat once everything is dry.
3. Copper Pumpkin Outline Pairing
Light slides across copper-gold shimmer and makes the metallic finish glow on most nails. Pumpkin outlines sit on the pale pink nails, drawn in gold with curved ribs and one thin black curl at the stem. Just two design pieces appear, so glitter texture does most of the talking against the soft pink. Black stays tiny, which keeps the gold in charge.
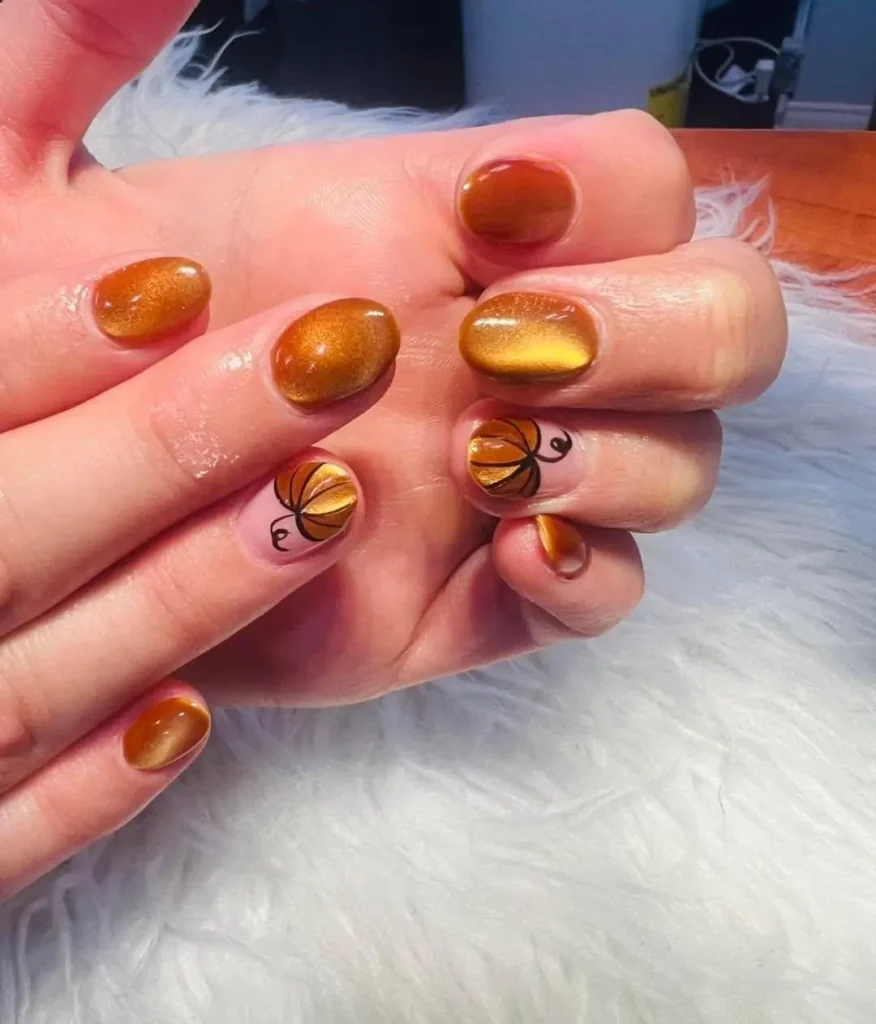
Copper shimmer needs two coats, and waiting between them prevents streaks. Metallic gold paint and a liner brush draw the outline, with ribs kept evenly spaced. Add the black curl last, using just the brush tip and very little polish. Heavy black paint here would swallow the delicate gold lines. Metallic paint settles, so shake the bottle well and store it upright. Shimmer can dull over time, so refresh the glossy top coat midweek.
4. Scarlet Pumpkin Curl Solids
One small filled pumpkin carries this set, painted orange with a black stem and a black curl sweeping beside it. Pale nude nails give it room, while scarlet red-orange covers most of the others in a bright, glossy solid. Without any green, orange and black deliver the harvest message by themselves. Nude negative space keeps every edge crisp and readable.
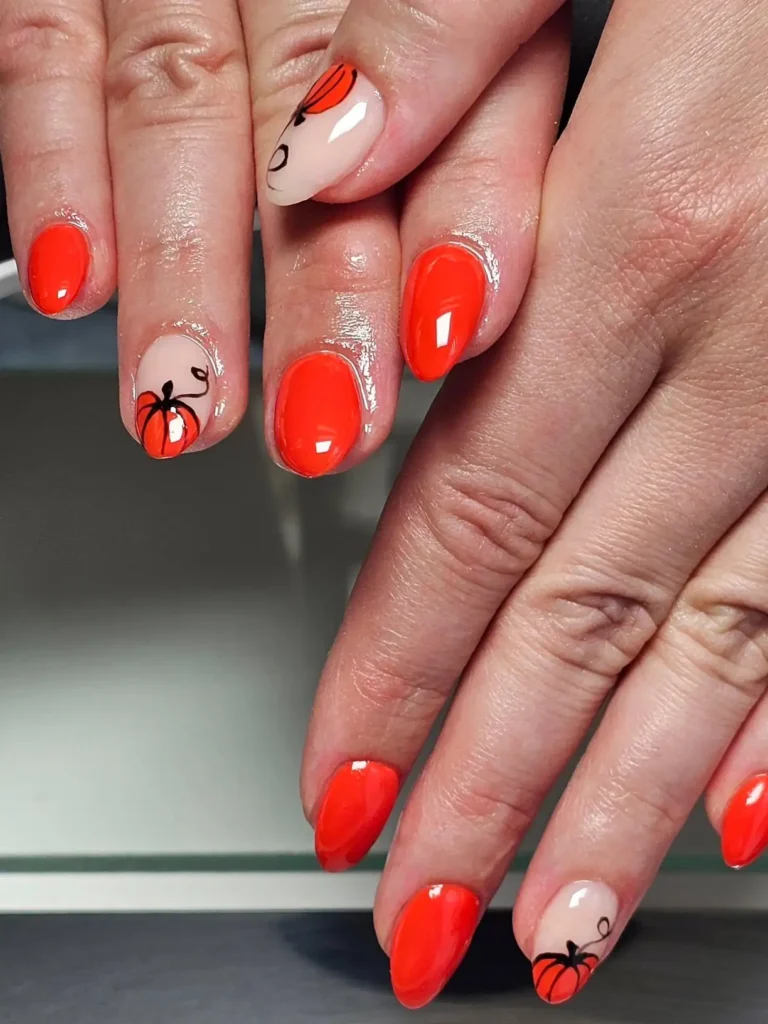
Thin coats of red-orange dry smoother, so clean the brush bristles between passes. Three overlapping ovals from a flat brush make the pumpkin body, and a liner brush adds the stem and curl. Give the orange time to set before sealing, otherwise black lines can drag and blur. Jeans and cream sweaters suit the colors, and a midweek top coat refresh keeps the gloss. Daylight is the best place to check the stem curve.
5. Crimson Glitter Turkey Faces
Flat painted turkey faces sit against dense crimson glitter, and the contrast keeps the set playful. Each face has white and black eyes, a yellow beak, and a red wattle, set on bare nude tips. Glitter covers the rest of the nail in a sparkling finish, with the nude space stopping the red from feeling heavy. Faces stay small.
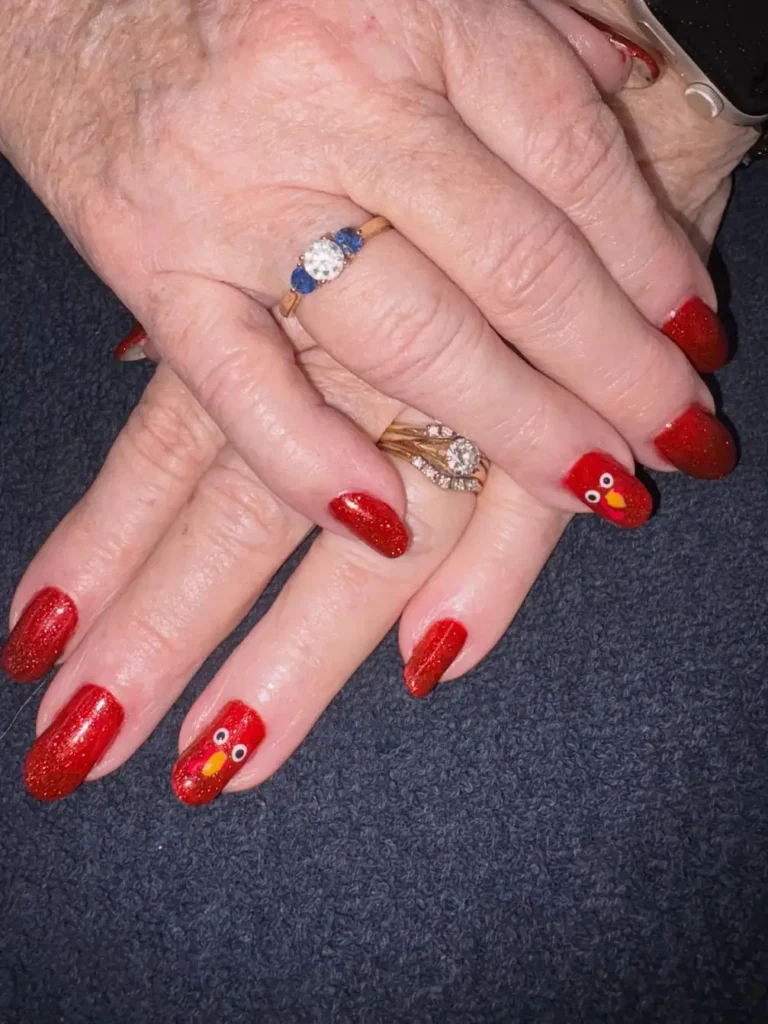
Two coats of red glitter polish, pressed flat with the brush, leave a smooth surface. Paint each face with a dotting tool: eyes first, then beak and wattle, pausing between colors. Worried about removal? A peel-off base layer beneath the glitter helps, and soaked cotton lifts the rest after a short soak. Seal the faces with top coat so dots do not lift, and avoid scrubbing glitter near the cuticle while sealing.
6. White Maple Leaf Solids
Single red-orange maple leaves sit on the white nails, each with a fine stem and pointed lobes. Burnt orange and dark brown fill other nails in clean, glossy blocks, so the set reads as solids with one drawn accent. Light bounces off the shiny surfaces, which makes the leaf detail easy to spot. White nails give the leaf plenty of room.
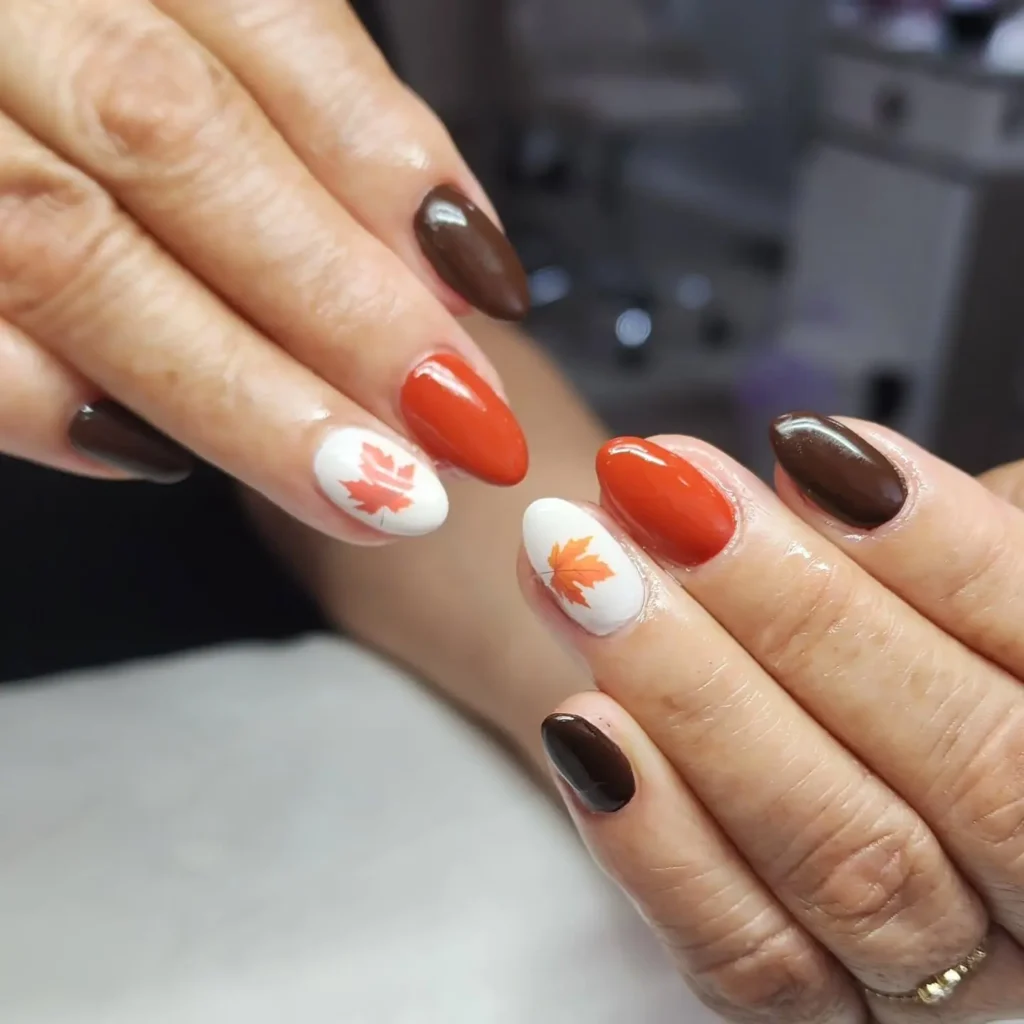
Solid colors stay truest when each coat dries fully before the next. Paint the leaf with a liner brush, starting at the stem and moving out so lobes look even. Unsteady hands can use a leaf decal as a shortcut instead, pushing air bubbles toward the edges. Seal with top coat once everything is dry. Keep a small brush for leaf touch-ups, because edges may need sharpening before the set is sealed. Skipping that fix leaves lopsided lobes.
7. Peach Tiny Leaf Detail
Soft gloss runs across the whole peach surface, leaving most of it empty on purpose. One tiny brown leaf sits near a tip, very small compared with the nail, with a gold foil fleck beside it. Warm brown looks natural against peach, while gold adds a faint metallic catch. Because so little is drawn, the single leaf looks intentional.
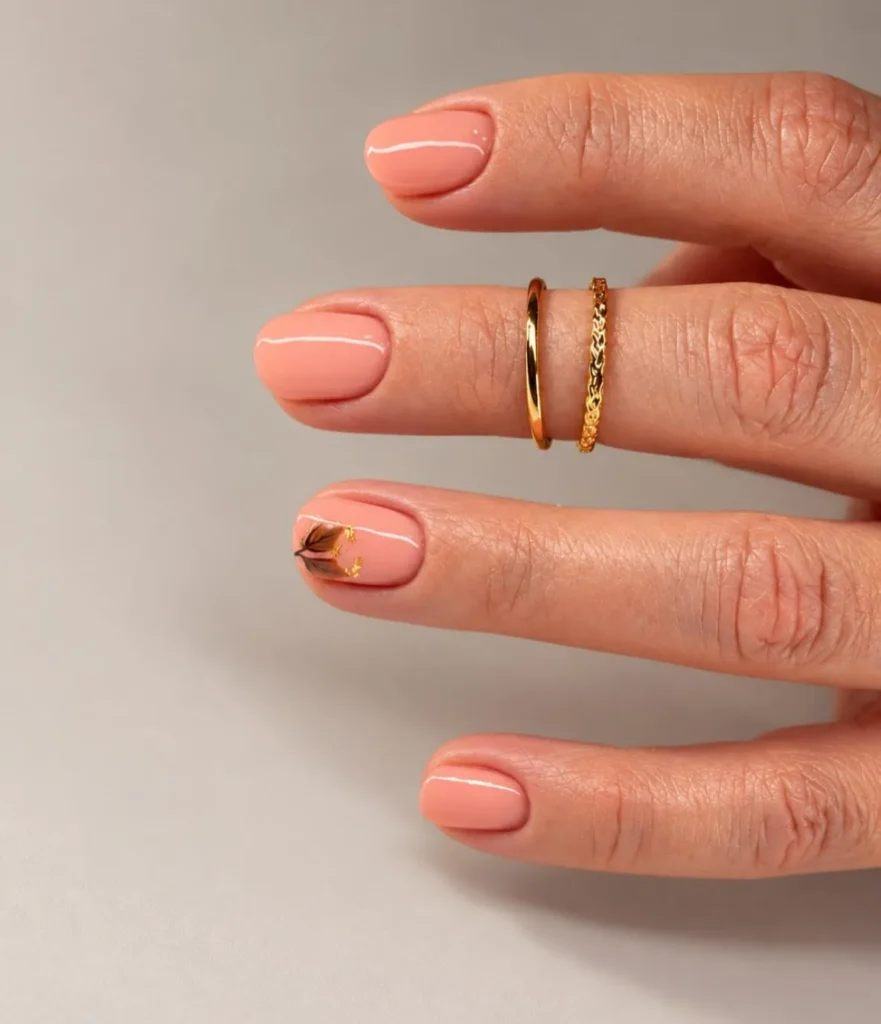
Peach polish goes on in two thin coats, and bright light shows edge flaws before any art begins. Brown leaf paint thinned slightly flows better: stem first, then the lobe, two strokes in all. Set the gold fleck into still-wet top coat beside the leaf stem, then seal the full nail. Scale is the real challenge, since an oversized leaf stops this from feeling simple. Compare the leaf with the tip width before sealing.
8. Cream Gold Foil Leaves
Warm gold meets soft cream across this set. Foil maple leaves sit at the center of several nails, their crinkled edges catching light from every angle. Smooth, opaque creamy nude polish fills the background, and open cream beside every leaf gives it a spotlight. Gloss stays high on the cream, so the foil reads as the only texture.
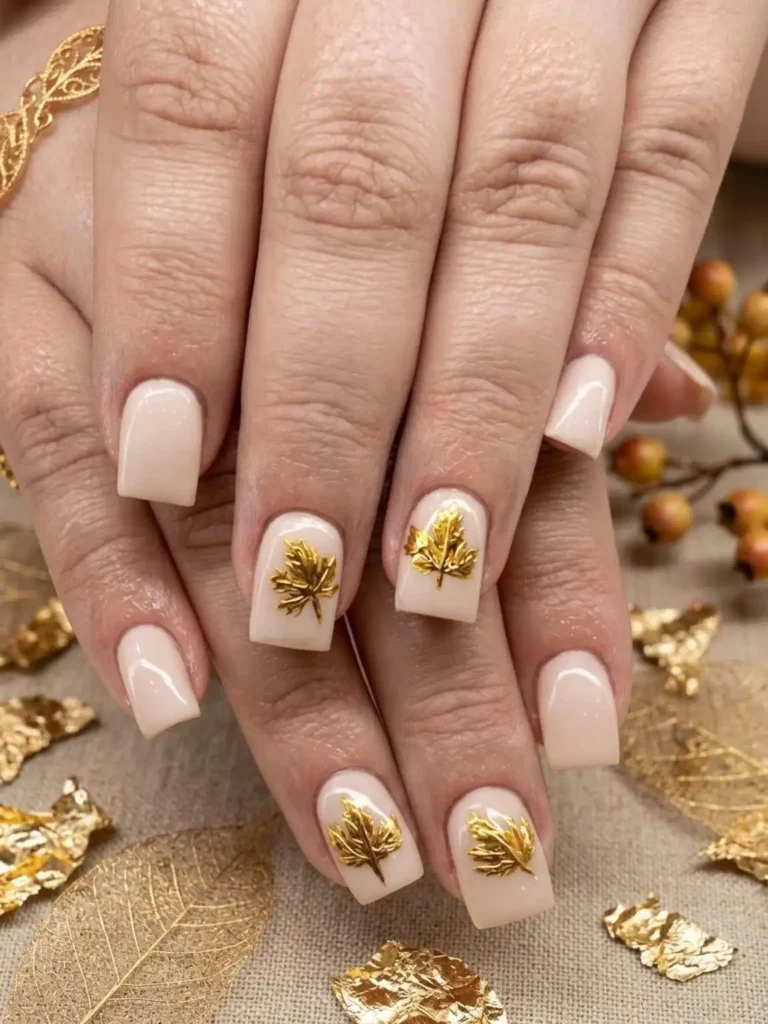
Foil adhesive comes after the cream, because the second coat must set completely first. Press the foil down gently with a silicone tool so each leaf stays whole. Corners lift first, so a pair of light top coat passes over the edges helps. Wait until the adhesive turns tacky before touching foil. Skipping that wait leaves the foil patchy and uneven. Leftover foil keeps best flat and dry, away from remover fumes.
9. Nude Neon Maple Leaf
Pearly shimmer glints across the nude-pink base, quiet enough to let large maple leaves take over two nails. Yellow and orange fill each leaf, with a brown outline and a bold brown stem. Bright color stands out sharply from the soft base, and shimmer space around the shape keeps it from overwhelming the set. Brown ties the leaf together.
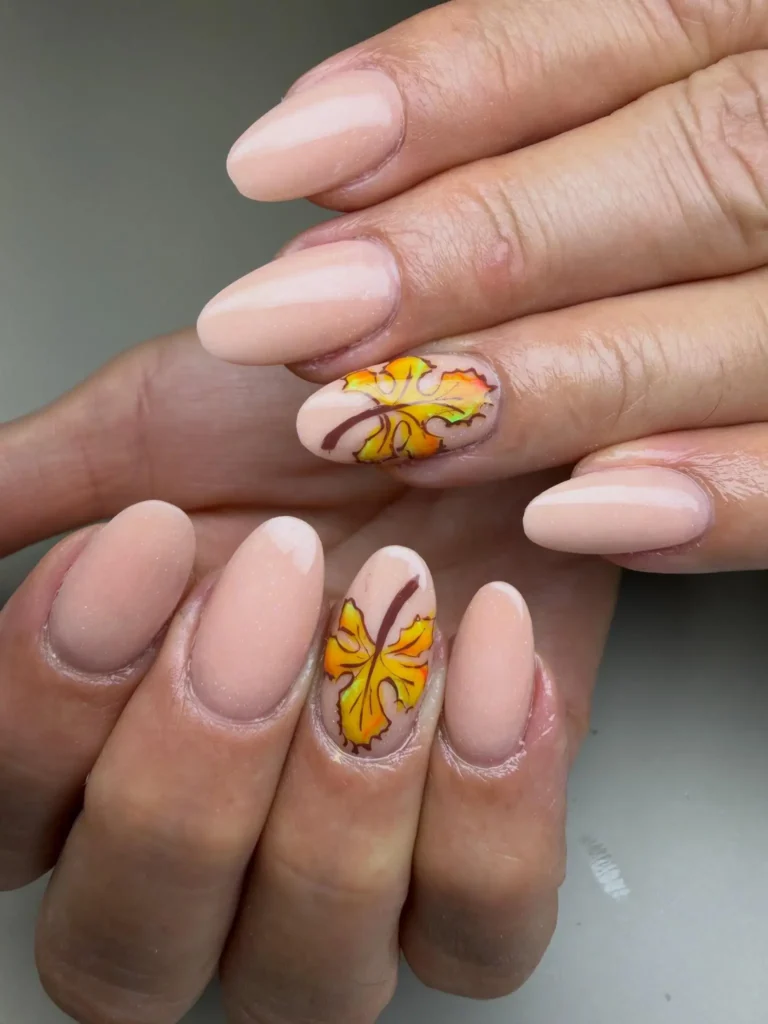
Start with the brown liner outline, then fill the lobes with yellow and nudge orange in along the borders before anything dries. Reach for a flat brush on the fill and a fine brush on the stem, wiping it often so veins stay sharp. Mixing orange in too early turns the leaf muddy. Let the leaf set fully before sealing the tip so the edges do not smear. Tan or cream clothing suits the warm palette.
10. Apricot Ombre Leaf Cluster
One tip holds a crowd of tiny maple leaves in red, orange, and gold, layered so they overlap. Below them, the color fades from pale pink at the base to apricot at the tips. High shine deepens the fade, and the cluster seems to glow along the nail edge. Pink space above it keeps the design airy.
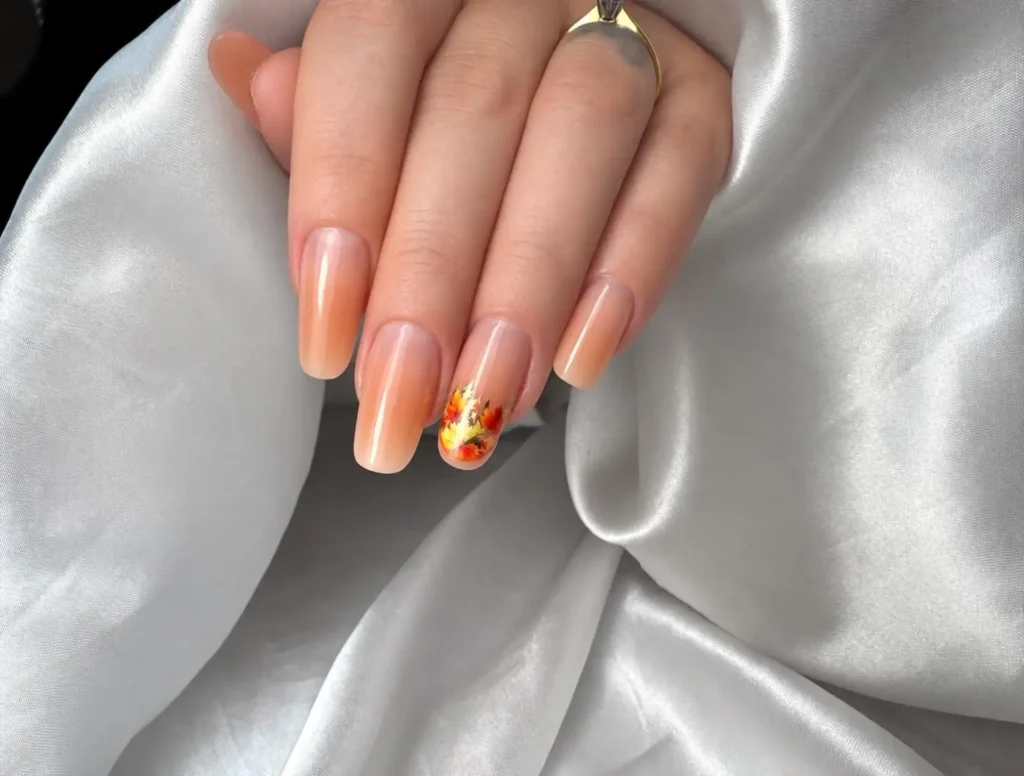
Layer thin dabs of peach over the pink with a makeup sponge until the fade looks seamless. Wipe the sponge clean after every layer. Leaves go on at the tip only, starting with red, followed by orange and gold, with a drying pause between shades. Staying inside the tip zone protects the bare pink above. Finish with glossy top coat, and keep hands out of hot water on the first evening. Fresh polish tends to dull when soaked early.
11. Blush Tiny Pumpkin Dots
Plain curved ribs and flat color keep two tiny orange pumpkins simple, each topped with a green stem. Small orange and white dots scatter around them for rhythm, leaving the rest of the nail open. Blush pink polish covers every nail in a milky gloss, so the pumpkins sit on bare pink. Nothing else competes with them.
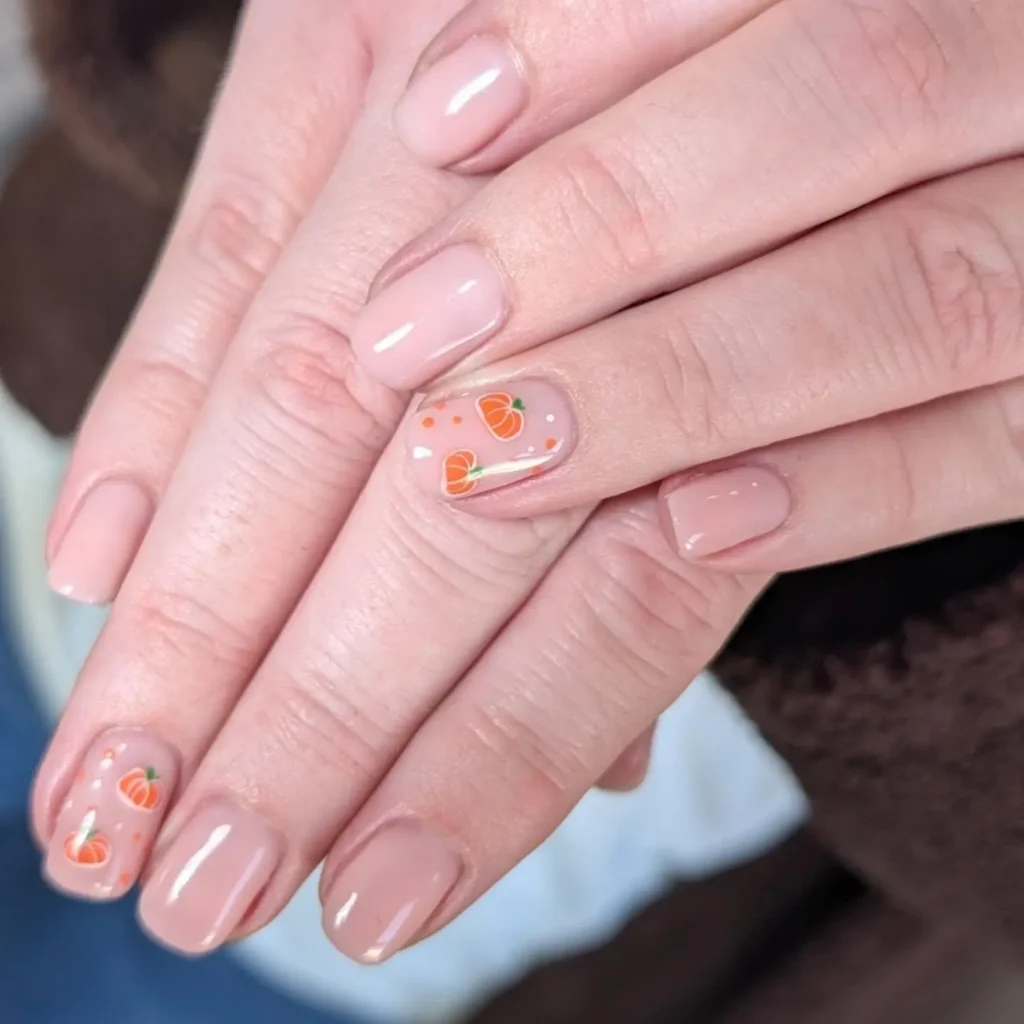
Each pumpkin starts as a short row of three orange dots, joined with a liner brush. One green liner stroke adds the stem. Wait until the pumpkins firm up before adding specks, or the rounded ribs smudge. Slightly uneven speck sizes look natural. Round tool tips tend to make the neatest dots, so wipe off buildup between pumpkins. Seal with top coat, and keep a dotting tool nearby for quick fixes.
12. Slate Pumpkin Tip Halves
Cool slate blue sets off warm burnt orange here. Each blue nail ends in a half pumpkin at the tip, filled with orange and marked by black ribs, a black stem, and a black curl. Both colors lie flat and glossy in solid blocks, and the bare blue above each half pumpkin keeps the look graphic and clean.
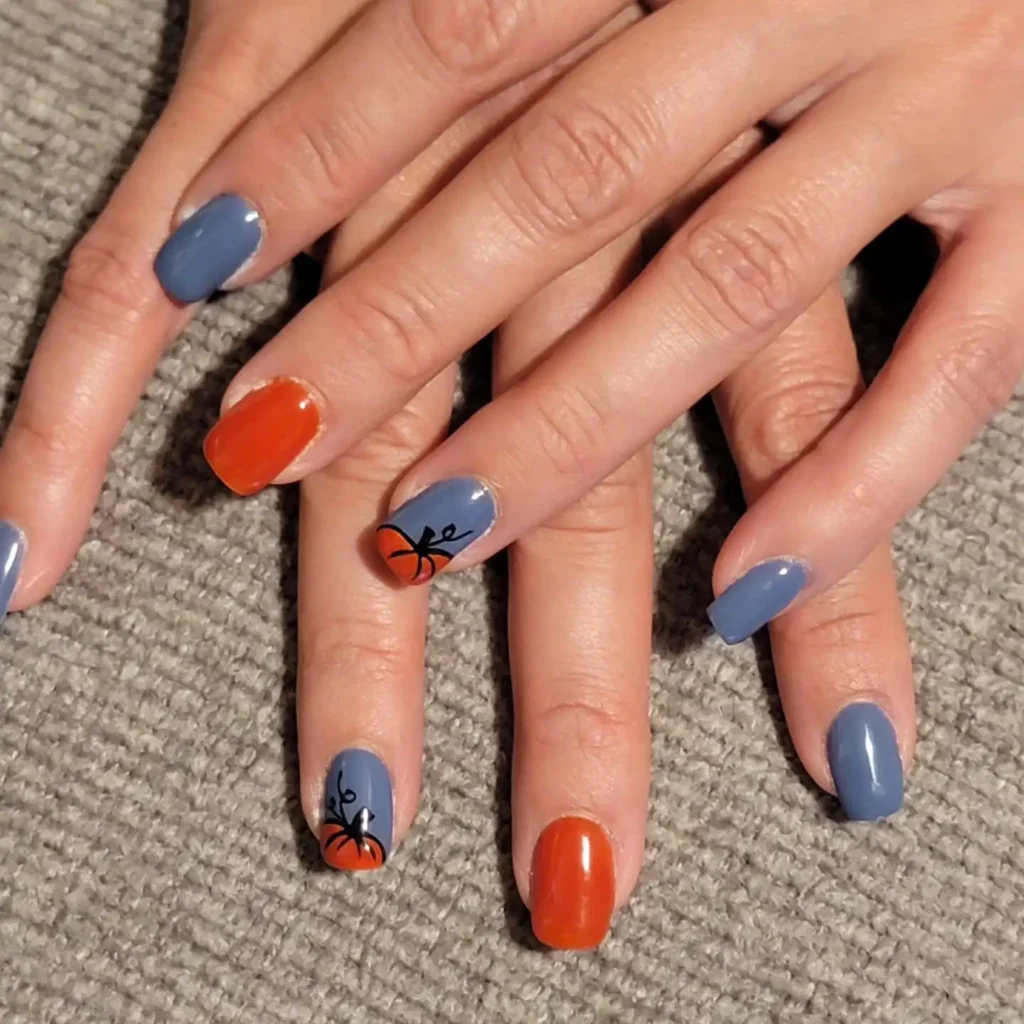
Freehand tip lines can wobble, so lay tape across the tip zone and paint the orange against it. Peel the tape while the polish is still slightly wet to leave a sharp line. Black ribs run from the stem toward the tip edge in curved liner strokes, and the stem curl comes last. Orange needs to set before black goes on, or the lines blur. Denim keeps the cool contrast going. Seal everything with top coat afterward.
13. Espresso Turkey Face Solids
Dinner-table humor drives this set: turkey faces with googly white eyes, a yellow beak, and a red wattle. Chocolate brown, glossy and deep, covers every nail, and the faces sit directly on top. Yellow and red stand out against the dark base, while the eyes bring the humor. Plain brown surrounds every face, so nothing distracts from it.
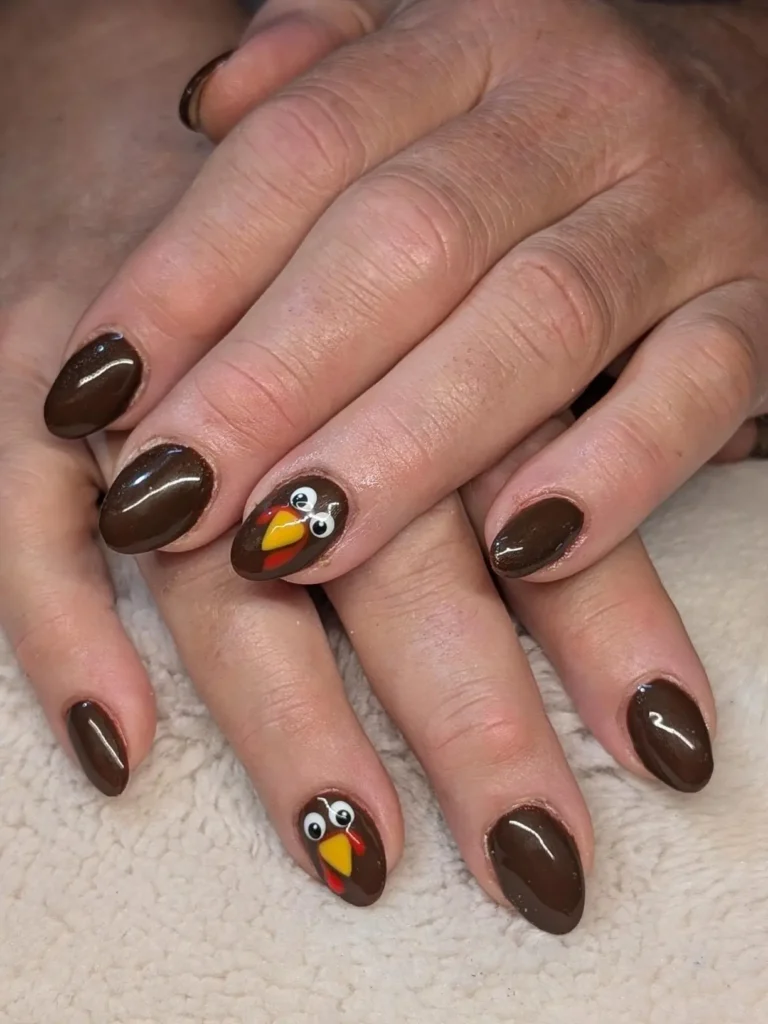
Start with two thin brown coats, and give the first one time to dry for full coverage. A large dotting tool makes the white eyes, a smaller one adds black pupils, and the beak and wattle follow. Let each color dry first, since damp paint spreads on dark polish. Hold up a mirror to check eye spacing before sealing. Leaving a thin gap at the cuticles makes growth less obvious. Finish with top coat.
14. Sunset Gradient Turkey Glitter
Just one nail carries detailed art: a glitter turkey with a purple-blue body that sparkles on the nude base. Orange fades into deep burgundy along the French tips, giving the set a sunset warmth. Open nude space keeps the gradient and the turkey from competing. Every other nail relies on the fade alone, which keeps attention on that one bird.
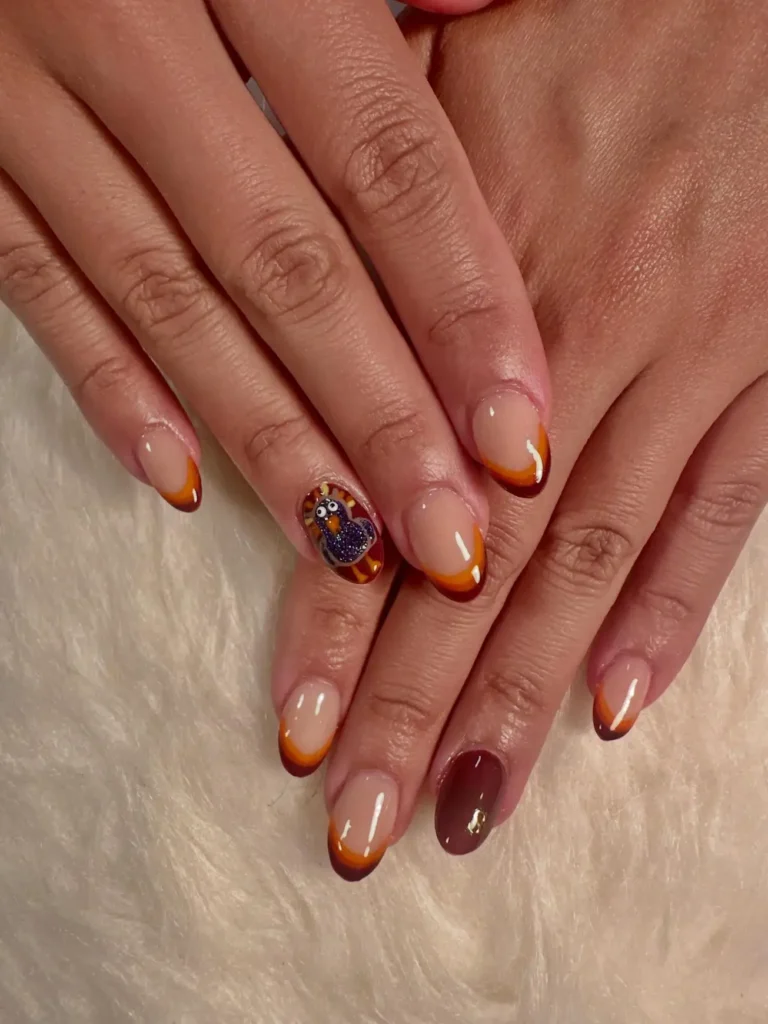
A sponge builds the fade: orange goes on first, with burgundy pressed along the very tip edge. Paint the turkey body in glitter polish, and add eyes and beak with a dotting tool once the glitter sets. A liner brush can sharpen the tip curve before sealing. Gloves during cleanup protect the gradient, and a fresh top coat layer midweek helps it last. Keep top coat from pooling at the tip edges.
15. Clear Foil Leaf Shimmer
Scattered red and gold maple-leaf decals add warmth to see-through nails, with bare clear space keeping the look light. One nail breaks the pattern with silver glitter plaid, a cooler line design beside the warm leaves. Decals lie flat and crisp, and gold tones warm the transparent base without hiding the natural nail. Transparency makes the leaves seem to float on the nail.
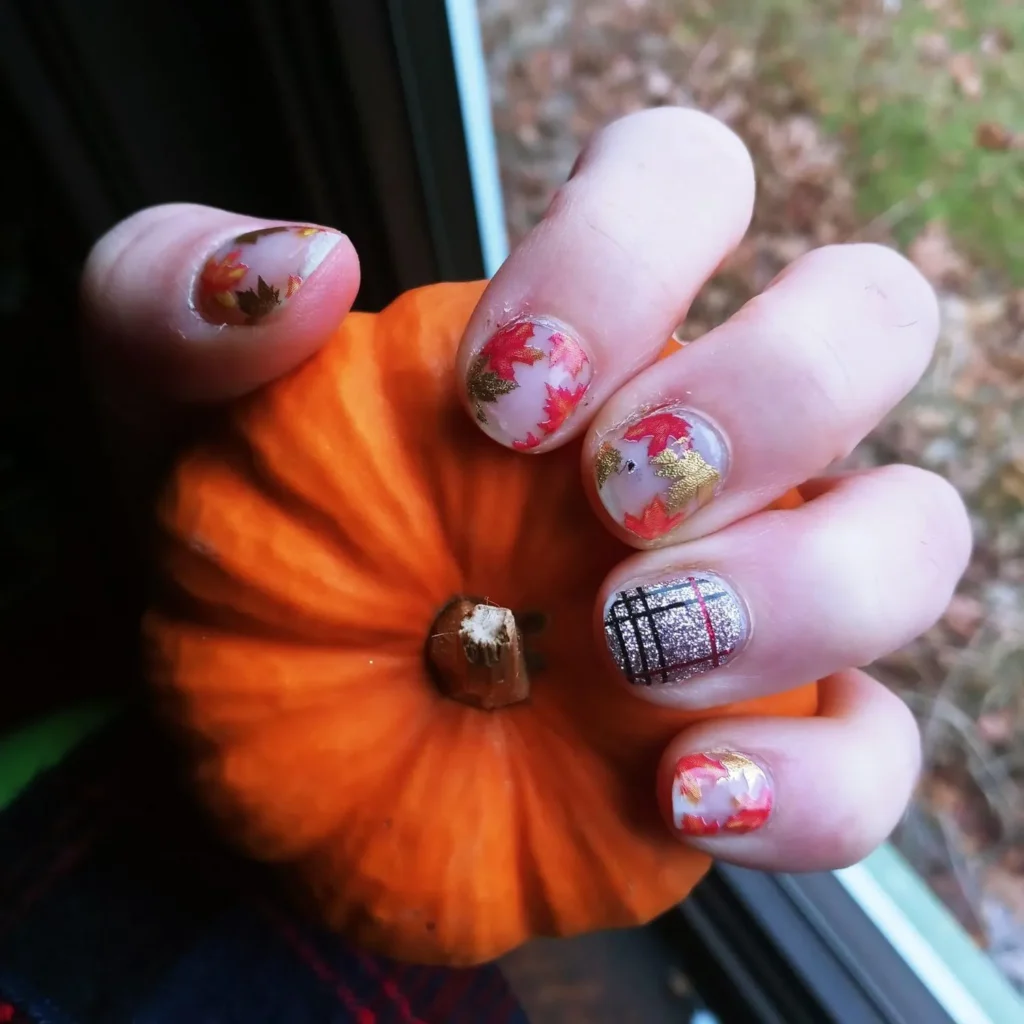
Dry clear polish gives decals a clean surface, so slide each off its backing with tweezers and smooth it from the middle to the edges. Sealing in two light passes stops edges lifting. Silver plaid comes from striping tape, with glitter lines laid over the clear polish. Give decals time to settle before long hand washing, and keep remover clear of the decal borders. Trimming any overhanging decal edge before sealing keeps the corners flat.
16. Burgundy Plaid Leaf Sprig
Against the deep plum, white nails stand out sharply: one holds a burgundy leaf sprig, the other a burgundy and black plaid grid. Glossy burgundy covers most of the remaining nails. Black lines in the plaid add structure, while the white background lets every burgundy mark show clearly. Dark and light nails balance each other.
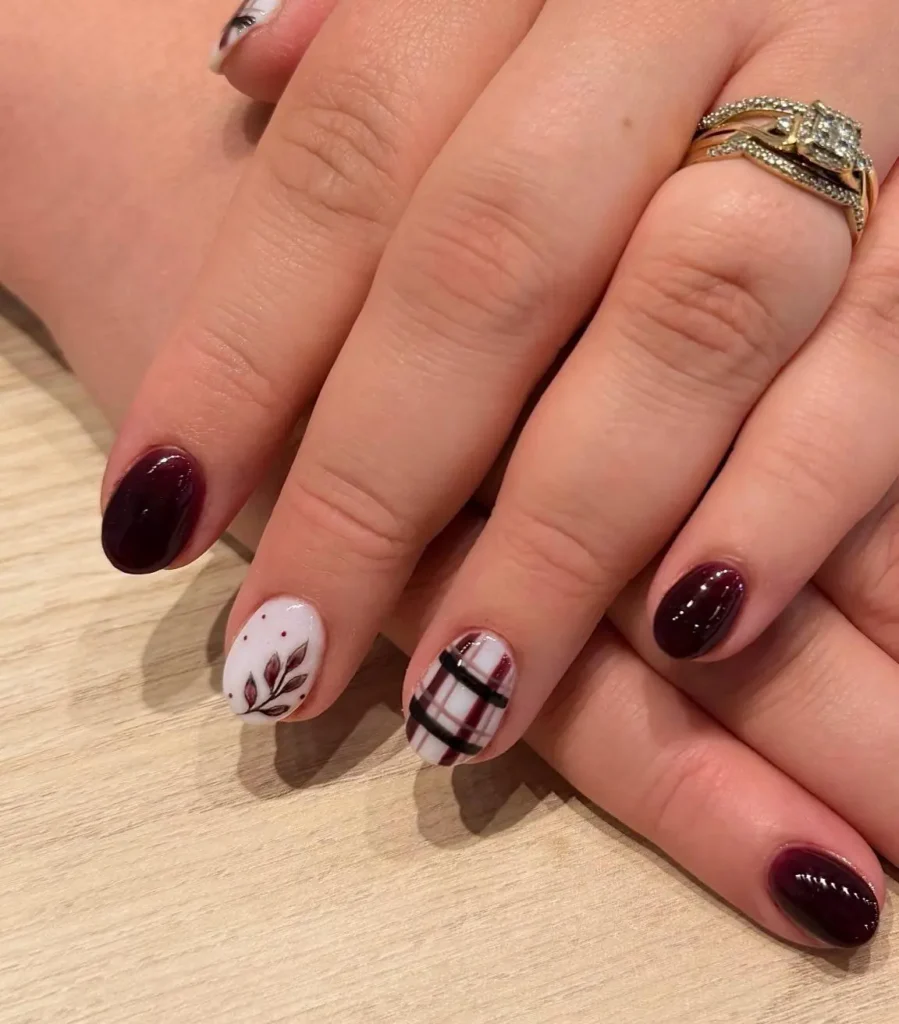
Draw the stem on the white nail with a liner brush, then add the burgundy leaves along it, and let them dry before starting the plaid. Striping tape marks out the grid, and the colors go on in sequence. Pull the tape up while the polish is tacky, and fix stray marks with a small brush dampened with remover. Cream knitwear echoes the white nails. Daylight is the best place to judge plaid spacing.
17. Metallic Maple Leaf Solids
Shifting reflections run across bronze copper and gold metallic nails, which cover most of the set. One white nail holds a single orange maple leaf, painted flat with a thin stem. Matte-looking orange contrasts with the shine around it. Open white space keeps metallic gleam from taking over, so the set stays rich but calm. Nothing else decorates the nails.
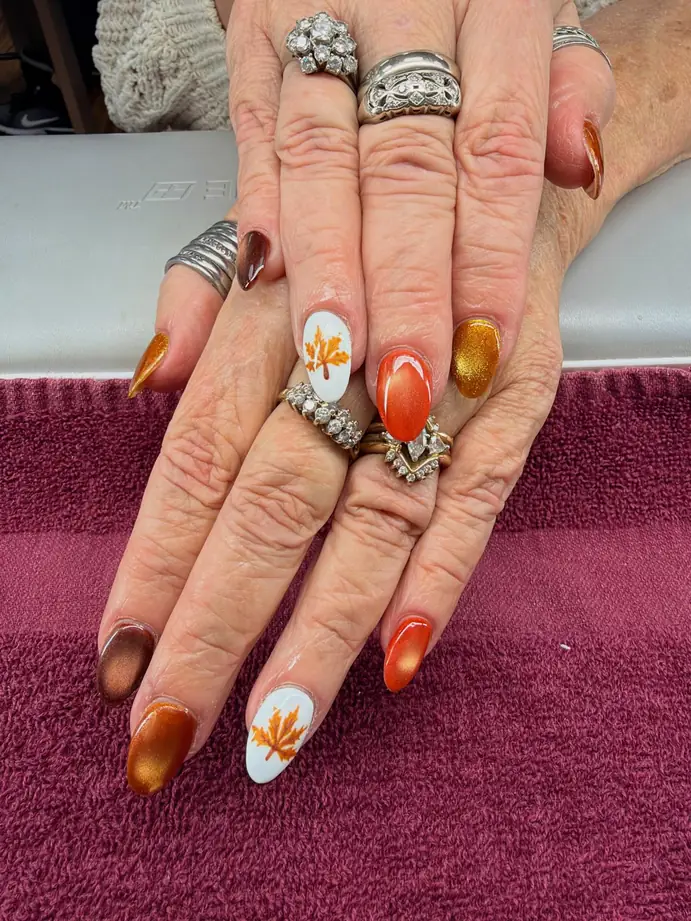
Ridges show through shine, so buff the nail lightly before metallic polish. Two thin coats stroked in one direction keep the shimmer lines even. On the white nail, paint the leaf’s stem first and the orange lobes after, using a liner brush. Glossy top coat matters here, since a matte one would dull the metallic finish. Wipe dust off skin before sealing. Dust left on skin tends to cling to wet top coat.
18. Orange Bow Turkey Glitter
Small black bows sit on striped orange and brown nails, giving the set a gift-like touch. Brown turkey faces nearby wear googly eyes and yellow beaks. Gold glitter adds warmth across the burnt orange polish, and orange ties every element together. Nude stripes leave rest areas between the busier accents. Glitter, bows, and faces each get their own spot.
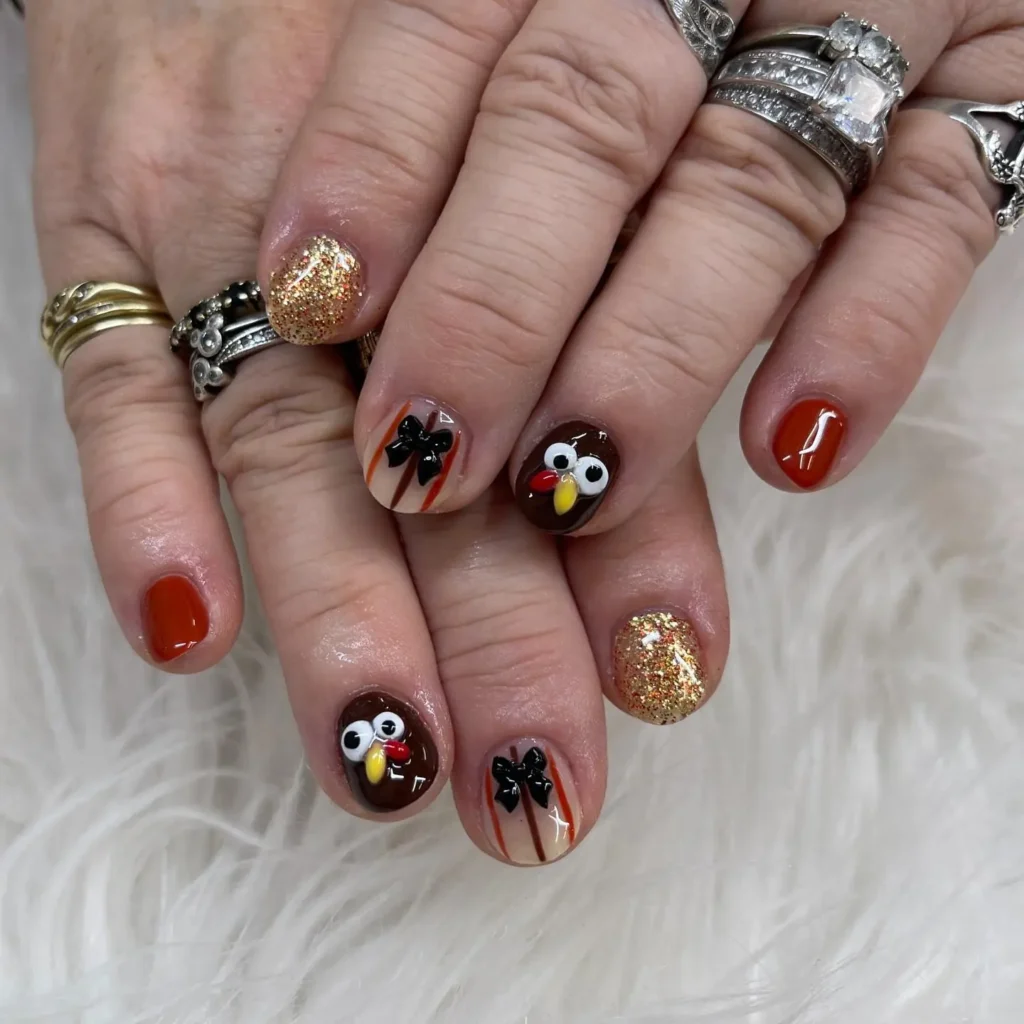
Press gold glitter into wet polish near the base so it lies smooth beneath the top coat. Stripes come next with a liner brush, then bows built from two loops using a small brush. Dry the bows before painting any faces nearby. Dot eyes first, then beak and wattle, pausing between colors. Skipping the dry time lets bow loops bleed into the faces. Finish the whole nail with top coat, and keep the glitter bottle standing upright between uses.
19. Cocoa Pumpkin Turkey Icons
Bold-outlined pumpkin and turkey icons sit on bare pink and white nails, flat and cartoon-like in orange, brown, yellow, and red. Rich chocolate brown fills most of the other nails in a smooth gloss. Brown frames the bright colors quietly, so the icons stay the focus. Plain color blocks keep each icon readable. Pale nails give the brights room.
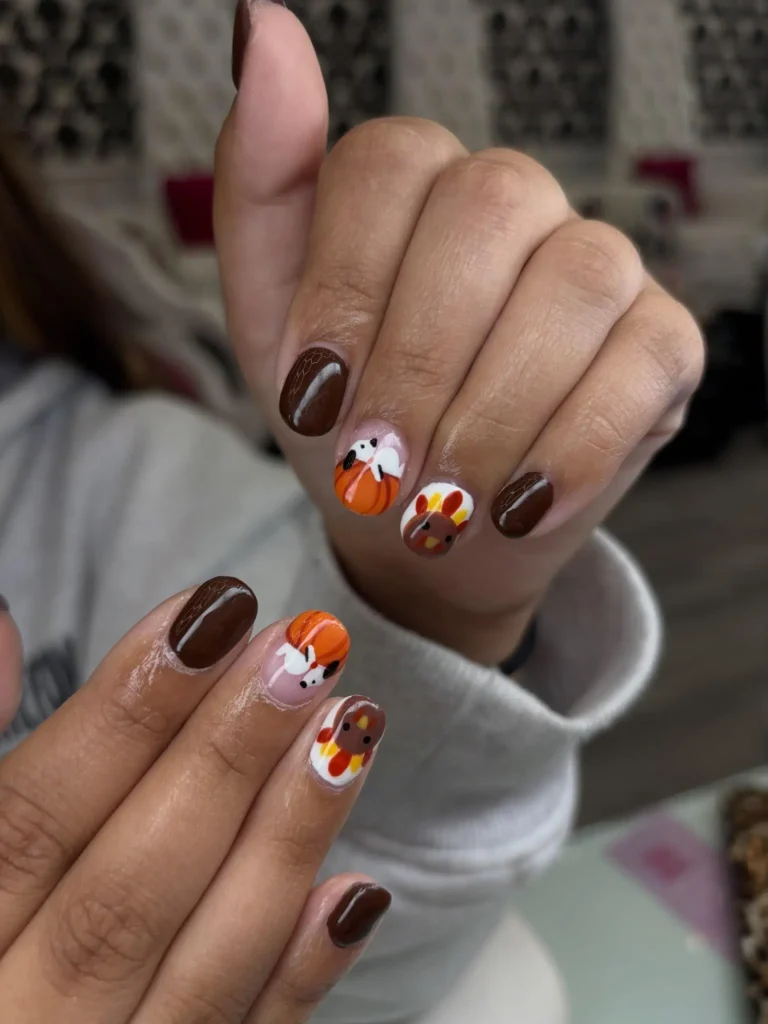
Brown solids go on first, and the icons follow on the pale nails to keep the oranges and yellows vivid. Stickers can replace hand painting for pumpkins and turkeys, smoothed down firmly before the top coat. Bold outlines drawn with a liner brush after the stickers settle sharpen the cartoon edges. Seal stickers under two top coat layers, and keep hands dry until the finish has fully cured. Leftover sticker sheets stay usable on the other hand if kept flat.
20. Wine Leaf Sprig Solids
Tone-on-tone color makes the tiny leaf sprig feel refined: burgundy lines on a sheer nude nail, with a thin stem and small pointed leaves. Claret burgundy fills most other nails with deep gloss. Only the sprig is drawn, so one nail holds all the detail. Solid nails supply everything else, and the sprig stays modest against the nude.
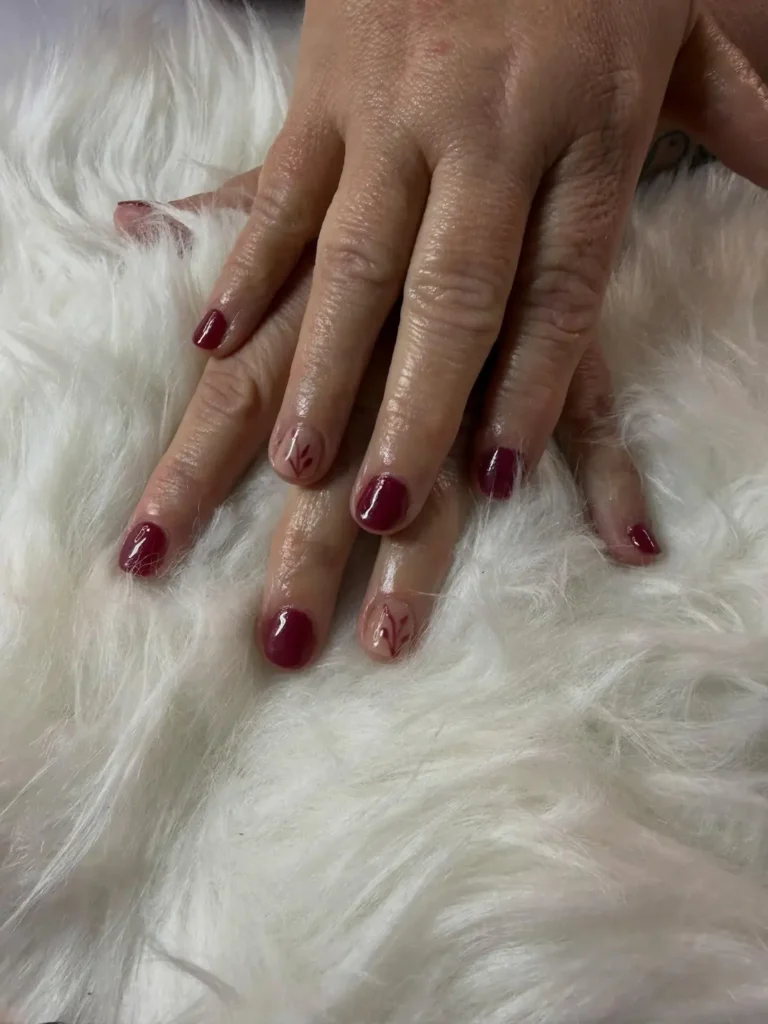
Degrease the nude nail with a quick wipe first, since oils blur fine lines. One steady liner stroke makes the stem, with leaves added in pairs down its length. Aim for a petite, centered sprig, because size is what keeps this quiet. Let the liner dry fully, since wet lines smear under top coat. Shaky stems can be wiped and redone before the polish sets. Inspect the leaf at full size before publishing, since it reads small in the image.
21. Chocolate Checkerboard Pairing
Sharp-cornered squares in brown and white form the checkerboard nails, with no color creeping past the lines. Solid espresso brown and solid white nails sit beside them. Brown grounds the dark side of the set, and white squares lighten it. Plain nails give the busy pattern room to breathe. Graphic pattern and quiet solids split the work evenly.
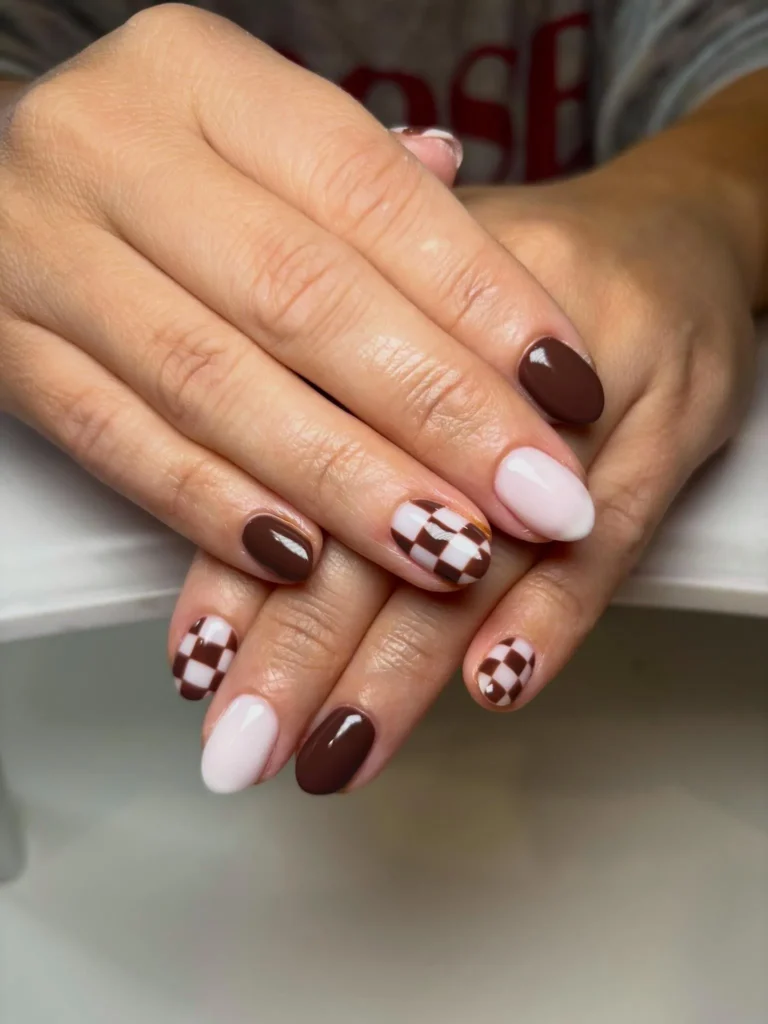
Lay horizontal tape strips down, then run vertical ones across them to mark the grid. Paint the brown squares and pull the tape while polish is tacky, tidying the corners using a flat brush. Let squares dry completely before the second color pass, or the edges blur. Black and cream clothing echoes the palette. Wipe lint off the tape as you go, because dust under the strips weakens clean lines. Seal with top coat last.
22. Ruby Foil Turkey Tips
Pale tips hold small turkey faces detailed in red, yellow, and black, while clear nails carry copper and gold foil leaves. Dark garnet burgundy anchors the rest of the set in a glossy solid. Foil catches light against the clear nails, and the faces at the tips add the playful note. Light and dark nails share the spotlight.
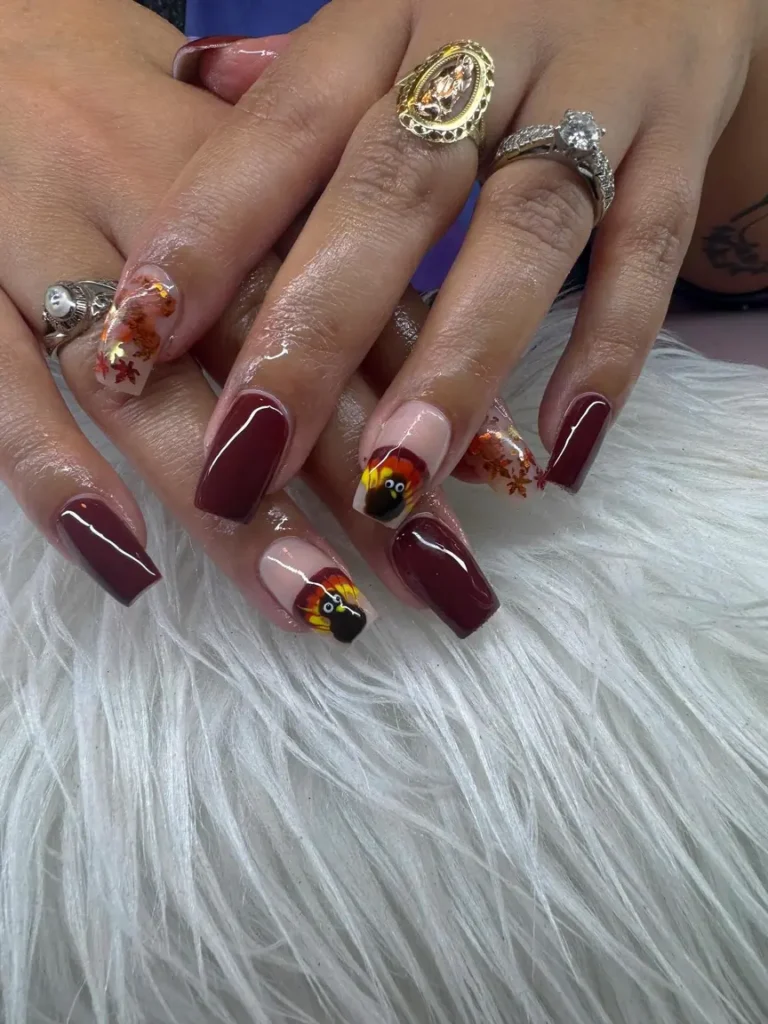
Foil adhesive holds each leaf, so press gently to preserve the crinkled texture. Turkey tips are painted with a liner brush, feather colors first and face details after the color sets. Two light layers of top coat protect foil and turkey art, especially at the free edges. Water can lift foil before the top coat sets, so avoid it, then refresh the top coat midweek. Compare face placement across nails before the final layer.
23. Garnet Plaid Grid Solids
Lines of different thickness cross on the nude nails, forming a plaid in black and burgundy. Dark burgundy covers most other nails in a rich gloss, keeping the set grounded. Empty nude squares between the lines keep the grid from feeling dense. Pattern and solids balance each other, reading like cozy fabric. Wide bands and thin lines vary the rhythm.
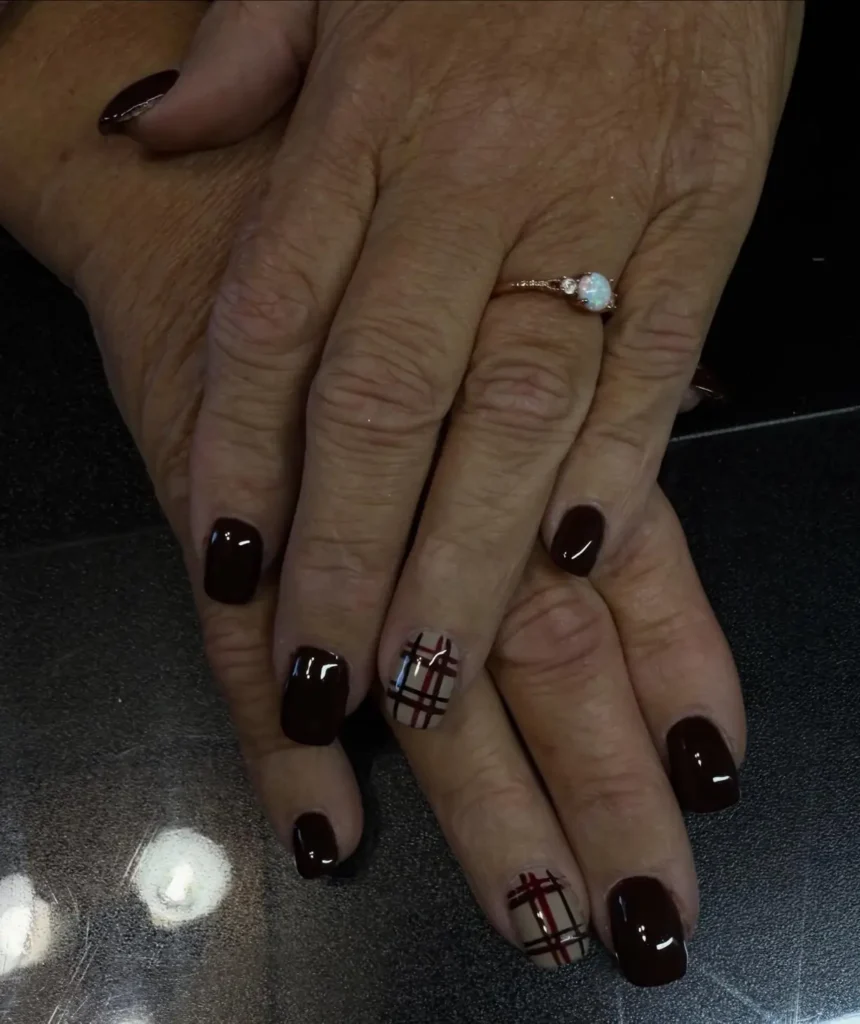
Plan the grid with striping tape, alternating thick burgundy stripes and slim black ones at even gaps. Burgundy goes down first and needs time to set before the black lines. Lift the tape between colors so crossings stay clean. Clean strays with a pointed cotton swab and a little remover. Rub the tape edges down well so lines stay straight, since loose tape lets polish seep under it. Seal with glossy top coat. A scarf in matching burgundy echoes the set.
24. Sand Maple Leaf Solids
Orange and red blend into a tiny maple leaf with a thin stem on one bare tan nail. Honey tan fills most other nails with warm gloss. Soft tan tones calm the bright leaf, and open space around it keeps the leaf subtle. In the photo, the hands sit far back, so the leaf reads very small.
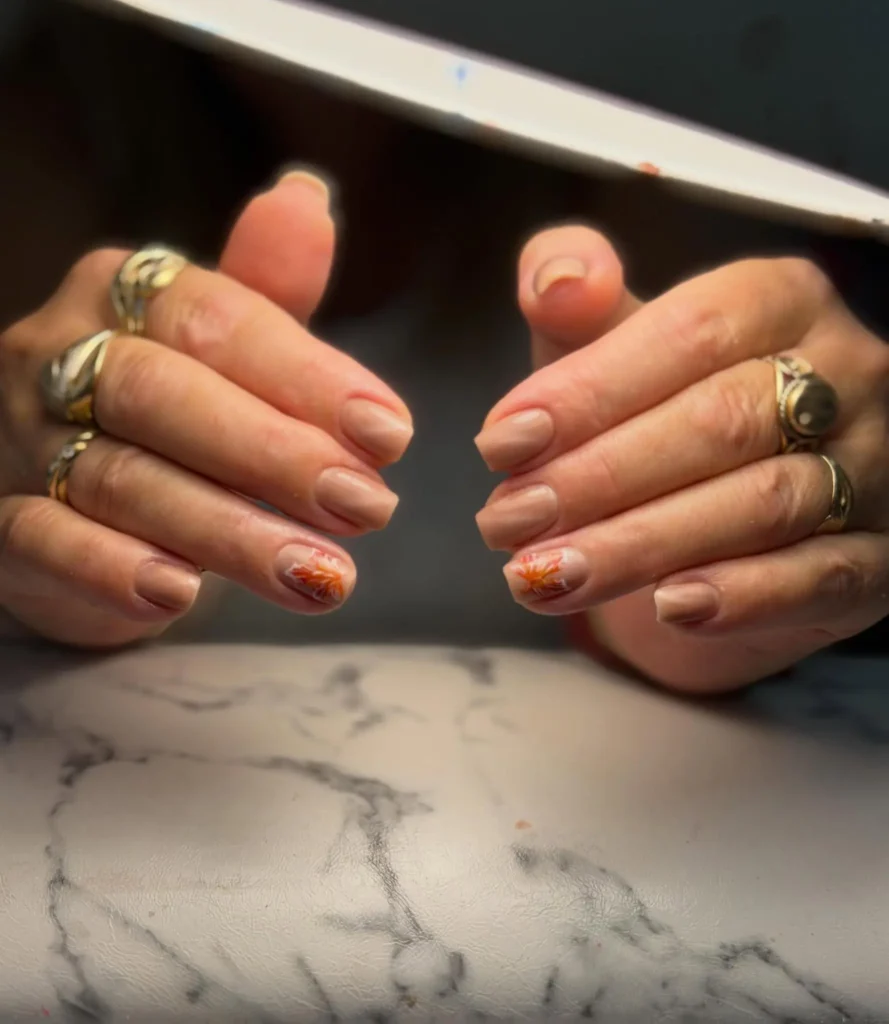
Zoom in on the image before relying on this design, since the leaf is easy to miss. Two coats of tan go on first, then a maple-leaf stamp gives the leaf a consistent size. One firm press and a straight lift keep the print from smearing, and wiping the stamp clean afterward helps the next print. Top coat goes on last. Some nails look bare in the image, so this idea is worth a review before publishing.
25. Rose Shimmer Leaf Decal
Pearly shimmer scatters light over rosy pink nails and softens the edges of one small leaf decal in orange and gold. Glare partly covers the decal in the image, so the leaf reads as a hint rather than a statement. Pink keeps the mood gentle, and open space around the single leaf keeps the set airy. Nothing else competes with it.
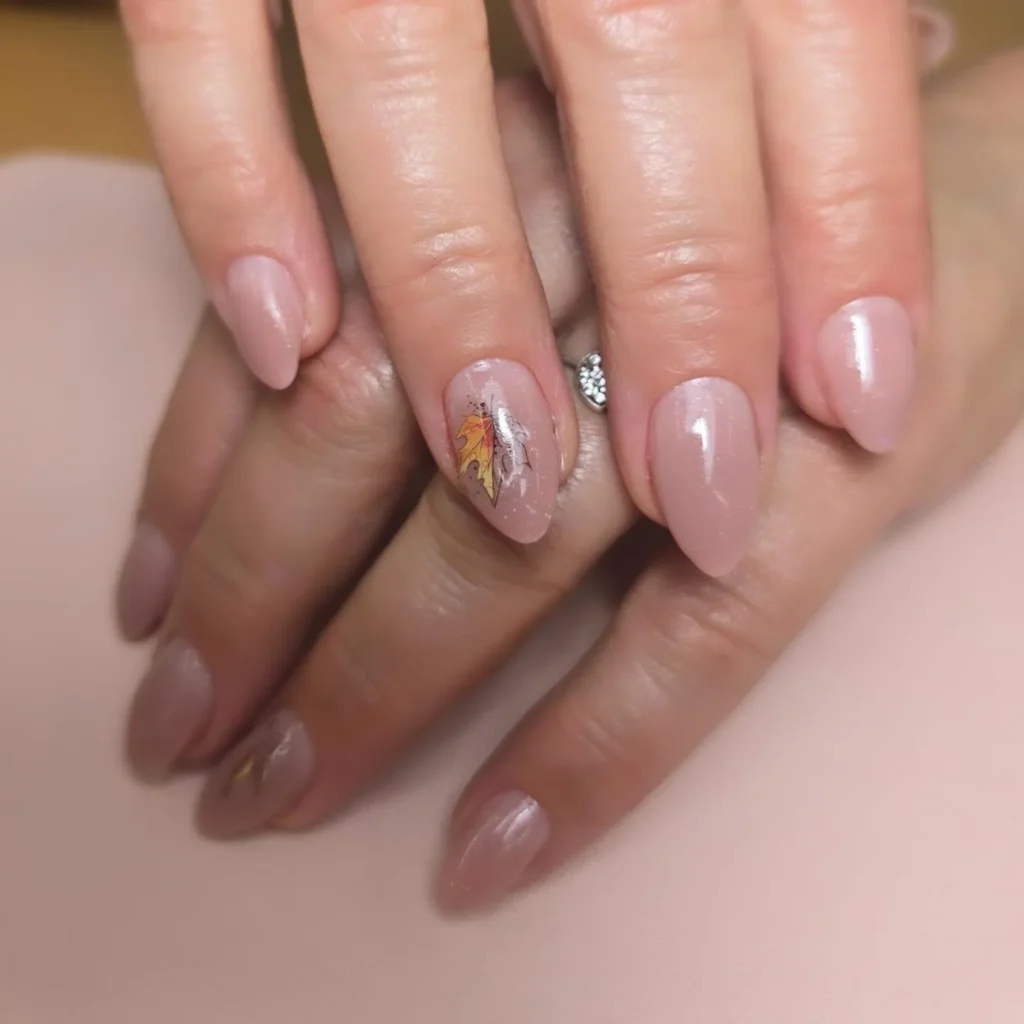
Start from a fully dry shimmer base, then lift the decal from its sheet with tweezers and smooth out air. Two light coats of top coat protect the decal better than one heavy coat, which can lift the edges. Glare is the real obstacle here, so use softer light when photographing the leaf. Review the image at full size before publishing. Heat weakens decal adhesive, so keep sheets in a cool spot.
Conclusion
Simple fall manicures succeed because of planning, not extra polish. Choose the base first, then decide whether thanksgiving nail art simple enough for your skill level means a dotted turkey, a stamped leaf, or a decal. Keep colors to three or fewer, leave open space around the motif, and seal the free edge so tips stay glossy through the week. Refresh top coat midweek if foil, glitter, or metallic polish starts to dull. Start with the easiest design on the list, and add detail only when the first nail looks clean.
