

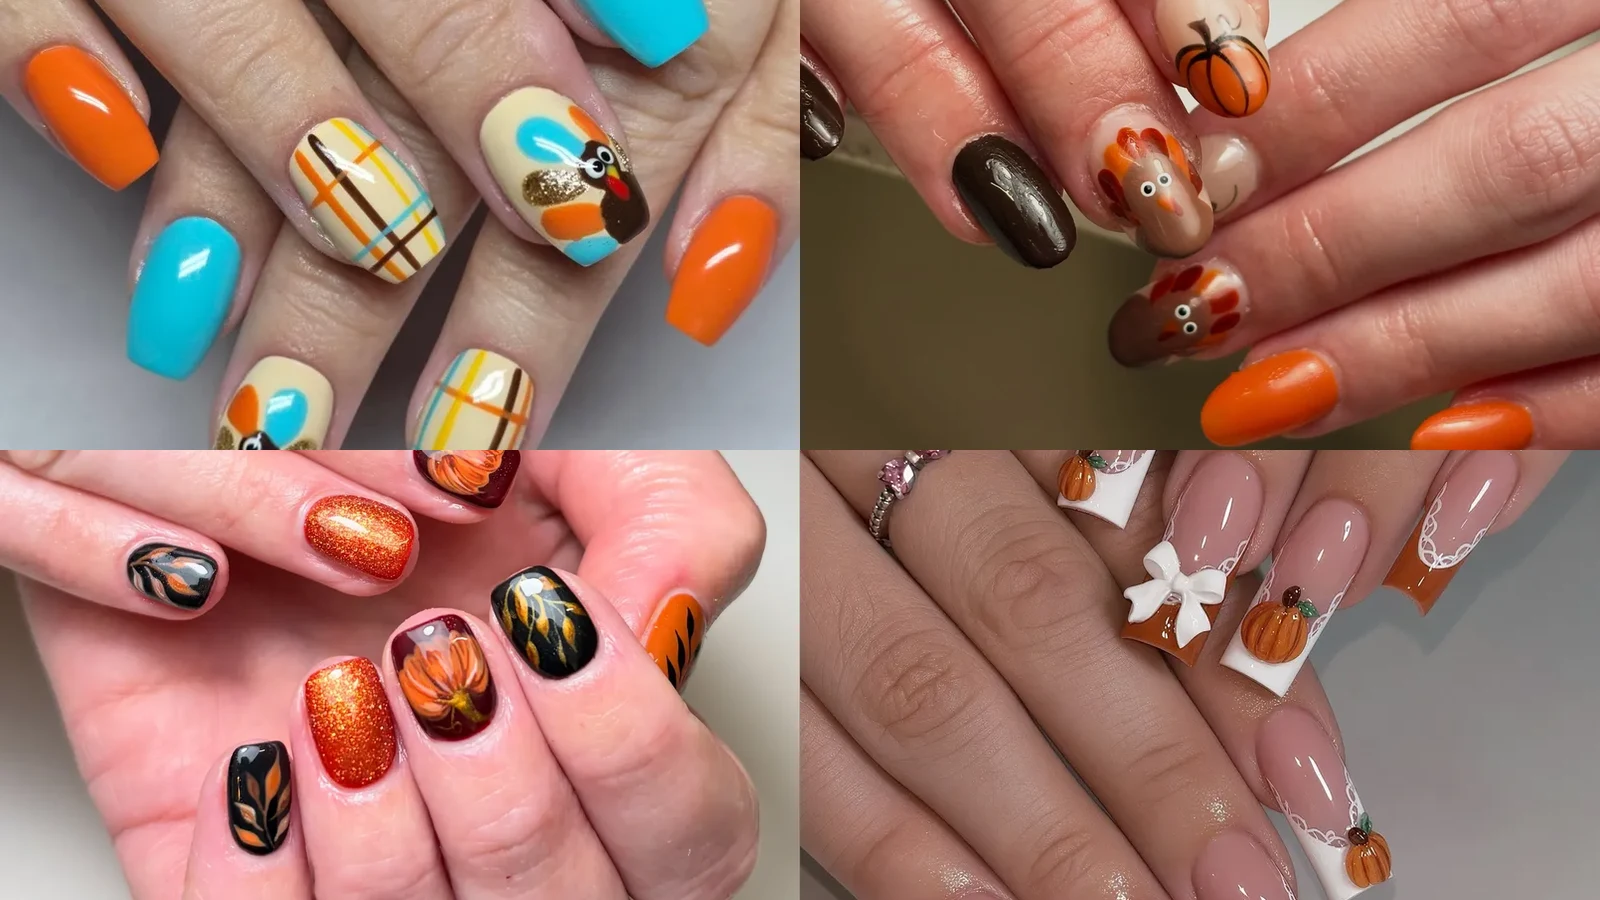
Warm autumn shades, playful turkey details, and delicate metallic accents bring seasonal character to a Thanksgiving manicure. Thanksgiving nail art ranges from simple pumpkin illustrations and classic plaid patterns to intricate pie designs, raised charms, and sparkling leaf decorations. Burgundy, burnt orange, copper, caramel, and creamy nude create a rich harvest palette that works across different nail lengths and shapes. Whether you prefer understated French tips or detailed festive artwork, fall-inspired nail designs offer plenty of ways to personalize your manicure. Consider your preferred finish, painting skills, and available nail tools when selecting a design for the holiday.
1. Turquoise Turkey Plaid Mix
Cool turquoise and warm orange sit side by side here, and the clash is the point. Cream plaid lines cross the turquoise, while gold glitter makes up the feather edges. Over on the cream base, a cartoon turkey wears brown plumage, googly eyes, and a yellow beak with a red wattle. Crisp black lines sharpen the beak, feathers, and plaid edges.
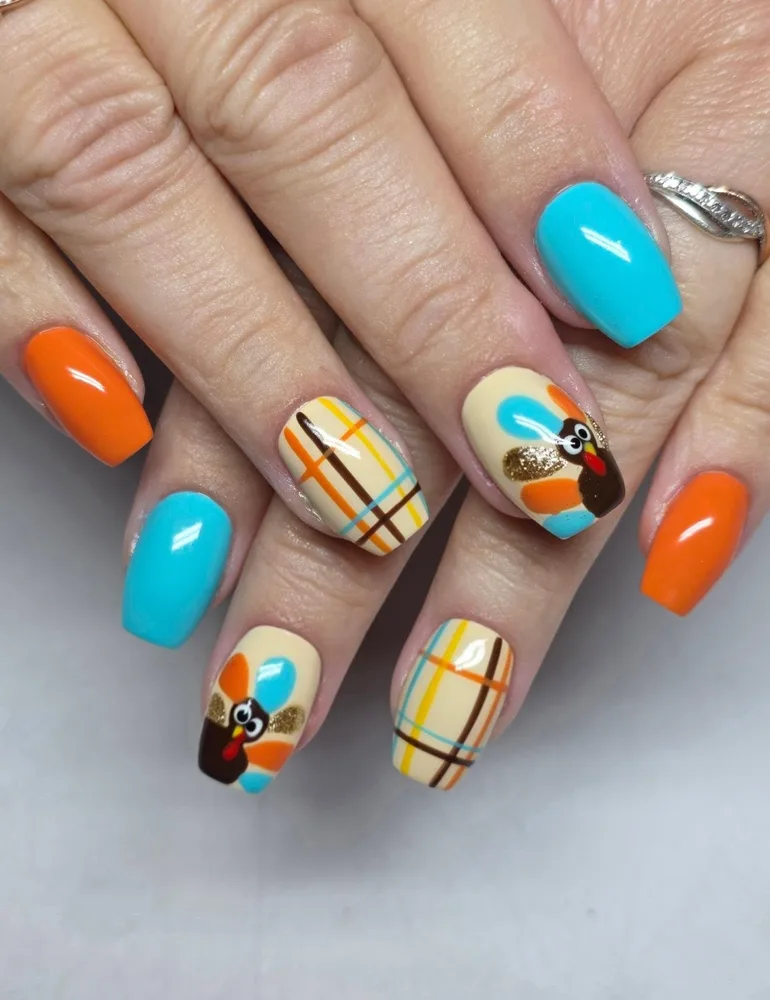
Thin coats matter most on turquoise and orange creams, since thick layers stay soft and smear under the liner brush. Let the base dry before crossing plaid lines over it, using a thin liner brush. Dot glitter along the feathers, then add eyes with a dotting tool while the lines are still tacky. Cap the free edge with glossy top coat to slow chipping. Plaid tends to look busiest on every nail, so keep solids on a few.
2. Brown Pumpkin Turkey Pairing
Plain solids rest beside the art nails, so the harvest scenes never crowd the hand. On the cream areas, a cartoon turkey carries orange and red feathers, a brown body, and a tiny yellow beak. Orange pumpkins with black outlines sit nearby, set apart from the solids. Chestnut and bright orange polish fill the remaining nails, and glossy top coat keeps the outlines sharp.
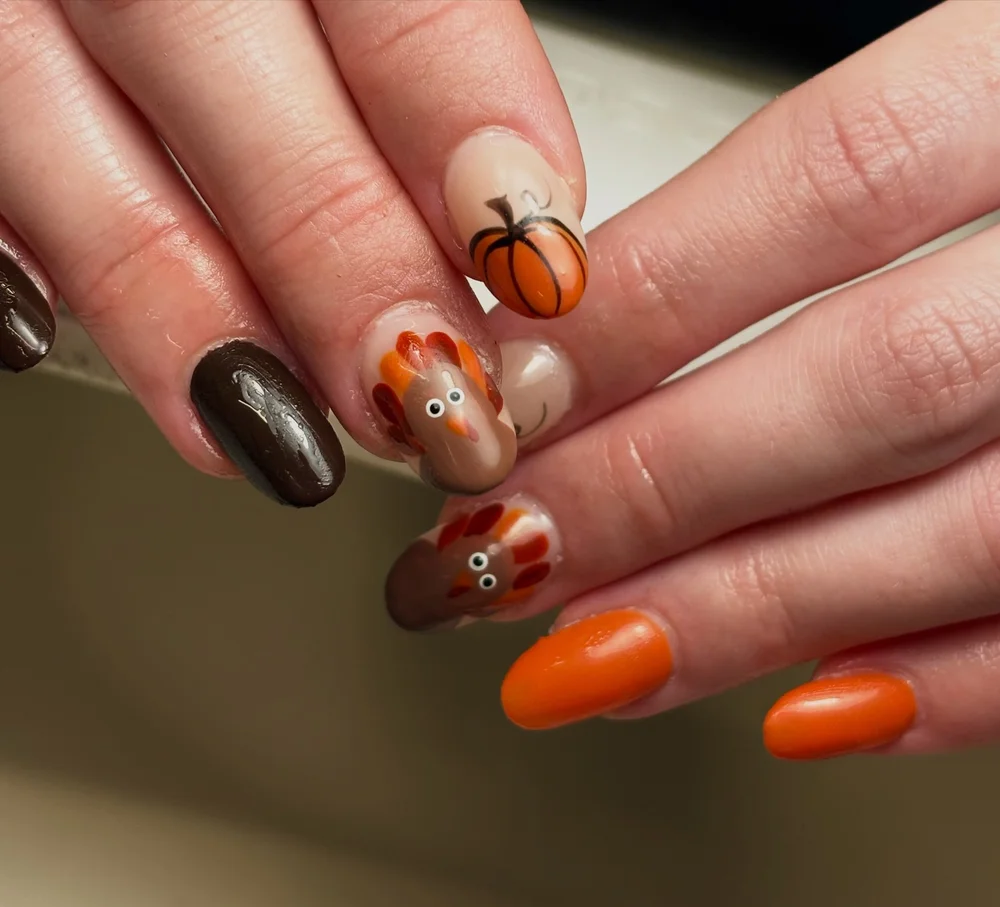
Black lines go on first, then orange, red, and copper fill the feather shapes. Give the outlines time to set before gloss goes on, or the colors can smear. Choosing nude cream for the art nails and plain brown or orange for the rest keeps the plan simple. Kitchen steam and oil dull gloss faster, so gloves help during cooking prep. For removal, hold acetone-soaked cotton in place until the polish loosens.
3. Dinner Plate Sculpted Feast
Raised food shapes rise off a coppery shimmer base, each one catching glossy highlights along its edges. Butter-yellow pats, a cranberry lattice pie, and a roast turkey on a white plate make up the table. Mashed potato, pie slices, and green dishes fill out the courses. Gold flecks give the food depth while keeping every outline clear.
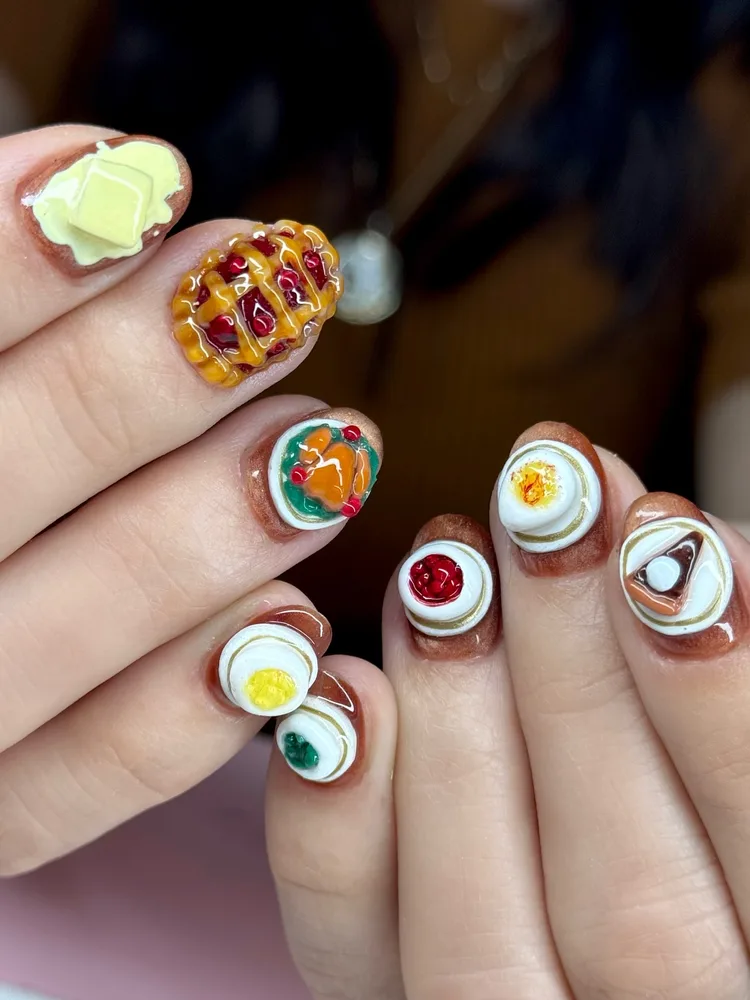
Cure the copper-brown gel base fully before building anything on top. Sculpt each dish in thin layers of builder gel, shaping it with a silicone tool and curing between layers before adding cranberry or butter details. Low placement near the center of the nail keeps pieces from snagging on fabric and hair. Seal with a flexible gel top coat, cure again, and run a finger over the edges for rough spots. Soak-off works best with acetone wraps and an orangewood stick.
4. Copper Glitter Pumpkin Vines
Light breaks across chunky glitter particles, giving each pumpkin a raised, sparkling surface in copper and champagne. Pale pink sits around the pumpkins, which lets the black vine lines stand out. Copper-brown glitter solids add depth on neighboring nails. Fine black lines trace the ribs and vines, so every shape still reads from arm’s length.
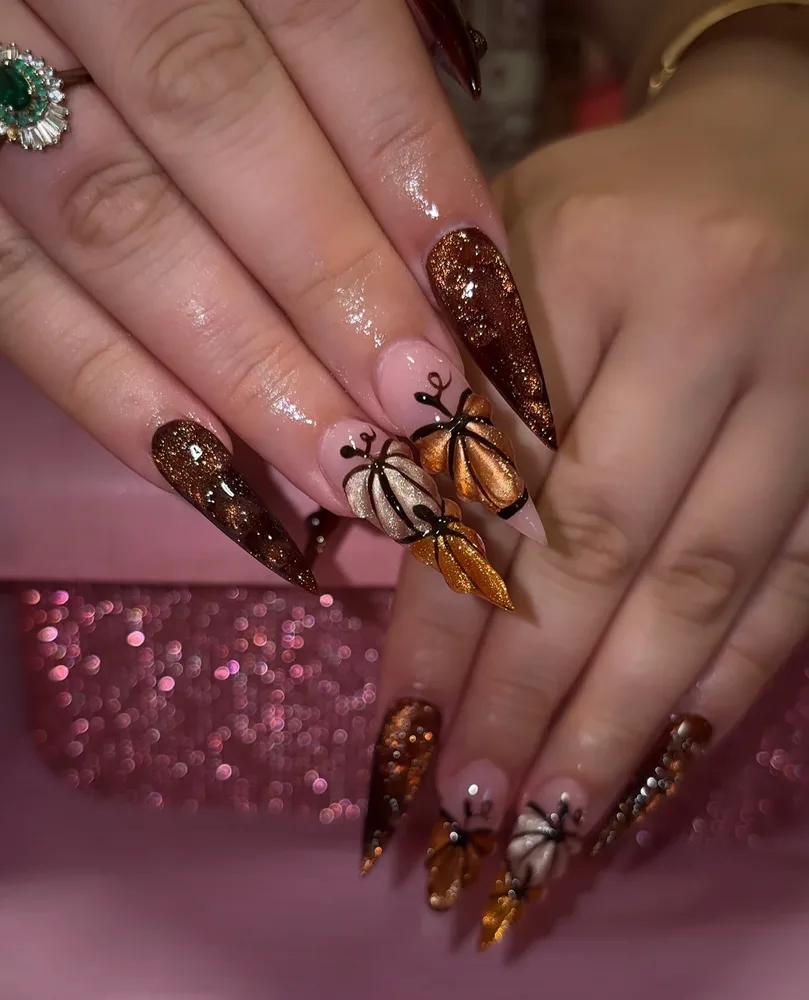
Dabbing glitter on with a makeup sponge tends to pack particles more densely than brushing, so press gently and build two layers. Keep the second pass on the pumpkin bodies only, leaving vines clear so the contrast holds. Black gel outlines need a brief set for crisp edges. Two glossy top coats smooth the texture, which helps keep hands from snagging on sweaters. Rust knitwear and gold jewelry echo the copper tones.
5. Cranberry Pie Roast Charms
Dotted orange polish adds a quiet pattern next to the charms. Cranberries in deep red, lattice strips in tan, and a pearl-topped pie slice sit on glossy orange shimmer. Red and white gingham and a red bow bring pattern to the rest of the set. Glossy highlights across the raised surfaces make each charm look wet and finished.
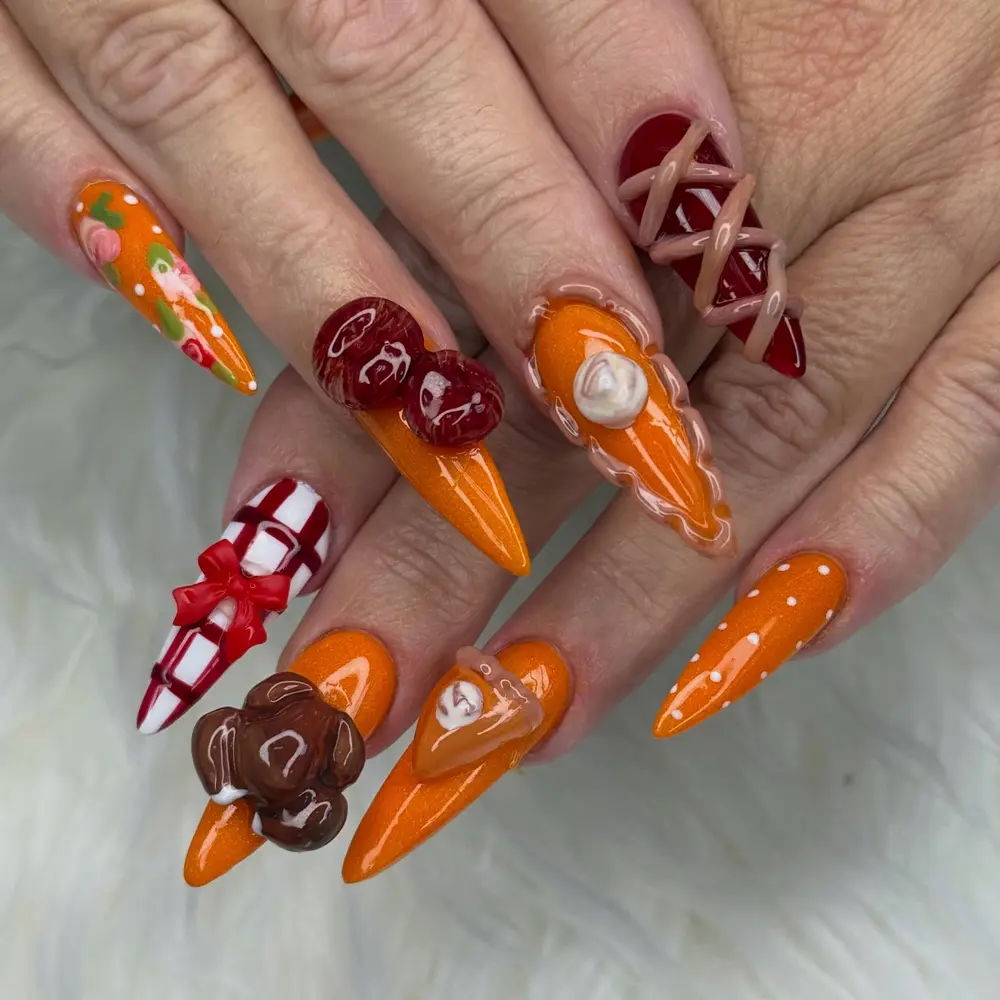
File the nail surface smooth before the orange shimmer goes on, and let each coat set fully. Charms attach with gel glue, so hold each piece still until it grips. Layer the tan lattice one strip at a time, setting between each, so the lines stay raised and separate. Thick pools of top coat hide detail, so seal only around charm bases. To remove, soak first and file after, since filing a charm can pull at the nail.
6. Gold Leaf Burgundy Pumpkins
Evening mood runs through this set: thin gold leaf sprigs with pointed leaves glow on glossy black. Burgundy nails hold painted orange pumpkins with gold stems and soft shading along each rib. Orange glitter polish adds a fiery sparkle that shifts as the hand moves. Dark bases make the gold paint look warm.
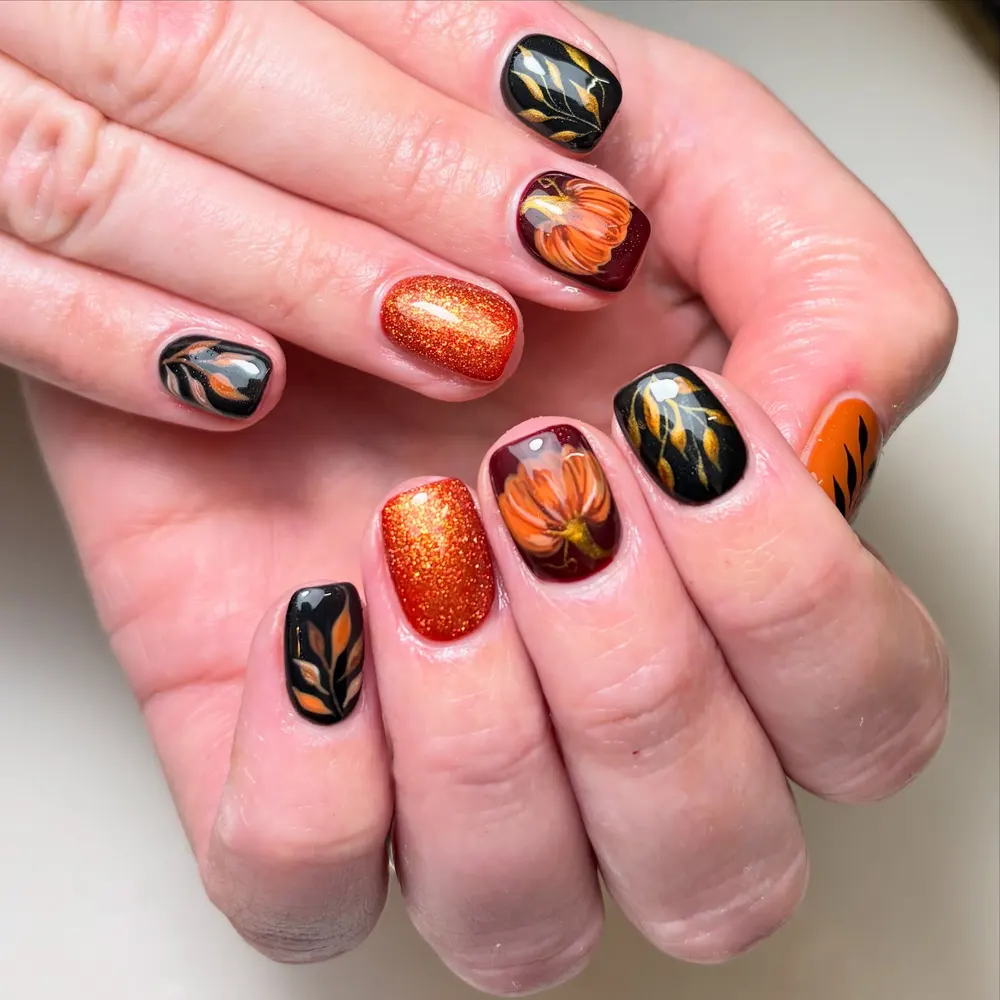
Buffing the nails gently before the black and burgundy bases helps polish grip, and each coat should dry before any leaf is painted. Gold sprigs come together best when stems go first and leaf shapes second, using a liner brush. Wet orange pumpkins can be shaded with a deeper orange to blend the ribs. Give the art time to dry, then finish with a single smooth stroke of top coat. Burgundy clothing and plain gold jewelry suit it.
7. Metallic Vine Pumpkin Art
Nude areas of the creamy bases are crossed by gold leaf vines, with dots in burgundy and copper along the way. Copper pumpkins carry black ribs and green stems, and leaf sprigs show up in copper, green, and burgundy. Burgundy glitter solids supply dark contrast and sparkle softly indoors. Metallic copper along the ribs gives the pumpkins a warm, polished look.
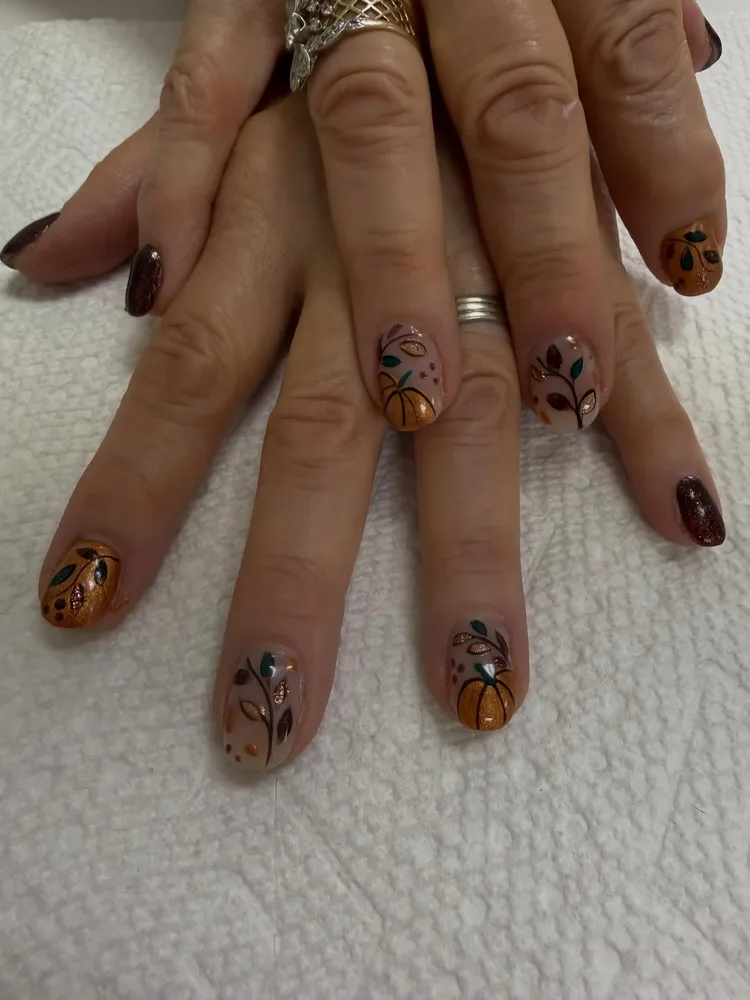
Steadying the hand against a table edge helps with long vine strokes on milky bases. Vine stems go in first, using a thin liner brush. Copper metallic polish goes into the pumpkin outlines, with narrow gaps left for the ribs. Leaf sprigs come next, with small berries dotted on last. Metallic paint drags if top coat goes on too soon, so let it dry fully. Storing metallic polish upright and shaking it gently keeps pigment even.
8. Rainbow Small Pumpkin Vines
Brown stems top each little pumpkin, and each one wears its own bright color: pink, purple, yellow, or orange. Brown vines curl over the white base, with leaf shapes and dots filling the gaps. Soft gloss gives the white a porcelain look in bright light. Cheerful colors sit comfortably against the pale ground.
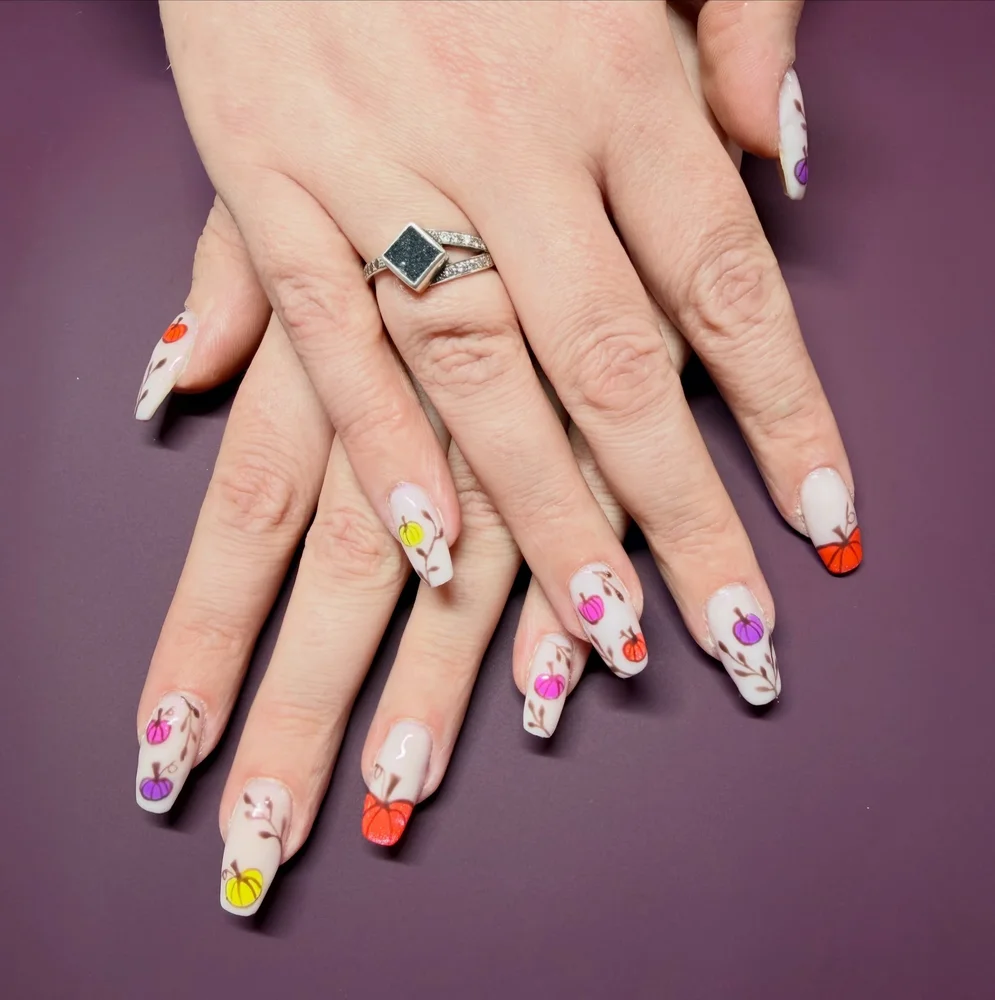
Busy art calms down when pumpkins are painted first and vines second, with stems kept thin and spaced apart. Dotting-tool centers give each pumpkin a starting point, and a liner brush shapes the rest in the chosen color. White needs two thin coats, dried fully between them, or streaks show. Wait until the vines feel dry before top coat, then check edges for smudges under good light. White or cream outfits keep attention on the colors.
9. Orange Turkey Silhouette Fan
Smooth reflections slide over the burnt orange cream polish, which covers most nails. Dark brown turkey silhouettes stand on nude bases, with yellow, orange, and red feather fans radiating behind them. White eyes and small orange beaks give the birds a friendly, storybook feel. Feather stripes add movement behind the brown bodies, and the nude keeps each silhouette easy to read.
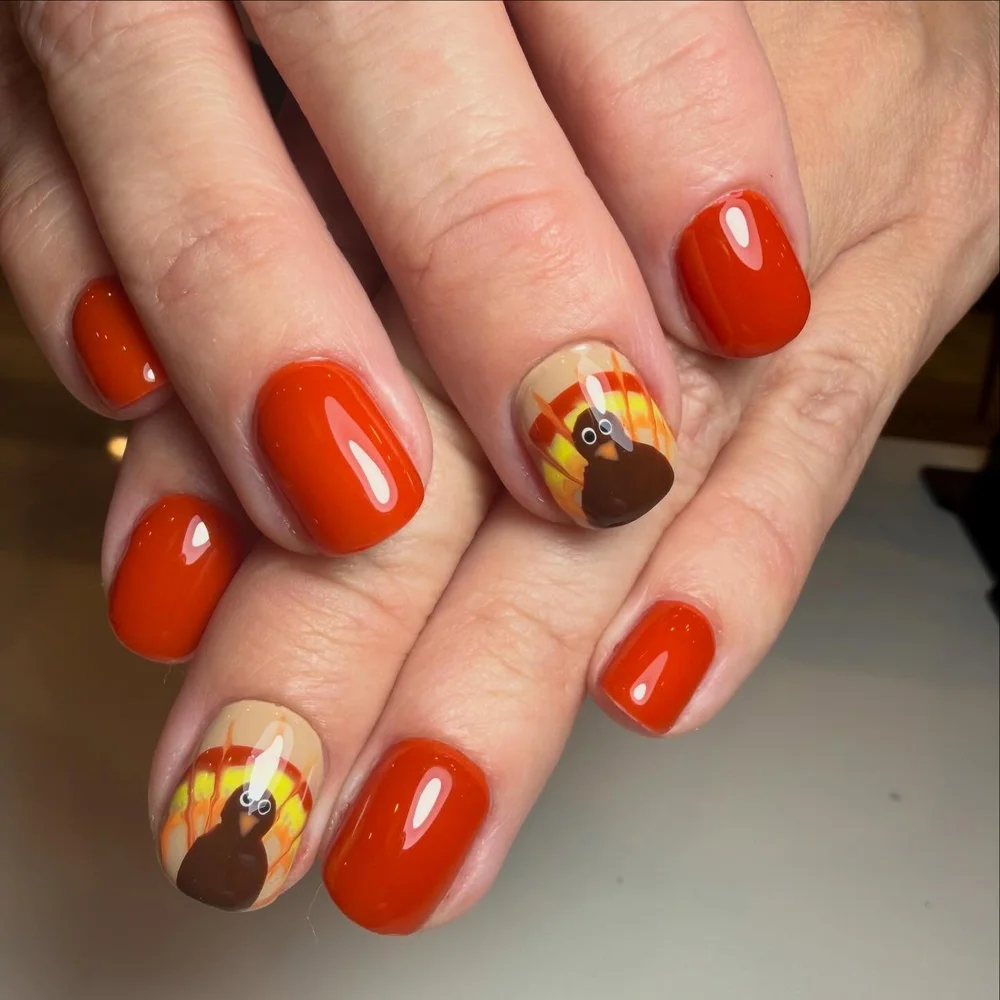
Feather fans go first, as yellow, orange, and red stripes left to dry before the brown bodies are added. Eyes need two steps: white first, then a black center dot, made with a dotting tool. Orange polish stays even when the bottle is shaken gently and kept away from direct heat. Wrapping the free edge with top coat protects the color through hand washing. Brown boots and a tan coat suit outdoor dinners.
10. Peach Pumpkin Gold Lines
Decoration sits only at the tips, leaving the rest of the milky, delicate pink nails plain and airy. Peach pumpkins are traced with curved gold lines that meet at a gold stem, topped with a curling green tendril. Metallic shine from the gold gives way to soft peach and pink tones.
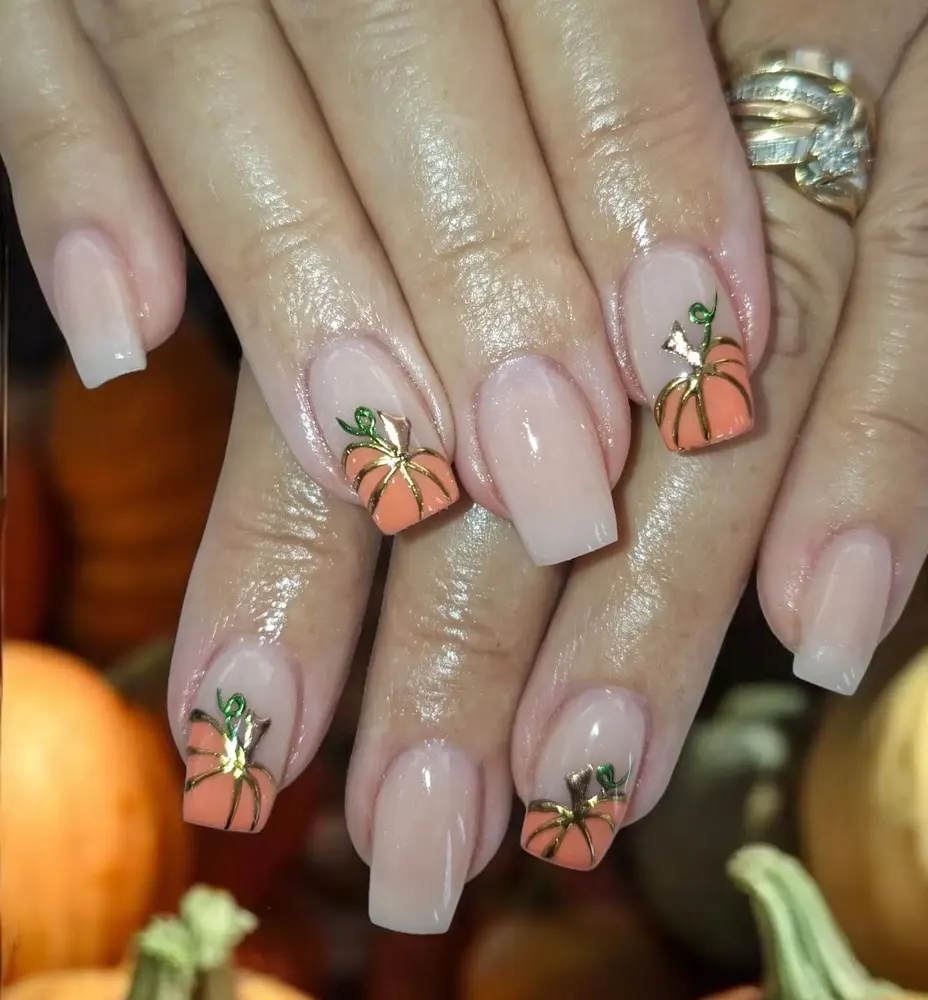
Thin layers of milky pink, dried or set between coats, make a smooth ground for the tips. Begin each gold line at the stem and stroke outward with a liner brush. Vines come last, using only the tiny tip of the brush so the curls stay delicate. A peel-off base coat is worth considering, since gold lines can then come off without acetone soaking. Cream sweaters and fine gold jewelry echo the palette.
11. Dimensional Turkey Leaf Tips
Orange, red, and yellow repeat everywhere: in painted maple leaves with fine brown veining, in the feather fans, and in the burgundy, orange, and yellow tips. Sheer pink polish carries the leaves. Raised turkeys have brown bodies, white eyes, and red wattles. Gloss makes the dimensional birds shine, while the leaves remain flat and detailed.
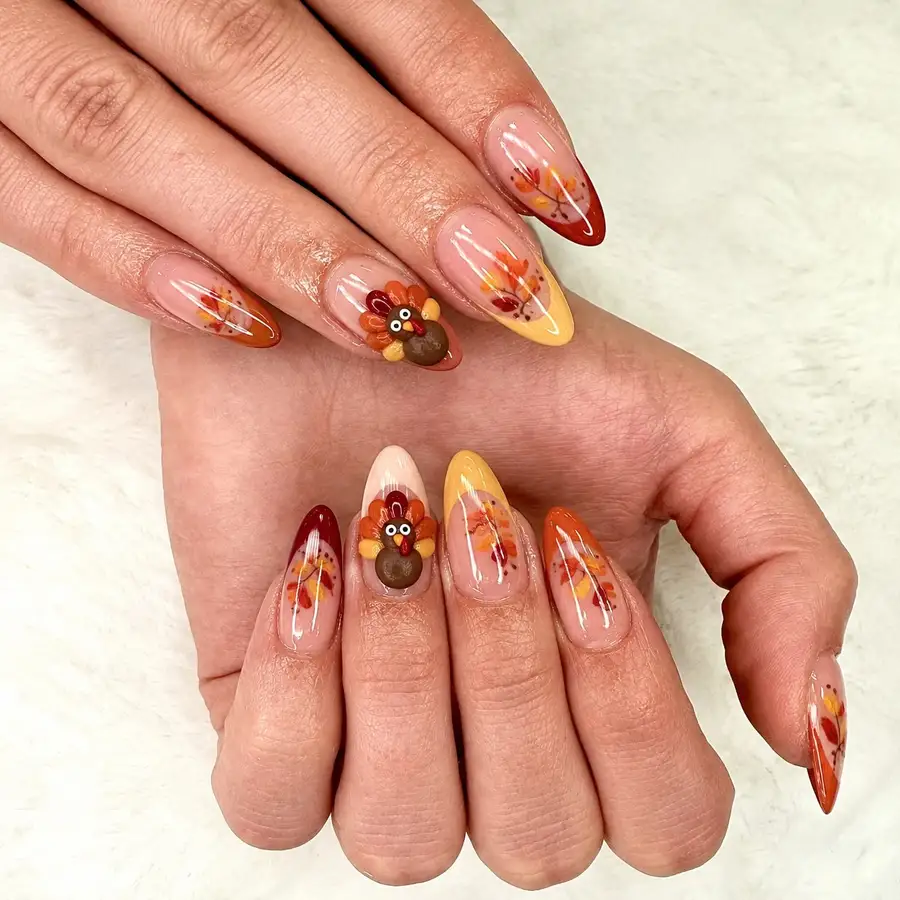
Small drops of leaf colors on a palette keep the shades ready while painting. Pressing a flat brush gently forms the maple lobes, and a liner adds the veining. Gel glue attaches the turkeys, but only after the leaves cure, and firm pressure helps them seat. Once top coat is on, check turkey edges and add a second seal around raised bases if needed. Picking at raised shapes lifts the edges and shortens wear.
12. Bronze Shimmer Turkey Dots
Cat-eye polish in bronze moves between dark brown and warm copper, with glitter particles adding depth. White nails hold dots in red, orange, and brown, and one tip shows a turkey face peeking out in gold, red, and brown. Pale dots stay crisp against their ground. Tiny eyes and feather hints add humor without drowning the shimmer.
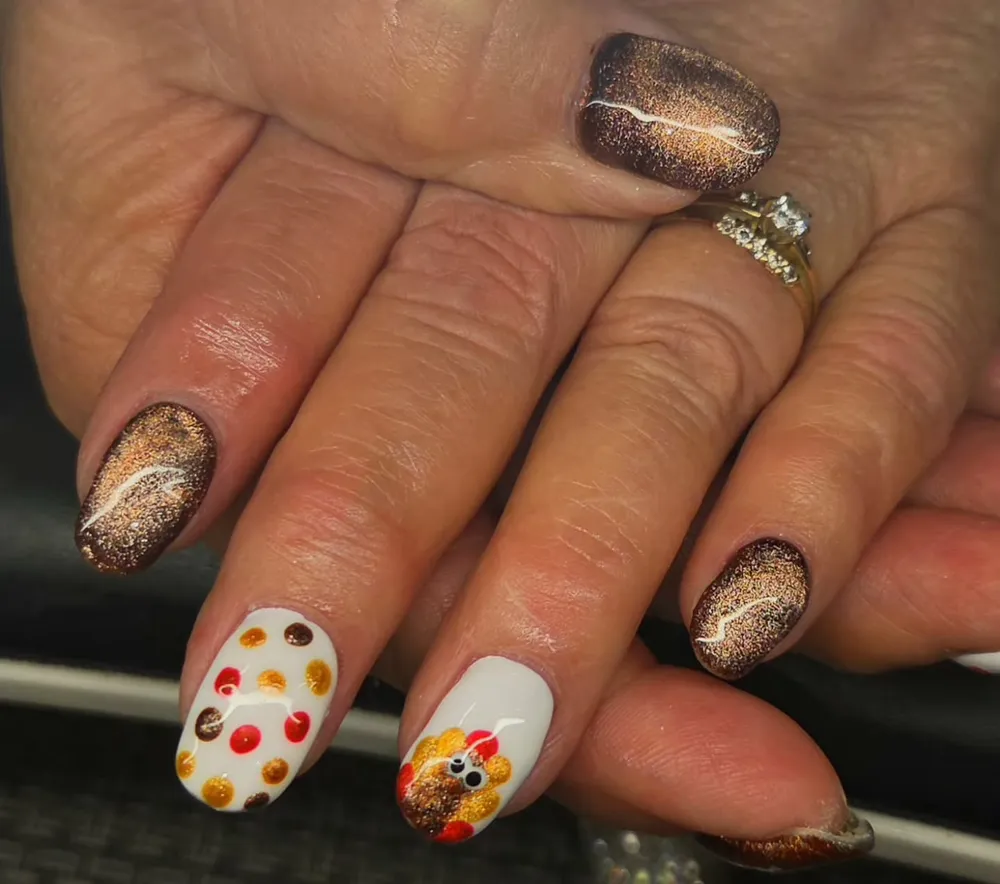
Magnet work happens while the gel is still uncured: hold the magnet above the surface for the time the product directs, then cure right away, since waiting lets the band drift and soften. Dot white polish in varied sizes with a dotting tool, and let the dots set before adding turkey details. Magnets should stay clean, dry, and away from polish bottles. Removal means filing off the top layer, then soaking in acetone wraps.
13. Blackline Pumpkin Tip Vines
Pumpkin shapes occupy only the tips, in gold and brown with black outlines, on calm nude polish. Curved black lines split each tip into ribs, with a stem and curls at the center. Gold metallic paint fills some sections and flashes against the matte nude areas. Tiny gold star sparkles sit near the stems.
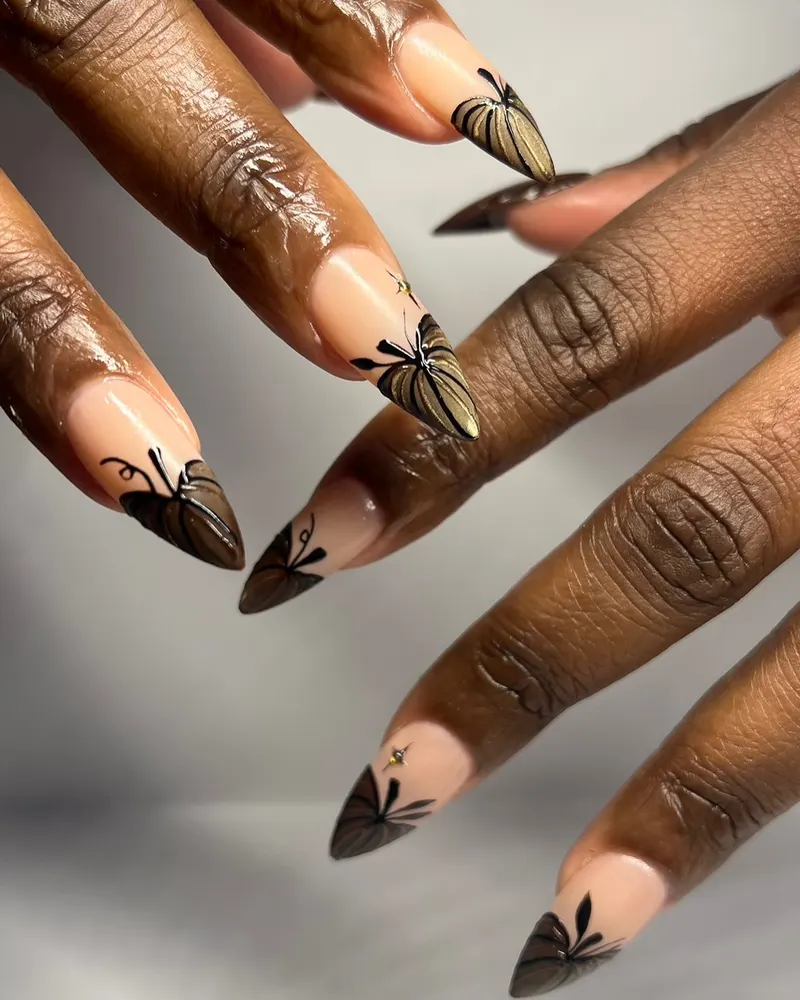
Nude goes on in two coats, each dried fully, before the tips begin. Black ribs are drawn with a liner brush, working from stem outward with steady strokes. Filling alternate ribs with gold metallic keeps the black visible and the pumpkins defined. One small cluster of gold dots per stem, placed with a dotting tool, makes the sparkles. Metallic paint can streak or pool under thick top coat, so keep that layer light.
14. Pink Pumpkin French Bows
Sparkle and softness meet at the cuticle, where rhinestone arcs and small brown bows sit on soft pink polish. Orange tips show pumpkin ribs in brown, while white French tips carry brown plaid lines. Glossy shine ties the pink, orange, and white together, and the rhinestones flash in small points of light.
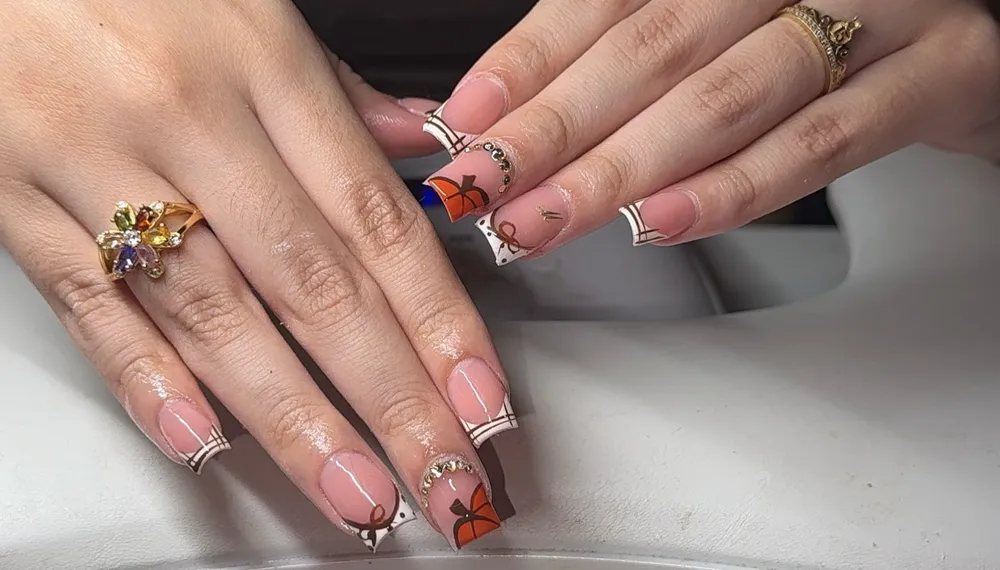
Rhinestones roll onto tacky top coat with a wax pencil, pressed lightly so they sit level. French tips go on first, then pumpkin ribs and plaid with a liner brush. Bows stay small and centered by the cuticle, fixed with a dot of gel glue. Cure the stone areas fully and tap gently with an orangewood stick to check them. Neutral clothing keeps the rhinestones and bows in view.
15. Crimson Turkey Feather Portrait
Small turkey faces peek from nude areas, with brown feather fans, white eyes, yellow beaks, and red wattles. Fan lines in brown and tan spread out around each face like a portrait. Deep red cream polish covers most nails with a smooth gloss. Bold reflections on the red make the faces a playful focal point.
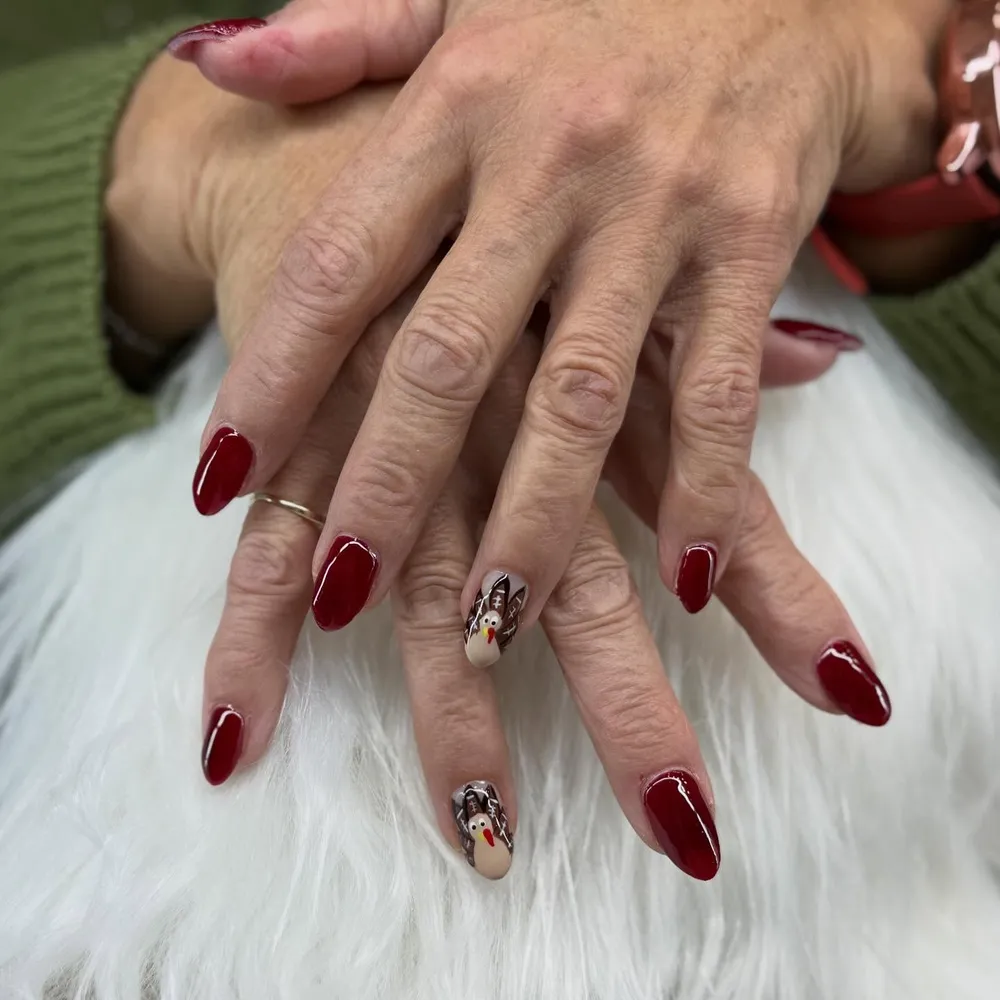
Deep red cream polish seals best with a no-wipe top coat, set for the full time listed on the bottle. Fans in brown and tan go on next, each color dried before the faces. Fine liner work makes the eyes and beaks, and brief strokes give better control. Hot water softens fresh gel, so skip it right after application. Green knitwear gives a classic holiday table look.
16. Blush Copper French Leaves
Copper glitter catches light along the French tips and fades into blush pink as a gradient, with no harsh color blocks. Turkey faces in brown have white eyes, yellow beaks, and feather fans in orange, yellow, and white. Small orange and brown leaves scatter across the pink. Warm sparkle stays at the edges.
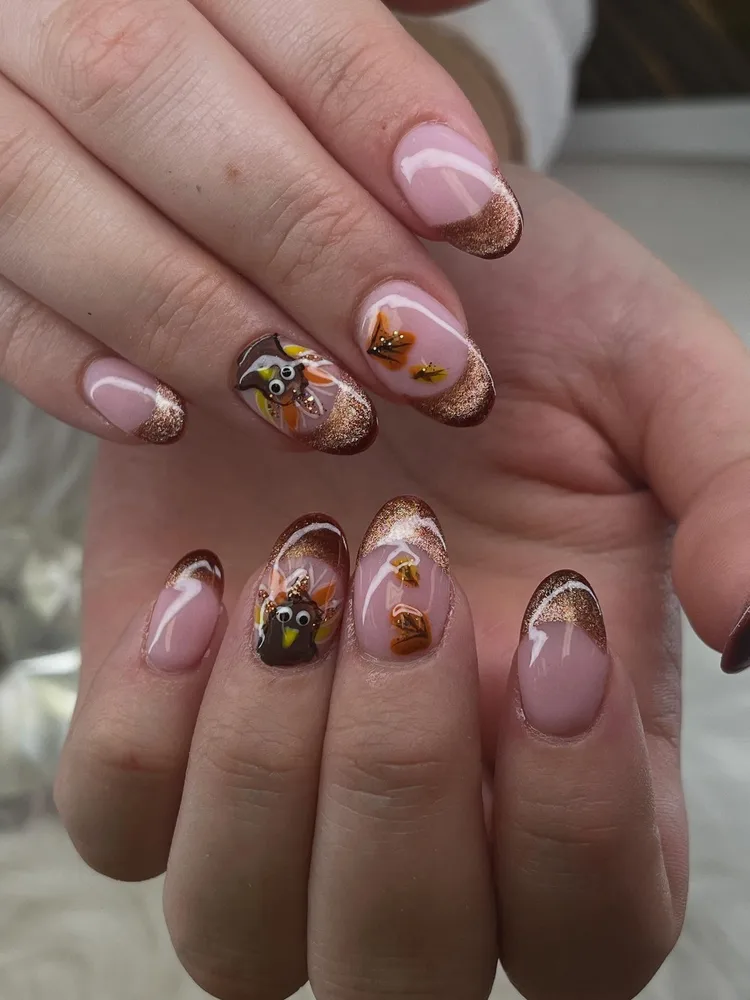
Sponge work builds the tips: press copper glitter along the edge in thin layers and smooth it as you go. Turkey faces wait until the glitter dries, then a liner brush handles the eyes and beaks. Leaves in orange and brown stay small, so they do not crowd the portraits. Top coat goes on in two thin layers, with the first dry before the second. Blush clothing and warm brown accessories echo the copper.
17. Nude Turkey Plaid Solids
Simple, bold shapes keep the mood cheerful. On cream, a brown cartoon turkey has googly eyes, yellow feet, and a red wattle. Plaid in brown, orange, and red grid lines runs over a pale base, and orange cream solids sit between the nude and plaid nails. Gloss keeps the colors looking fresh.
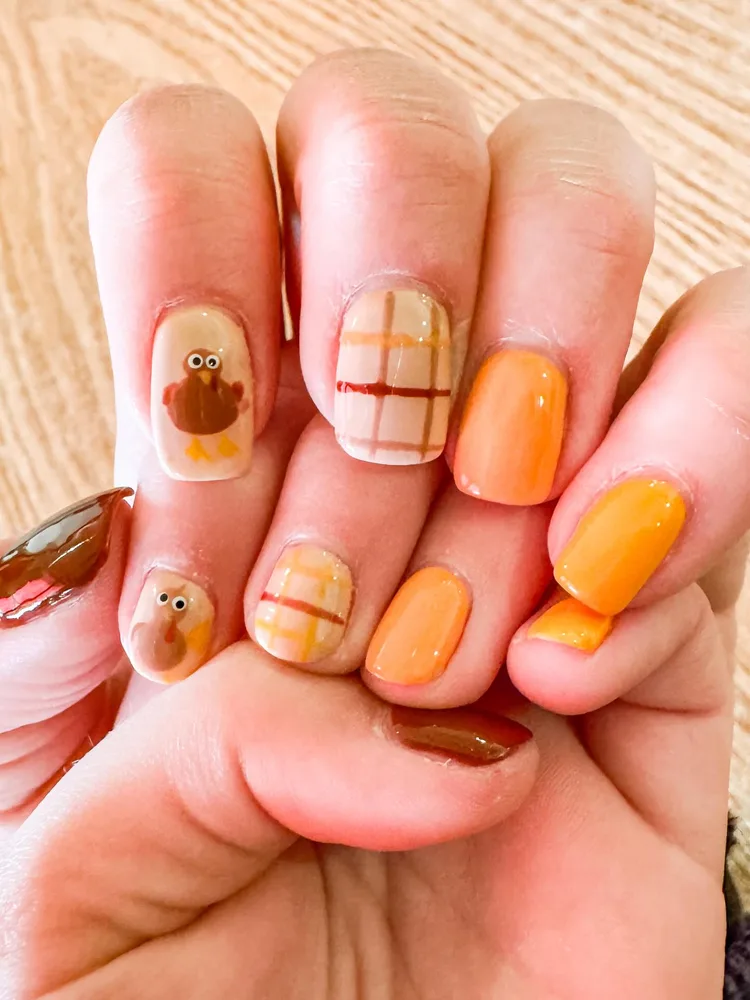
Striping tape makes plaid easy: press it down firmly, then paint the grid colors over the nude base. Tape comes off while the polish is slightly tacky, pulled slowly at a low angle for clean edges. Brown goes on the turkey body first, and eyes and wattle follow once the brown feels dry. Let plaid and turkey set before glossy top coat. Checked scarves and brown leather shoes match the palette.
18. Taupe Pumpkin Glitter Halves
Orange pumpkin halves sit at the tips of cream nails, divided by gold glitter lines that radiate from a stem. Taupe glitter polish covers most other nails, with gold flecks through a warm gray-brown base. Gold ties the glitter and pumpkins together, while taupe stays muted and the orange and cream contrast gently.
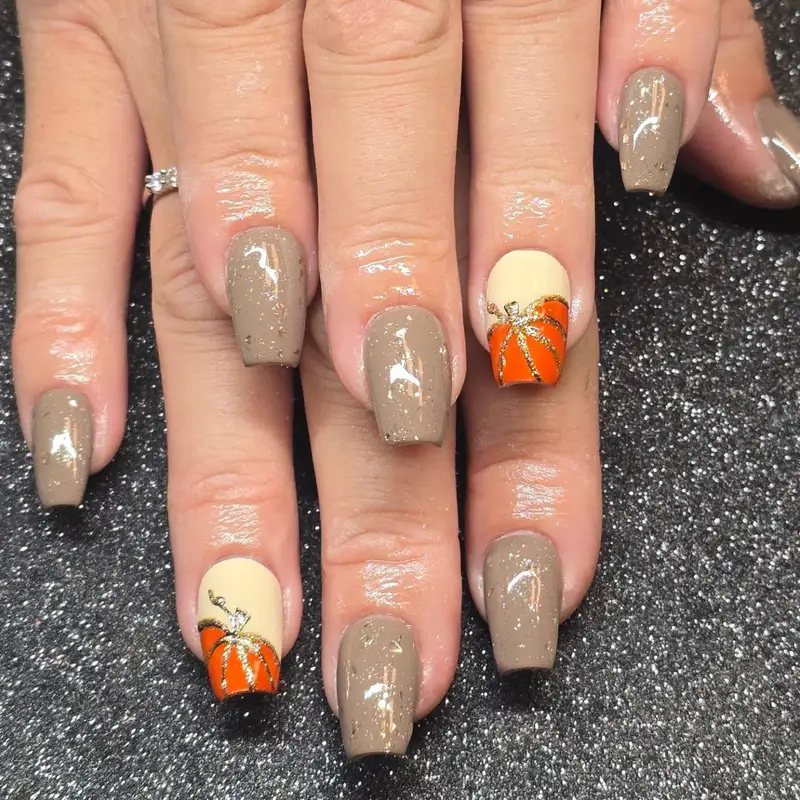
Liner brush glitter lines are drawn from the stem outward while the cream stays slightly tacky. Keep brush strokes quick, since tackiness fades. Thin coats of taupe glitter dry faster and chip later than thick ones. Acetone on the brush between colors keeps the flecks from muddying the cream. Glossy top coat smooths the texture, and a second coat helps if it still feels rough. Cream knitwear and gold hoops suit the taupe.
19. Neon Turkey Foil Leaves
Loud neon edges meet quiet nude: yellow and orange French tips form color blocks along the free edge. Turkey faces have brown bodies and googly eyes, with orange, yellow, and green feather fans. Maple leaves cut from foil, in copper, pink, and brown, flash in metallic glints across the nude areas.
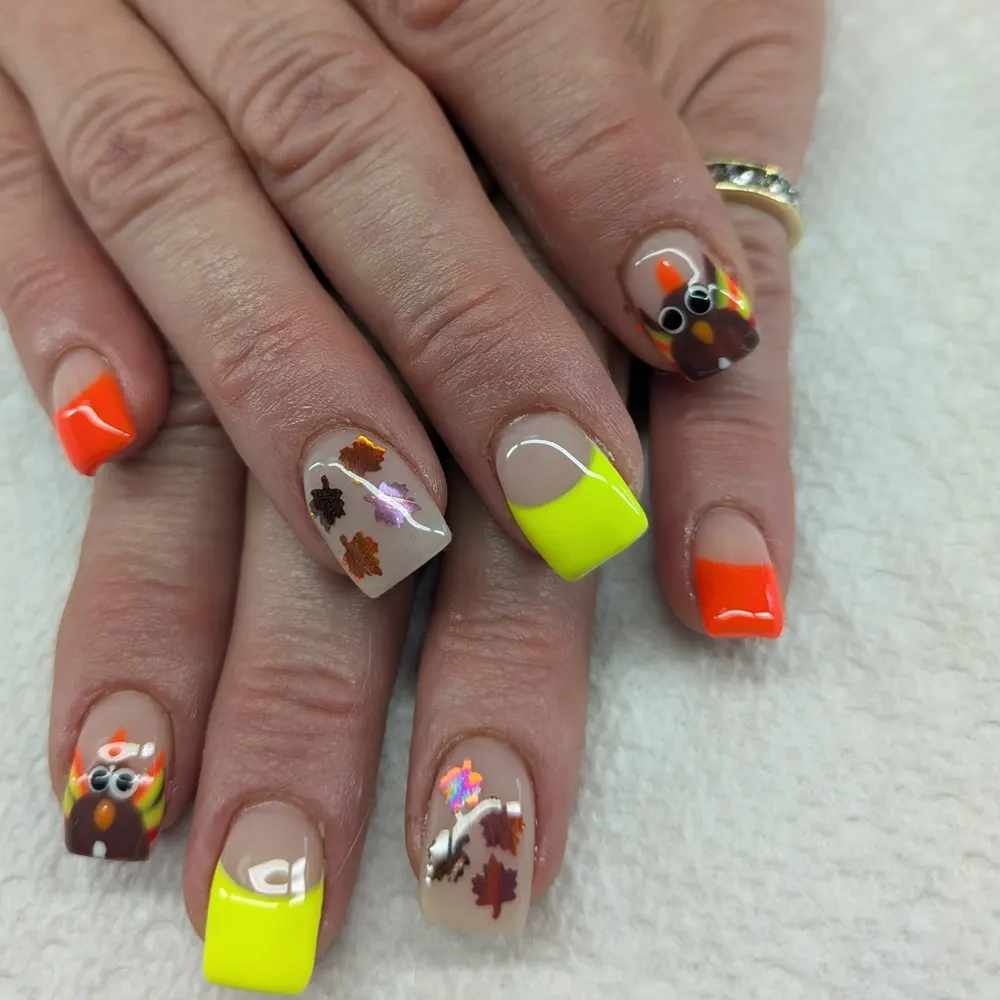
Neon polish tends to streak, so a white base coat first makes yellow and orange look brighter. Foil leaves press onto tacky polish with tweezers, and a silicone tool smooths the edges. Faces get painted after the foil sets, with black liner for eyes and outlines. Top coat should follow right away, since unprotected foil edges lift easily. Simple black clothing keeps the bright colors from competing.
20. Lace Pumpkin Bow French
Dinner-party softness shows in dusty pink polish with white French tips edged in fine white lace patterns. Raised orange pumpkins on the white tips have brown stems and green leaves. White bows rest on caramel tips, with lace curving beside each bow and pumpkin. Glossy light picks out the raised shapes while the lace stays thin and intricate.
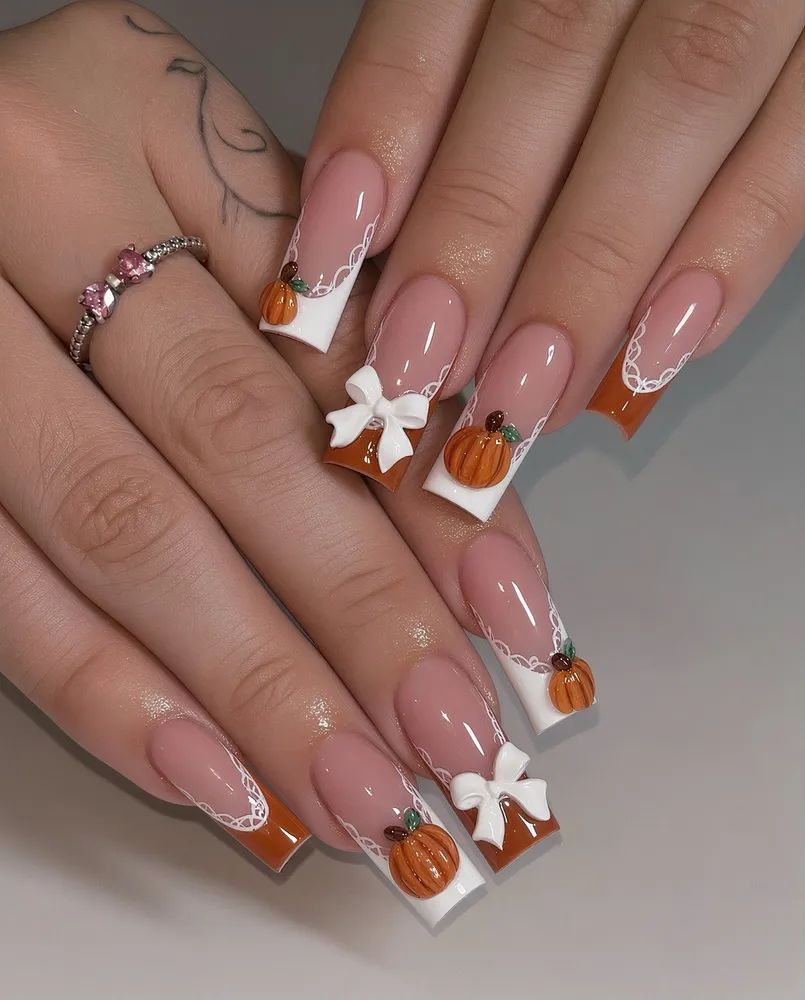
Thanksgiving nail art with lace needs light pressure, and a very fine liner brush keeps loops thin and even. Charms attach with gel glue, held until it grips, and lace goes on after they cure, worked around raised shapes with controlled strokes. Check the lace under bright light and fix any broken loops before top coat seals them. Mending a loop is far easier before sealing. Cream dresses and pearl jewelry suit a dinner.
21. Sparkling Gold Turkey Faces
Googly eyes give each turkey face its personality, set on white bases with brown, tan, and orange faces and feather fans in dark brown and gold. Gold glitter polish sparkles on accent areas, and solids in dark plum, caramel brown, and deep green add contrast beside the glitter and white. Autumn leaf props beside the hands echo the gold and orange.
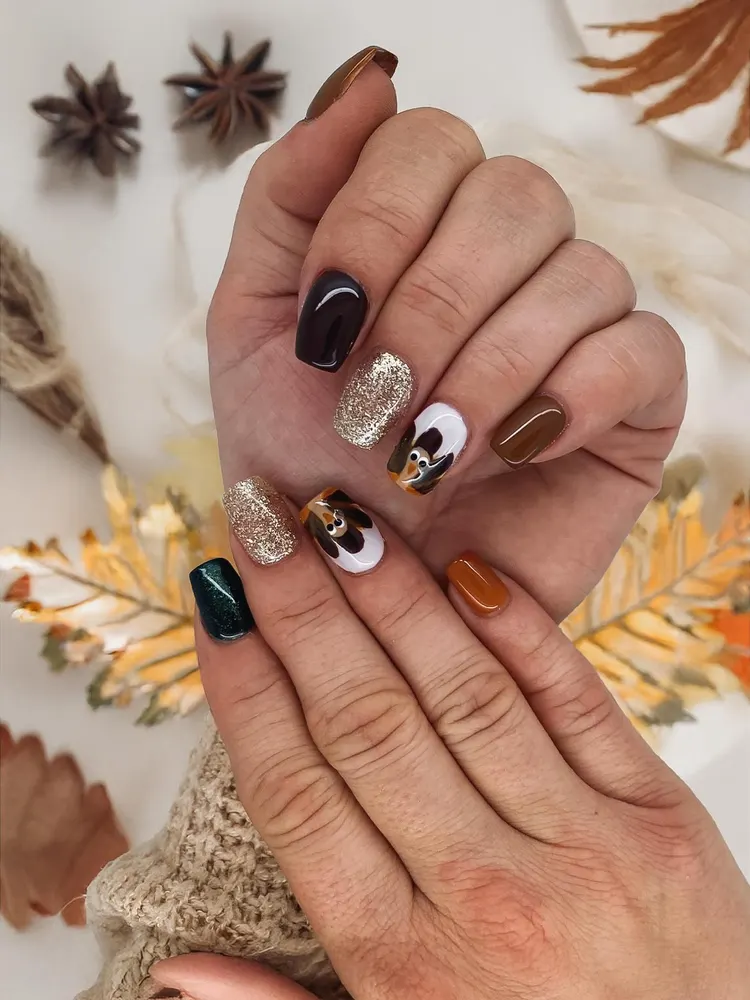
Painting works best with hands resting on a table, since small eyes need precise placement. Gold glitter goes on with a sponge in two passes until coverage looks even, and packing it this way avoids bare patches. Dark solids take two thin coats with full drying between, which avoids dragging. Matte top coat on the dark solids can sharpen contrast against the glitter. Mustard scarves and dark green coats suit the plum and gold.
22. Caramel Gingham Turkey Charms
Charms sit at the tips: a turkey, a pie slice, and a maple leaf, with orange and yellow details, resting on caramel gingham in white and brown grids. Light pink polish covers the rest. Squares stay neat, with brown lines crossing white areas. Gloss makes the pink shine, and the charms give the tips a small story to tell.
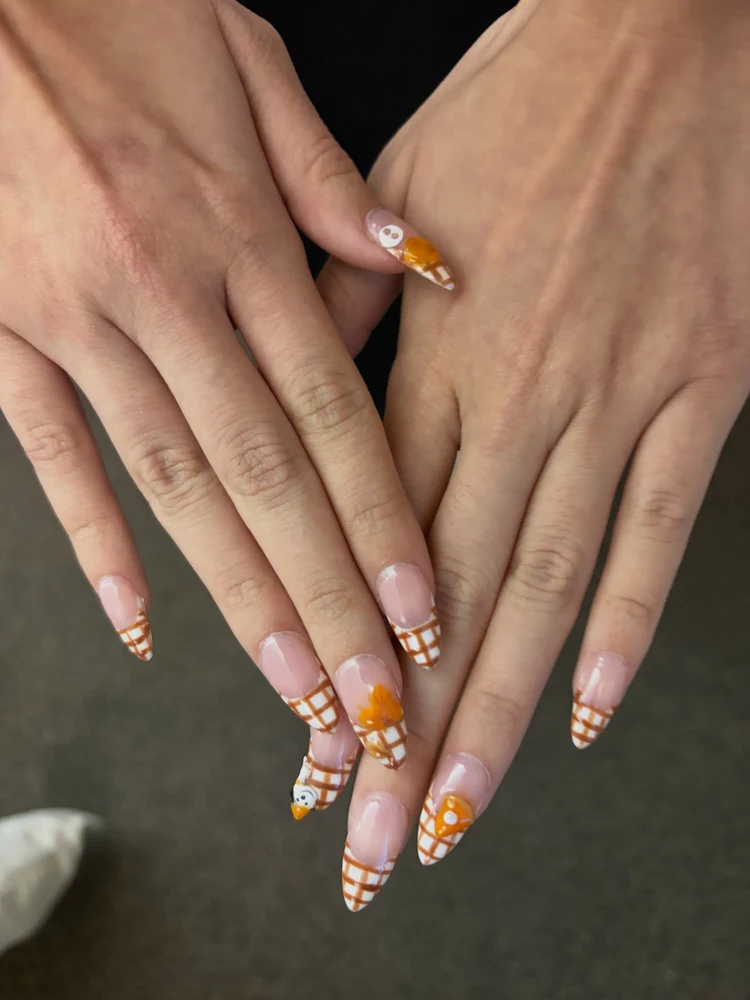
Gingham comes from a liner brush: straight, evenly spaced brown rows over white tips. Tiny charms stick on with one drop of nail glue, each pressed flat so it does not tilt. Small charms catch on clothing less and tend to last longer than big ones. Top coat goes around charm bases only, leaving the tops clear. Denim jackets and brown ankle boots suit the caramel.
23. Chrome Pie Pumpkin Sweater
Mirror-like copper chrome gives accent nails a metallic surface. Caramel and brown nails hold pie slices topped with white cream, pumpkins with black ribs, and a coffee cup with steam. Cozy cable patterns in caramel look knit and raised. Turkey faces with feather fans in green, orange, and red finish the celebration.
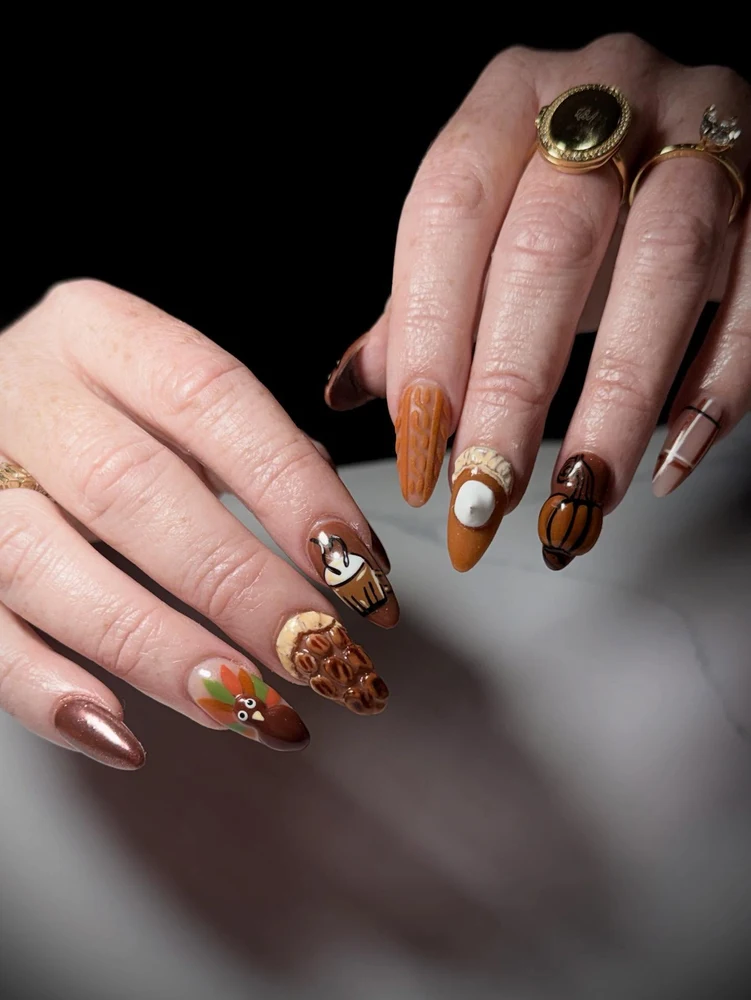
Chrome powder rubs over a no-wipe gel top coat in circles until the shine looks even. Cure that layer before painting pie, pumpkin, and coffee details so the powder does not smear. Sweater cables come from builder gel, with each line set before the next goes on. A second top coat protects the chrome, but check edges for powder residue first. Caramel sweaters and brown leather bags echo the palette.
24. Glitter Turkey Triangle Dots
Light hits the brown and orange glitter first, and only then reveals the turkey faces and triangle patterns below. Accent nails carry dense, sparkling texture. Turkey faces on nude bases have brown bodies, yellow feet, and feather fans in orange and yellow. Scattered across the nude are orange triangles, each with a white center, plus gold dots for geometric contrast.
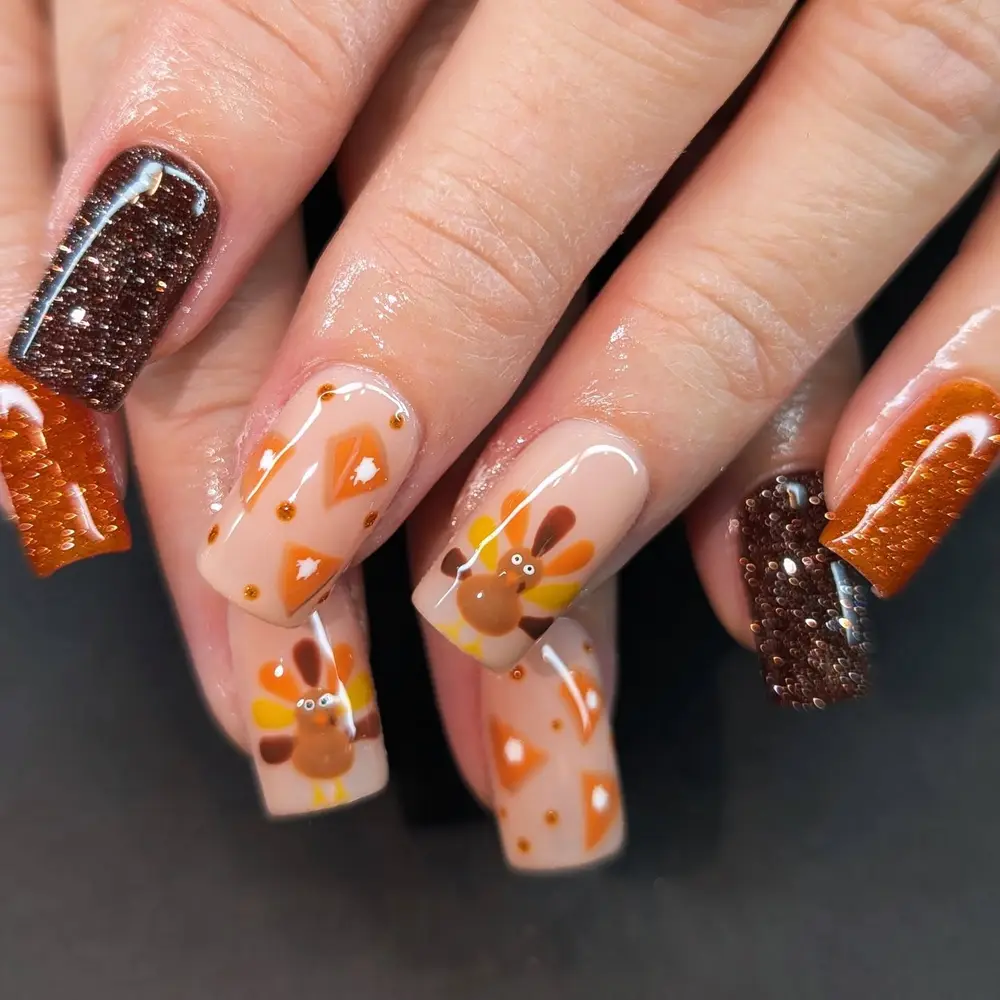
Rough glitter smooths out with a light buff after drying, followed by top coat. Buffing should stay light, since heavy pressure thins the glitter layer. Triangles come from a flat brush: orange first, with white centers added using a dotting tool. Keep turkey faces for last, with eyes small and centered. Filing painted turkey art directly strips detail faster than polish, so shape nails before painting. Black outfits make orange triangles and turkey faces stand out.
25. Line Art Copper Pumpkins
Copper and black lead here: bold black line work draws pumpkins with stems, curls, and star sparkles, and copper metallic fill shades the ribs. Muted pink forms the soft base. One accent area in rust polish adds warmth beside the nude pink and copper. Light along the copper makes the drawn pumpkins seem to glow.
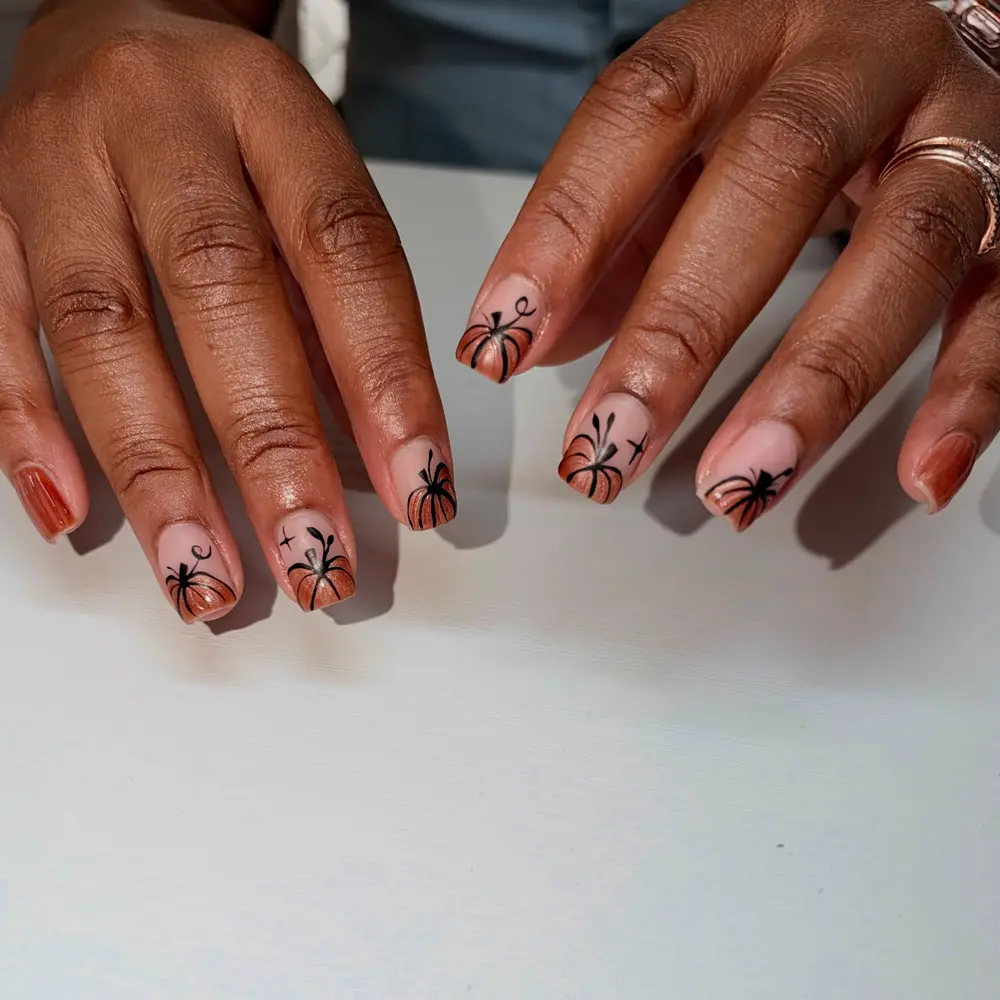
Black gel outlines need a brief set, otherwise copper fill can bleed past the edges. Work the ribs one at a time, using a liner brush for narrow sections. Copper metallic looks richest when the fill stays inside the lines. Four-point sparkles, placed near stems with a dotting tool, balance the design. Pulling every stroke toward the tip, in one direction, keeps control. Nude pink clothing and simple black accessories match.
Conclusion
Thanksgiving nail art looks best when each hand has one clear focus, whether that is a turkey face, a copper pumpkin, or a raised pie slice. Plain solids in burgundy, orange, nude, or cream give busy designs room to breathe. Pick the finish that suits your tools, from chrome and cat-eye shimmer to foil, glitter, and gel charms. Start with one or two accent nails, then add more detail as your brushwork improves.
