

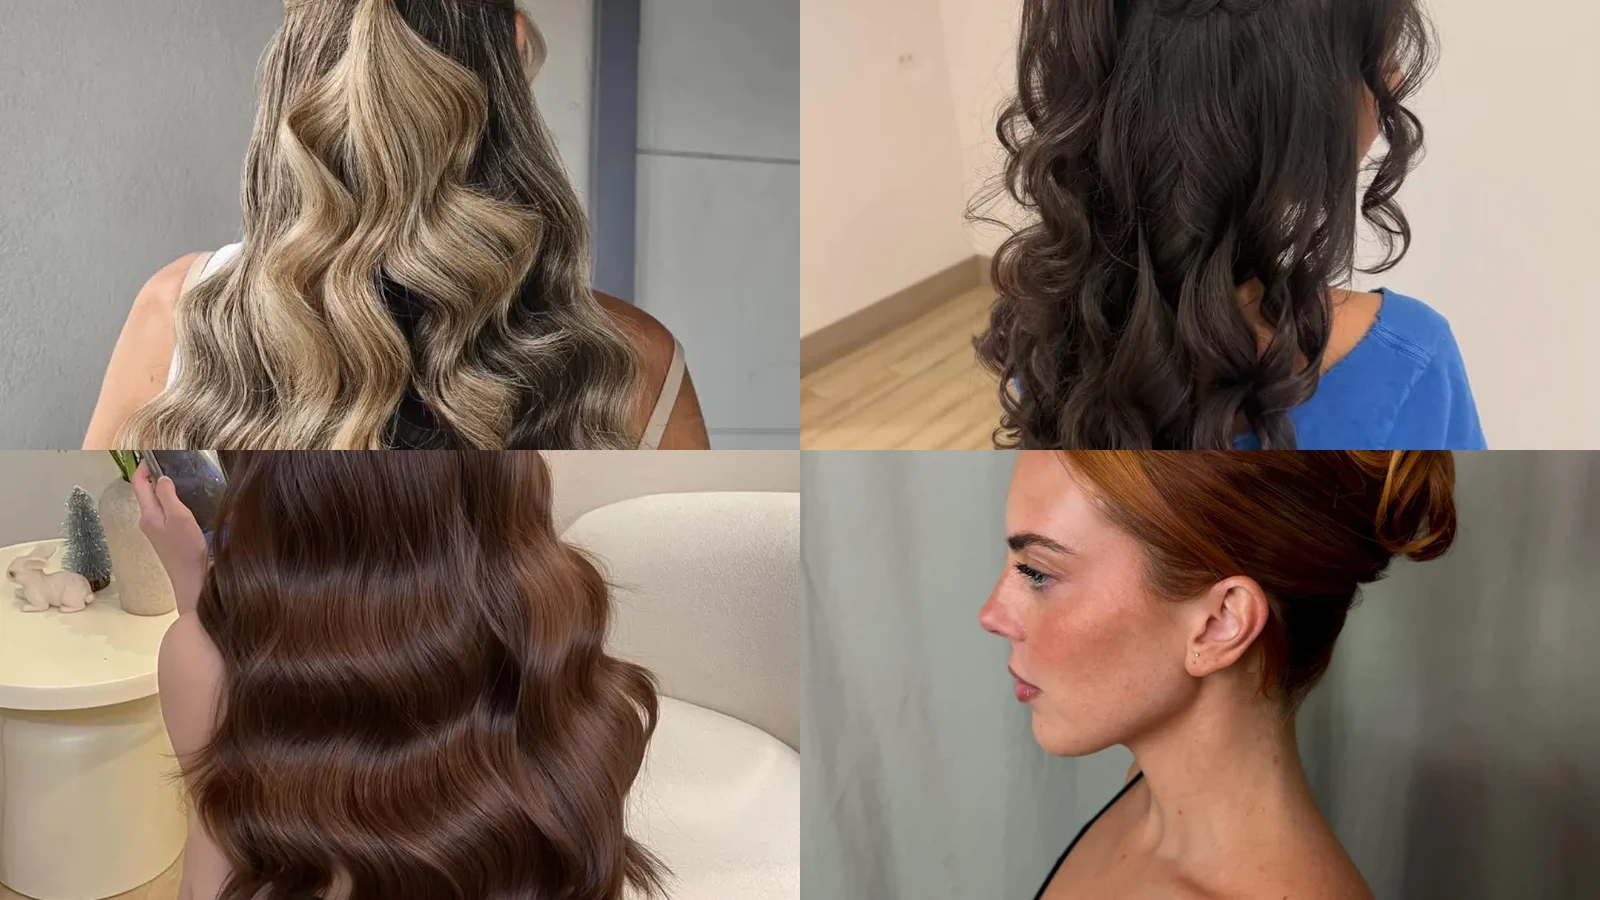
Long dinners, warm kitchens, and spontaneous family photos can put even the best hairstyle to the test. Hair needs to stay comfortable through hours of conversation, festive meals, and plenty of movement without losing its shape. Thanksgiving hairstyle ideas range from braided crowns and textured ponytails to soft waves, polished buns, and curly updos. Thanksgiving hair inspiration also includes half-up hairstyles and elegant holiday looks for different hair lengths and textures. Whether you prefer a relaxed finish or a more refined appearance, the right fall hairstyle can complement your outfit and suit the occasion. Focus on a style that feels natural, holds comfortably, and looks great from the first photo to the final gathering.
1. Half-Up Side Twists
Tidy twists on top meet soft, wavy lengths underneath, and that contrast is the whole point. Both twists start above the ears and travel back to one center point, forming a gentle V. Against dark hair, the twist lines read clearly. Volume stays through the mid-lengths, and a few loose strands near the sides keep the top from looking stiff.
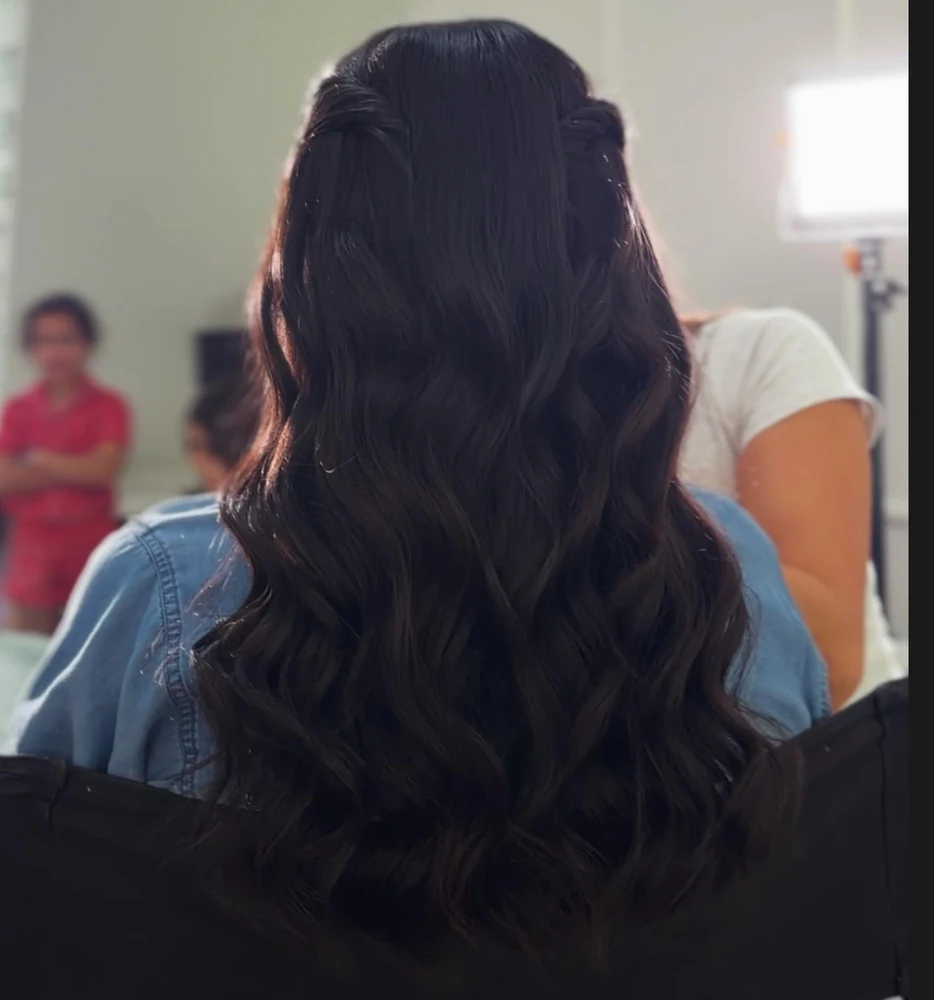
Pins do the real work here. Cross two pins over each other where the twists meet, so the join stays flat instead of sliding. Big, loose waves below add movement that can slacken the hold during a long meal. Press the pins back in after an hour. Dry, slightly textured hair grips pins better than slick hair, so skip heavy oils on the top section. Mist a little texture spray on first.
2. Soft Knotted Bun
Two thin tendrils curl beside the neck and set the mood for this low bun at the nape. Dark hair twists and crosses before tucking into the knot, which leaves a rounded but uneven edge. Natural, low shine suits the soft shape. Smooth, flat sides against the head keep attention on the knot. Side view shows the bun resting beneath the ear line.
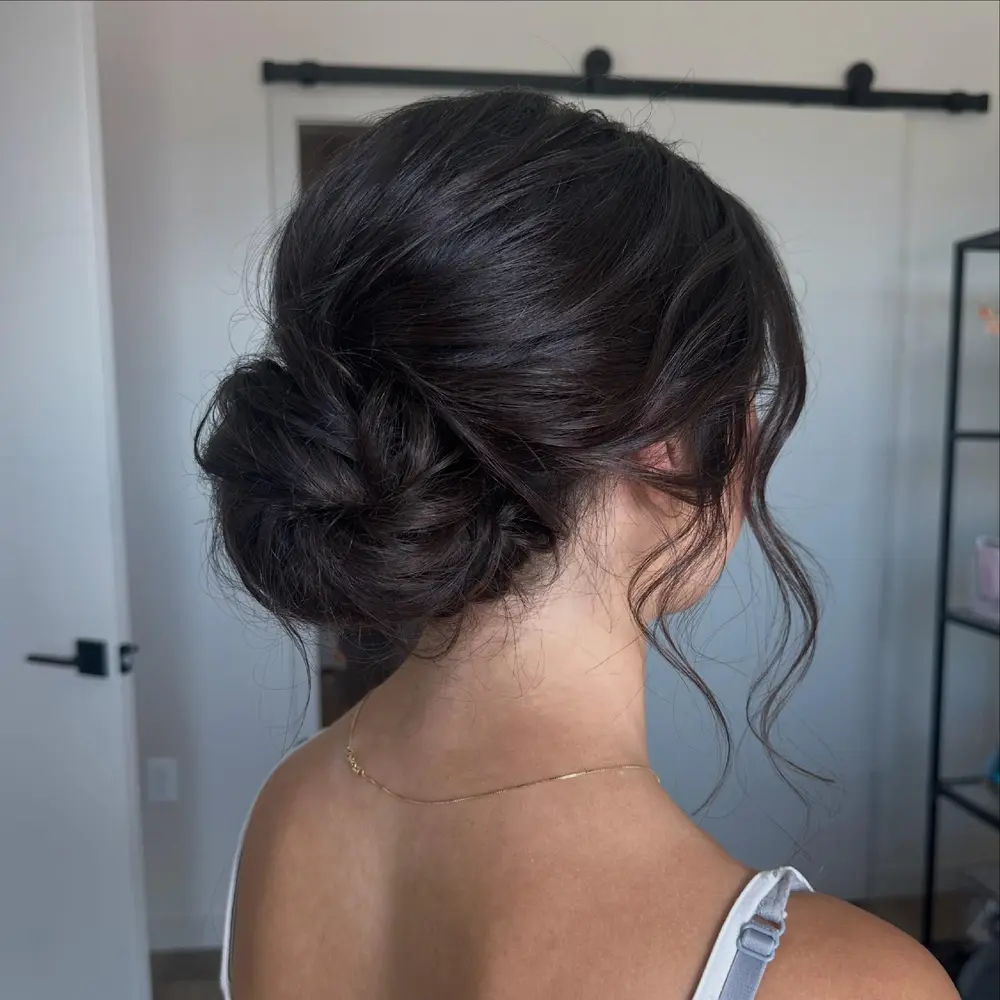
Slipping is the main risk. Pinning from four sides spreads the load, so one pin letting go does not drop the whole knot. Twist each section tightly before wrapping, since loose twists unravel inside the bun. Pack three spare pins for later. Curl the tendrils lightly with a small iron, and leave them as they are afterward, because pulling them straight removes the soft curl. Dry hair holds a twist better than damp hair, so skip the shower right before styling.
3. Wide Twisted Bun
Light catches the glossy top of this bun, while the rest looks dense and even from behind. Dark hair wraps across the back in bands, ending in a wide, flat shape at the nape. Strands travel from crown to twist with no visible part. Flyaways sit only at the outer edges, so the outline is broad, not round.
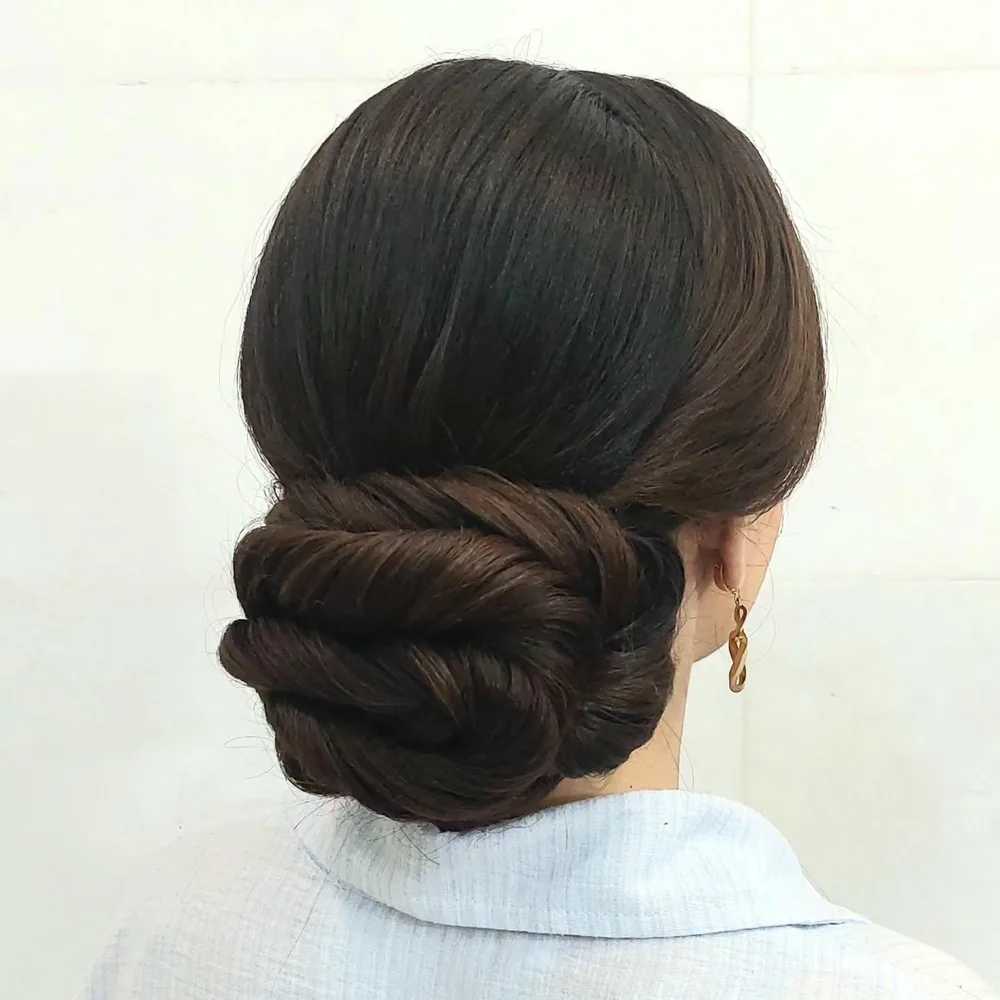
Crown smoothness decides how neat this bun looks. Work a pea-size dab of smoothing cream through damp hair before combing it back, since too much leaves the surface greasy instead of sleek. Fold the twisted band across the nape and pin both ends first, then the center. Brush over the crown again just before group photos. Medium hold spray at the end keeps the surface from lifting. Pins at the ends carry most of the weight, so push them in deeply.
4. High Wavy Ponytail
Caramel color runs from root to tip in long, glossy waves. Hair sits high on the crown, so the top stays lifted and smooth. Below the tie, waves open up gradually and relax toward the ends, giving the tail a full and bouncy outline. Longer pieces frame the sides of the head. In profile, the ponytail sits high and away from the shoulders.
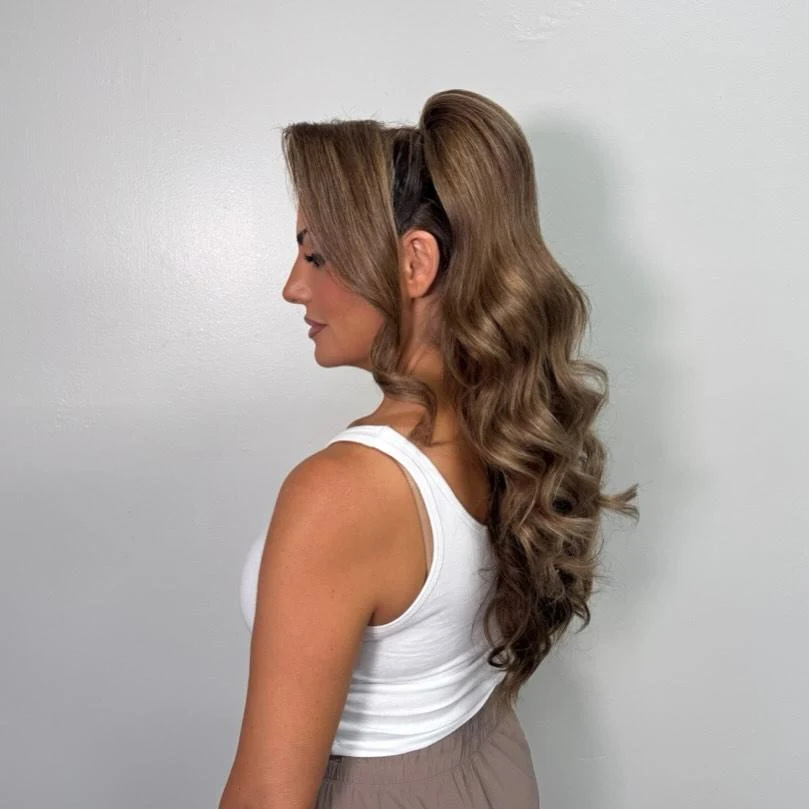
Roots lose height first once you sit down. Sweep dry hair upward and gather it at the crown, then use a strong elastic so the base holds. Wrap one thin strand around it to hide the tie. Curl the tail in thirds and loosen the curls with your fingers instead of a brush. Oily products near the top weigh the lift down, so keep that area light. Tuck a small comb in your bag and fluff the roots when you stand up.
5. Fishtail Low Ponytail
Right down the center of the back, a tight fishtail starts at the nape and ends in a straight tail. Glossy, straight strands run into it from the crown, and a wrapped section covers the tie. Narrow pattern stays consistent along its length. Shine follows each edge of the braid. Everything about the shape stays low and symmetrical.
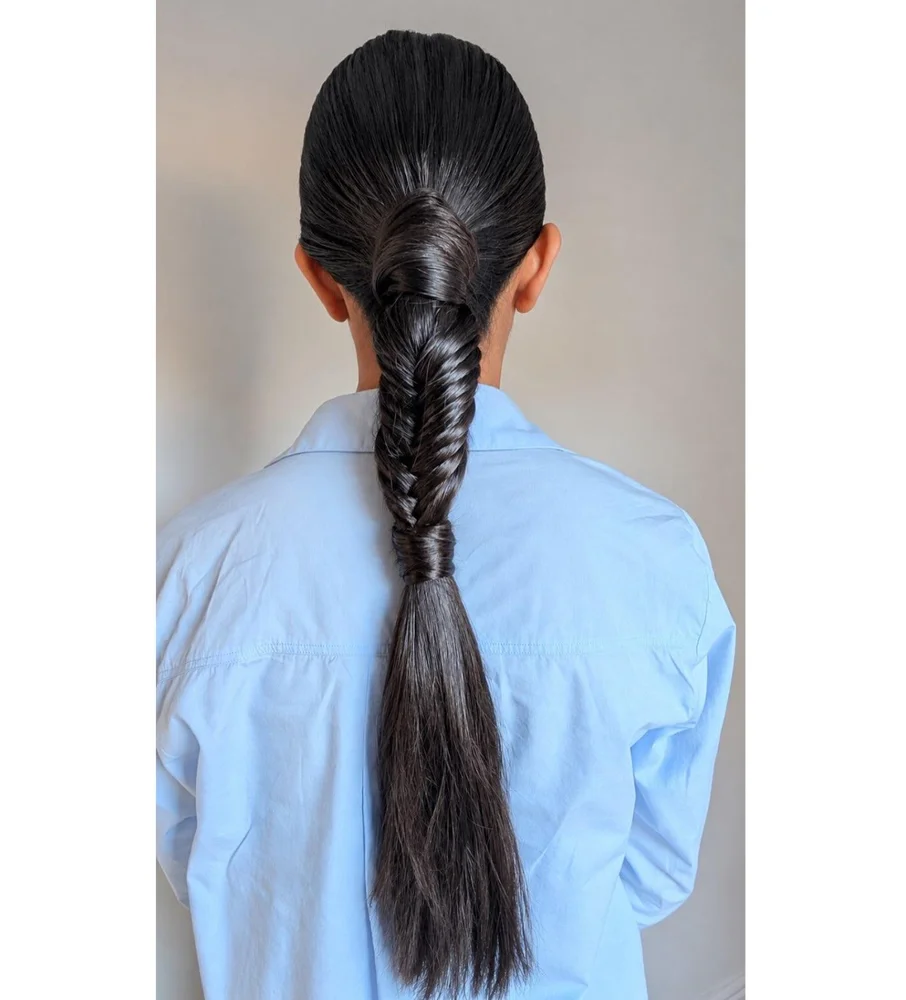
Patience matters more than speed here. Gather damp hair at the nape and brush it smooth, then split it into two halves. Take a thin piece from the outside edge of one half and cross it to the inside of the other, working slowly down. Stop halfway and wrap the end with a strand of hair, then secure it with a clear elastic. Lightly mist the braid, since this pattern comes undone sooner than a plain three-strand braid.
6. Tortoiseshell Claw Twist
Warm amber tones in the tortoiseshell clip stand out against blonde hair. Hair is gathered into an upward twist along the back, with the clip standing upright down the middle. Smooth blonde sections lead from both sides into the twist, while the ends tuck underneath. Outline stays tall, narrow, and clean. Seen from behind, the clip reads as one amber band.
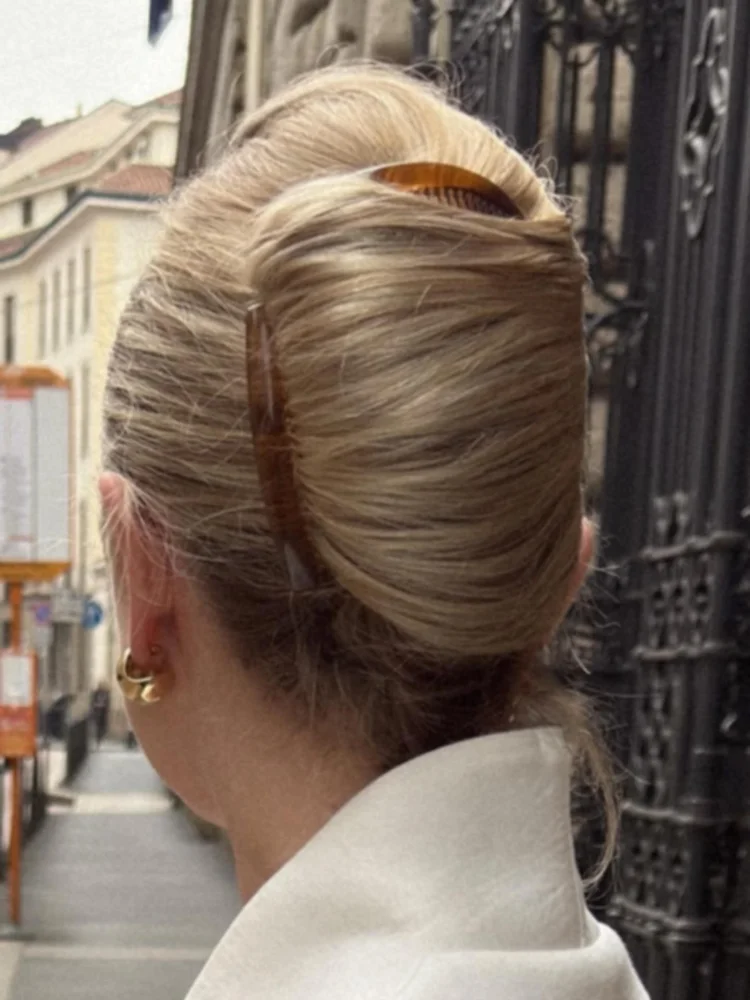
Clip size decides everything with this twist. Large claw clips grab thick hair; small ones tend to slip. Fold the hair up along the middle, open the clip wide, and snap it shut over the whole twist before tucking the ends. Turn your head side to side to test the hold, then add two pins if anything shifts. Practice once before the holiday so you know how much hold your clip really has. Thin or slippery hair may need the pins from the start.
7. Braided Crown Curls
Dark curls spring loose below a thick braid that stretches across the top of the head. Braid strands keep an even width from end to end. Definition shows clearly through the curls, and the crown looks lifted instead of flat. Seen from the back, the braid frames the head while curls take up everything beneath it. Curls are springy rather than tight.
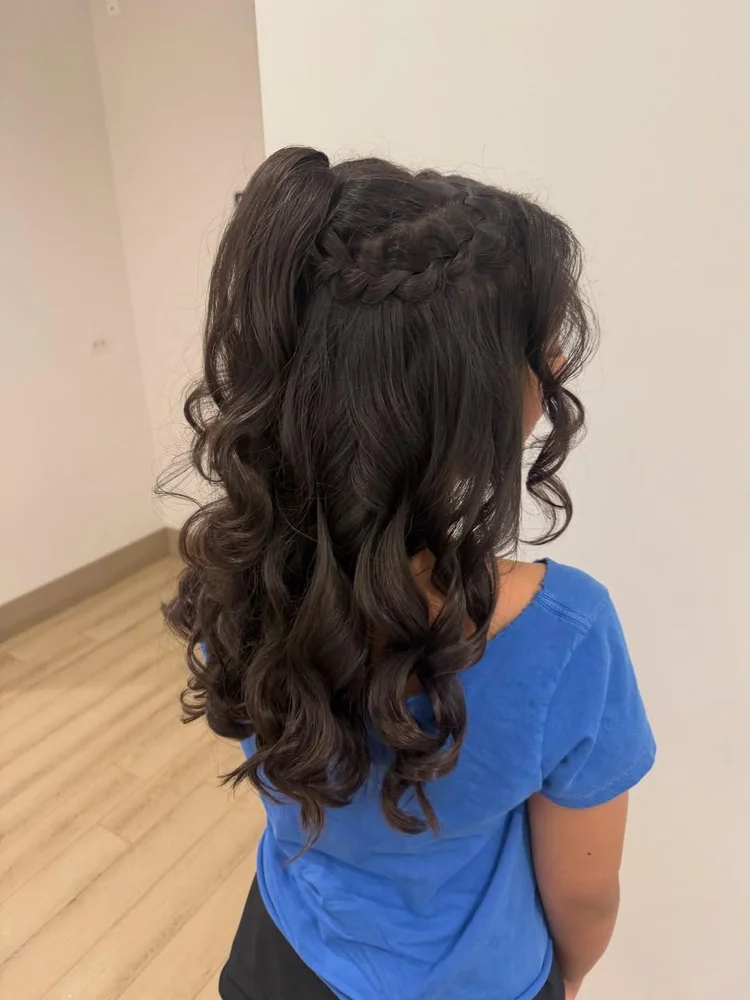
Refreshing is easy if you skip the brush. After dinner, dampen your hands and scrunch the curls upward to bring back their shape. Leave the braid pins where they are while you do this, or the crown will shift. Start with detangled hair, divide off the top band, and braid it before touching the curls. Just a little curl cream, scrunched in and left to air dry, usually sets the definition.
8. Textured High Bun
Loops and twists give the top edge of this bun an airy, uneven finish, with small pockets of shade between the loops. Copper tones run through the whole knot. Sides pulled back smooth keep the focus there. In profile, it rises well above the neck as a round shape, gathered high on the crown. Hair is loose and textured, never tightly coiled.
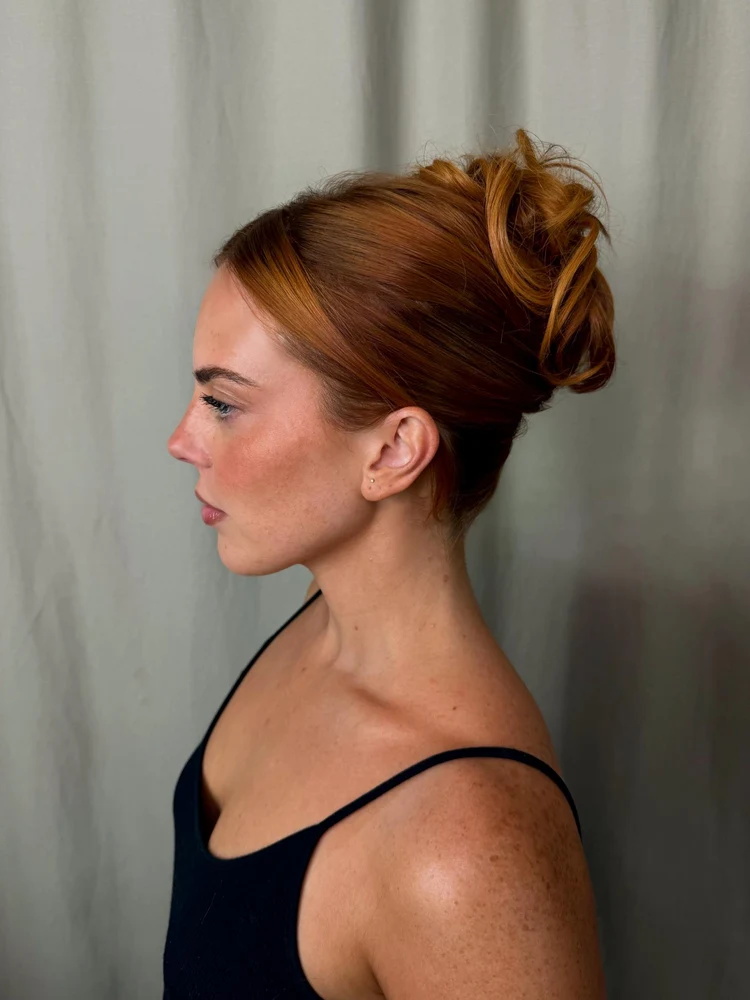
Looseness is the secret. Fasten the elastic loosely at the crown first, since a snug base squashes the loops before you finish. Wrap the tail around the base twice and pin each pass in a separate place. Tug out a few pieces, then leave the bun alone, since combing breaks up the shape. Spray flexible hold on the bun only, and check the base pins before you head out. Keeping spray off the sides leaves them clean.
9. Crystal Pin Bun
Sparkle comes from one silver crystal pin set along the top of a low, round bun at the nape. Hair in a brown shade starts flat at the crown and flows into the bun, with a gentle side sweep. Surface stays even from edge to edge. Viewed from the side, the pin stays visible while the bun sits neat and low.
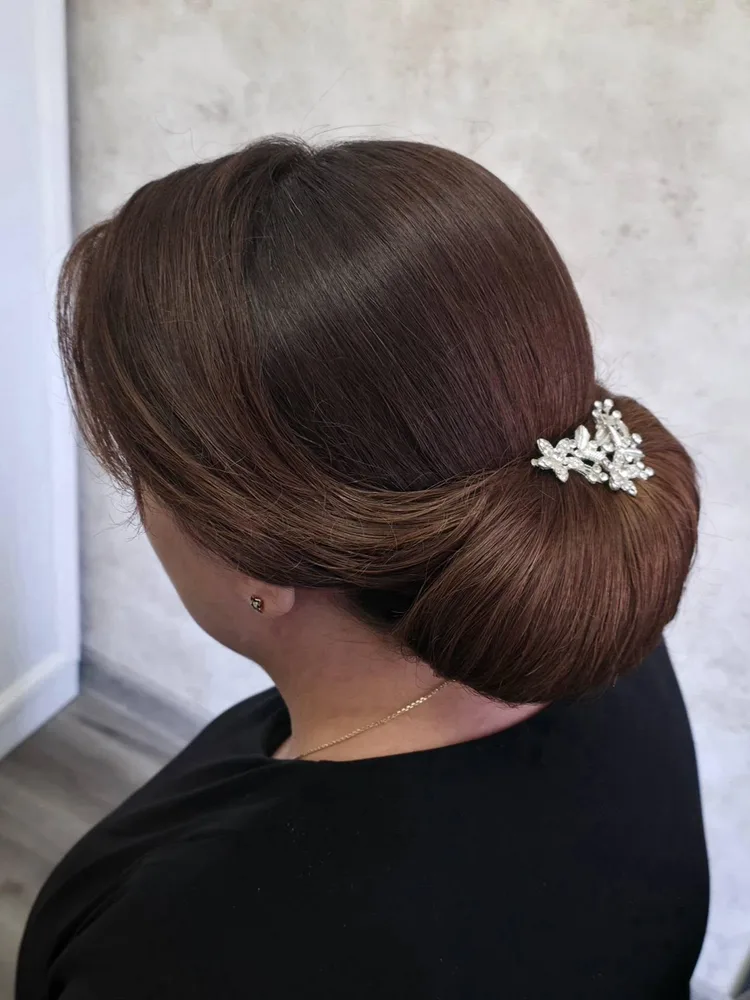
Serum goes on first, in a tiny pea-size dab, since extra can make the surface look oily. Smooth stray hairs with a toothbrush lightly coated in hairspray instead of adding more product. Pin the bun firmly before the crystal pin goes in, because that pin is for show and the bun pins do the holding. Crystal pins bend easily, so a small pouch protects one in your bag. Dry hair takes pins more securely than slick hair.
10. Flower Braid Bun
Mood is fresh and full, thanks to white blossoms clustered beside a low bun. Dark hair forms a tight French braid, starting at the front and running back along the side. Its end tucks under the flower cluster. Blossoms, braid, and bun link into a single shape in profile. Flowers give the look its size.
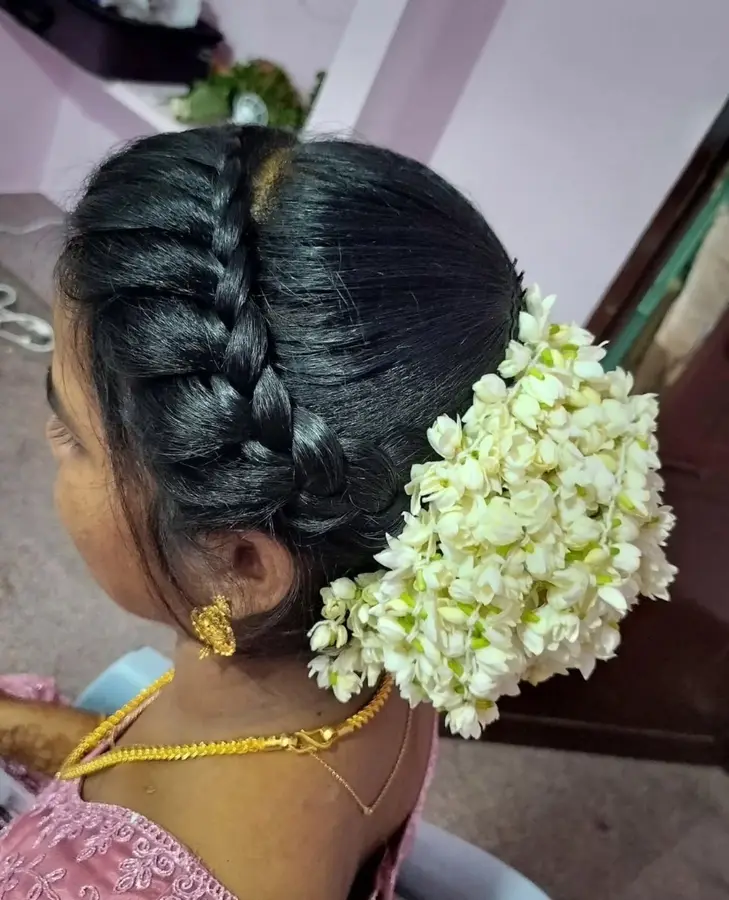
Start the braid at the front hairline and work toward the back on damp hair, then gather everything else into a low bun. Anchor the braid’s tail inside the bun with a pin, then fix the flower cluster in place with two more. Flowers hate heat, so keep irons and dryers away from them. Hugging guests can knock a bloom loose, so check the cluster afterward and replace any loose bloom right away, since one gap shows fast. Light spray on the braid is enough.
11. Loose Side Knot
Wide and relaxed describes this low knot, which sits slightly off center instead of dead middle. Light brown hair is worked into the knot with loose twists, and the ends stay free. Thin pieces slip out around the edges, softening the outline. Viewed from behind, it looks like a ribbon of hair folded over itself. Nothing about it feels tight.
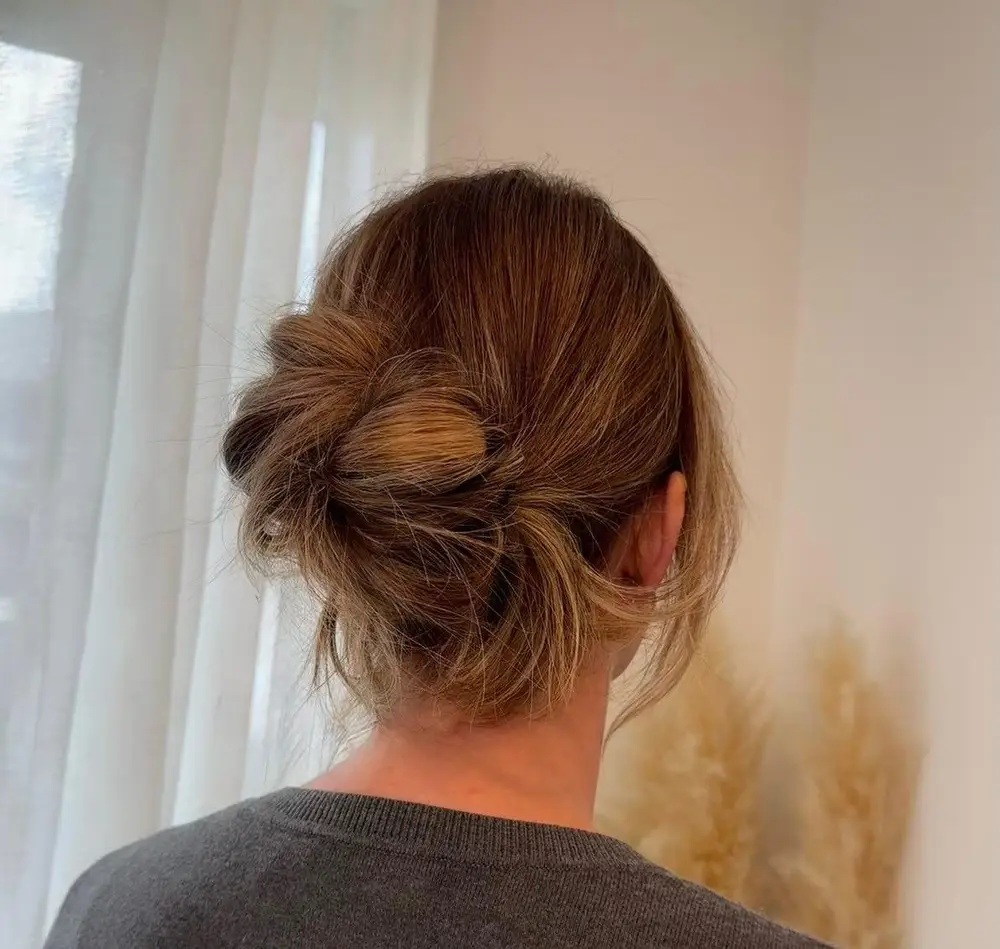
Slightly textured hair holds a loose knot far better than freshly washed hair, so mist on a little texturizing spray first. Roll the hair into a low knot, starting a little left of the middle, and pin from underneath so the pins stay hidden. Tease out three fine strands and curl them around a finger. After eating, check the knot, since turning your head can shift it. Small gaps between pins are fine, because the style is meant to look relaxed.
12. Waterfall Braid Curls
Small gold charms hang along the center of the braid, with dragonfly clips resting on it. Waterfall braiding runs sideways across the back and shows clearly on dark hair. Beneath it, long curls drop in defined rings that fill the space below. Charms and clips both stay on the braid rather than on the curls. Against the dark color, gold shows up strongly.
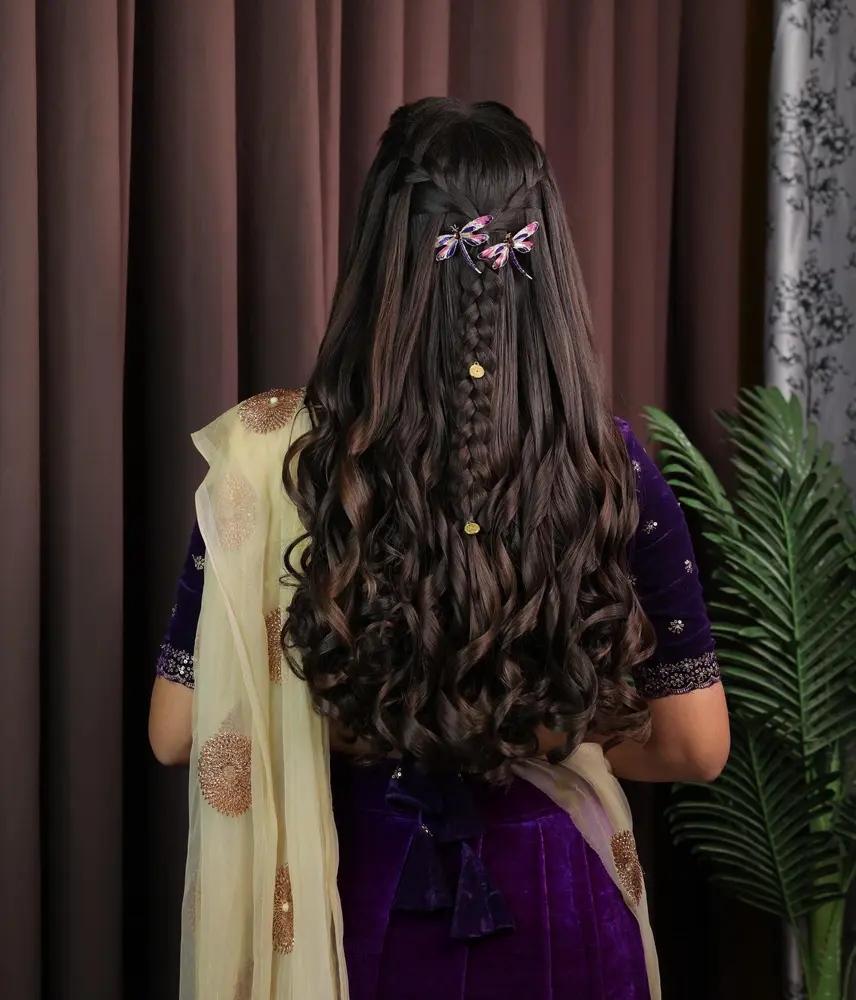
Clips go on last, each held with its own pin, because curls can push them outward over time. Braid the waterfall section first on damp hair, letting strands drop through as you go, then curl the lower lengths in medium sections. Leave the curls unbrushed after curling, since brushing turns rings into frizz. Skip brushing the braid once clips are in place, too, or the pattern loosens. Re-pin any clip that slides, and do it before the curls push it too far.
13. Bubble Cornrow Ponytail
Against glossy black hair, metallic cuffs in gold and silver stand out clearly. Small cornrows run along one side, tight and neat, and their lines guide your gaze toward the base of the ponytail. High on the head, the tail bends downward in rounded sections, each marked by a cuff, which sets a bold, even rhythm.
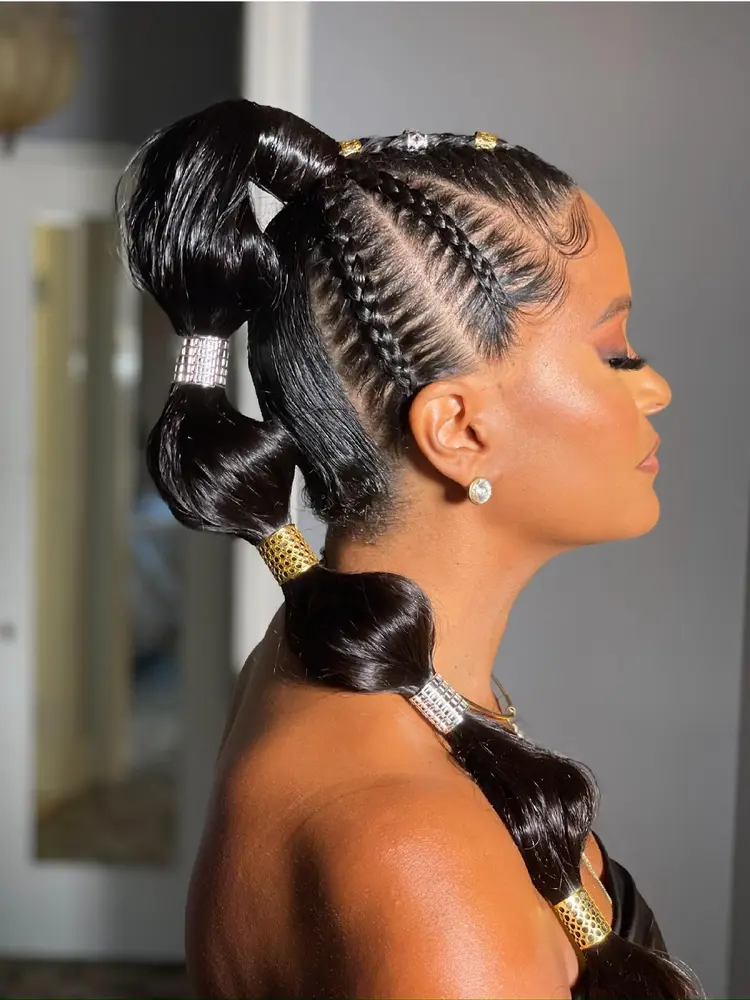
Braid the two small cornrows first, on damp hair, then gather everything into a high ponytail. Space elastics evenly along the length of the tail, tug each segment out sideways into a bubble, and put a cuff over every elastic. Gel works on the sides for a clean finish. Wearing a hooded coat may squash the bubbles, so check them after an hour. Keep extra elastics in your bag in case one snaps.
14. Side French Braid
Resting over one shoulder, the braid starts at the crown and travels the full length down one side. Brown hair crosses over itself at an even rate, and stray pieces hang beside the ear and neck. Thickness stays the same all the way down, ending in a straight tail. Viewed from the side, a diagonal line cuts across the head.
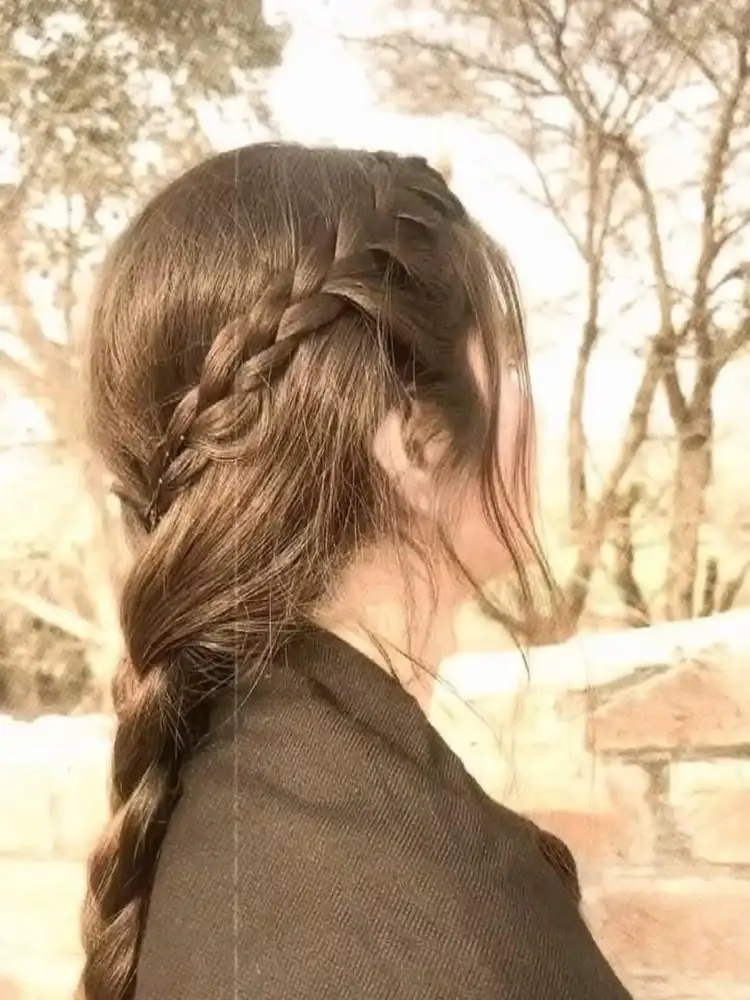
Angle matters most with this braid, so run through it once ahead of the big day. Start at the crown on damp hair and pick up fresh hair from the side with every cross, holding steady tension. Leaving the front pieces loose avoids a pulled feeling. Loosen the outer edges a little for a fuller look, then finish with a small elastic and light hold spray. Replace the tie if it slides.
15. Pinned Curly Updo
Depth comes from stacked coils and loops sitting above the nape in a full updo. Each brown curl keeps a clear ring shape, and the whole updo spreads wide instead of lying flat. Smooth, pulled-back sides contrast with the textured top. Seen from behind, it forms a rounded cloud, and one thin curl dangles near the neck.
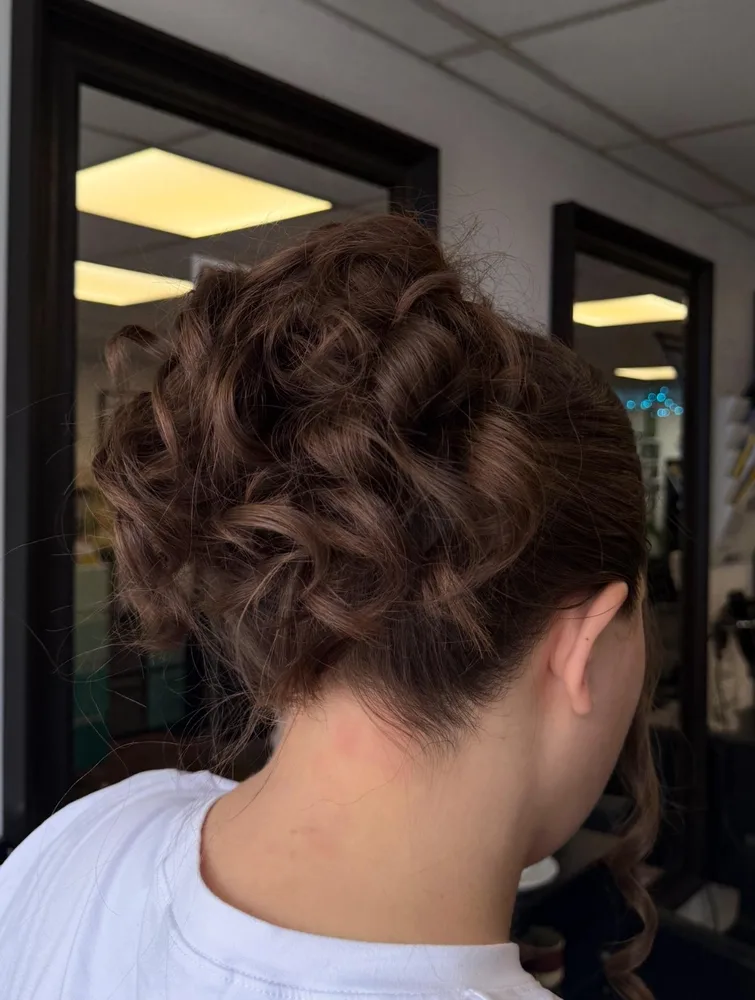
U-shaped pins hold curls better than straight ones, which slip right out. Work leave-in cream into damp curls by scrunching, then let them dry most of the way before pinning. Begin at the nape and climb toward the crown, pinning small sections as you go. Brushing dry curls breaks the pattern, so use only your fingers. Pinning near a window shows each curl’s shape more clearly than kitchen lights do. Wet curls slide out of their pins, which is why waiting matters.
16. Looped Braid Ponytail
Thin braids sit against a thick central one, and that contrast gives the ponytail its look. Small loops circle the base and form a knot, while long thin ends hang down beside the braid. Black hair runs smooth from the crown onward. Even thickness continues in the main braid along the back, and from behind the loops resemble a bow at its top.
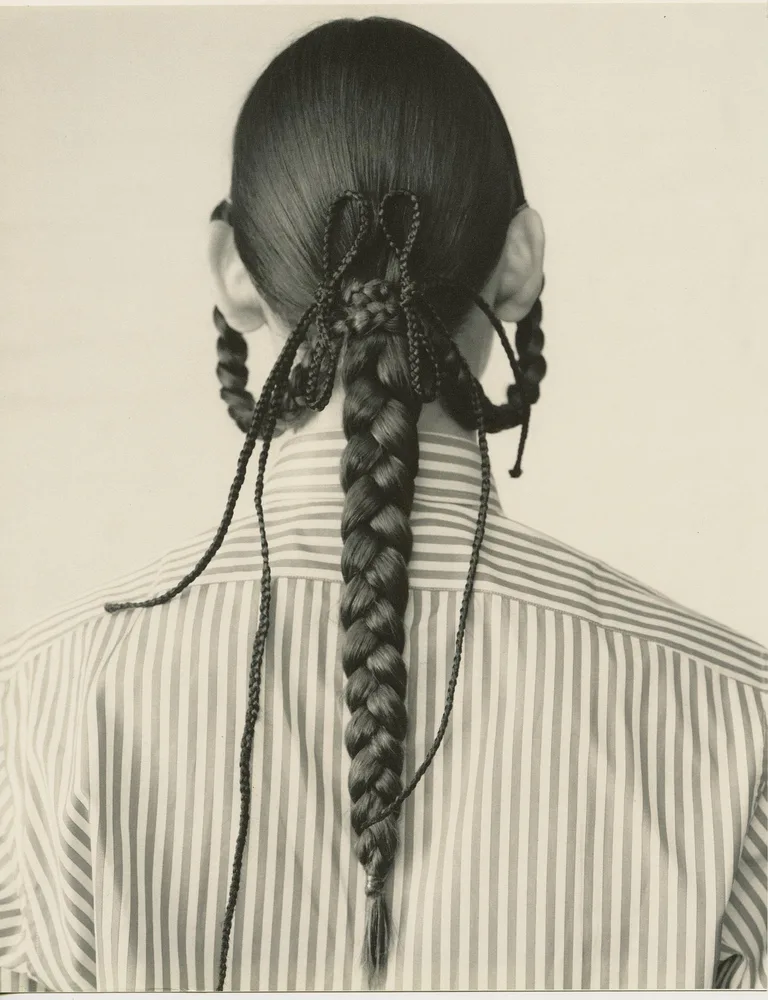
Start by working the small braids in near the top of the head, ahead of forming the main ponytail. Plait the tail straight down the middle, then bring each thin braid around the base and pin every loop where it lands. Slack loops creep downward, so keep the base snug. Clear elastics on the thin braids almost vanish on camera. Pulling on a loop once it is pinned drags the main braid sideways. Set each loop once and leave it.
17. Curly High Bun
Springy curls burst out in every direction from a tall, uneven bun at the crown. Smooth sides pulled close to the head stay black and tidy, which makes the bun stand out. Beside the neck, a single thin curl hangs loose. In profile, curls crowd the top edge of the high bun, giving it a loose, springy outline.
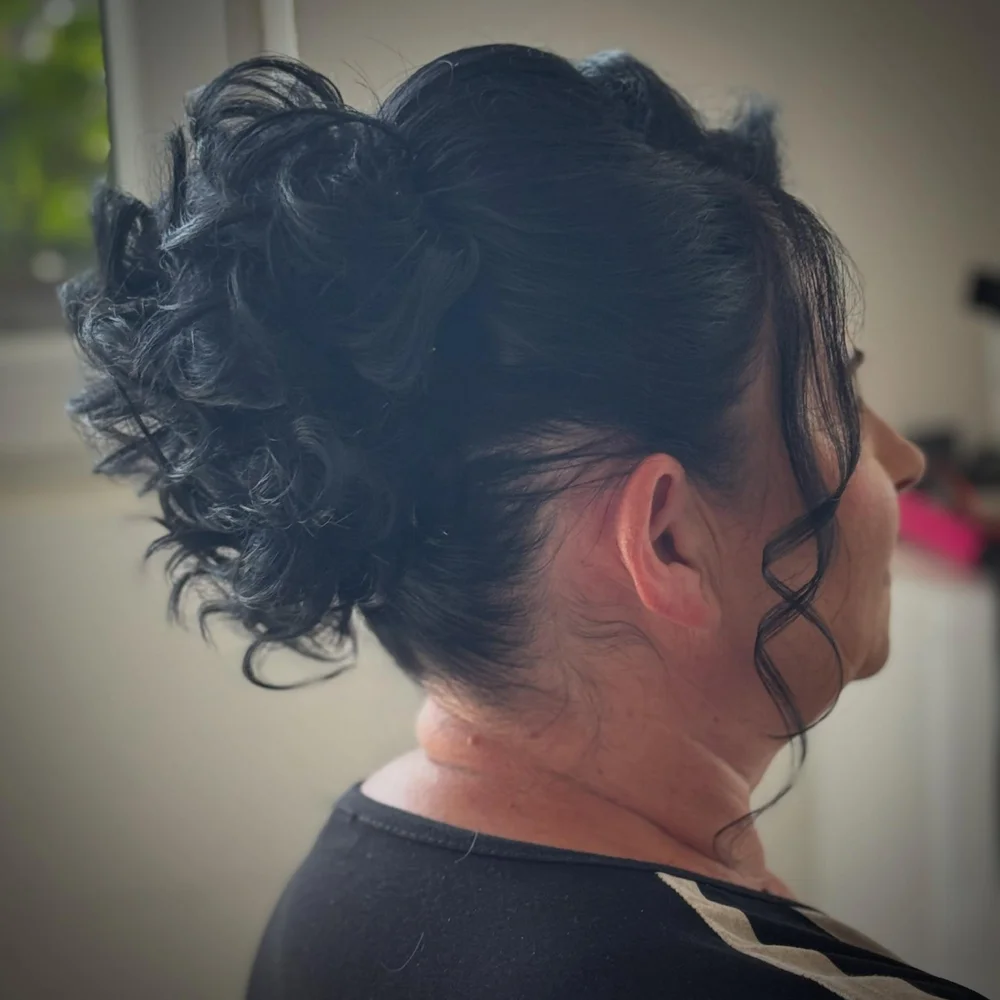
Stack dry curls at the crown once curl cream has been scrunched in, so each curl keeps its shape. Coil the rest into a relaxed bun, secure it at four points, and tease out a few curls for volume. Running a brush over the bun makes curls puff out fuzzy, so use your fingers instead. Long days dry curls out, so pack a mini curl refresher. Mist only the bun itself, which keeps the sides neat.
18. Tied Half-Up Waves
Blonde waves fall long and wide, with ends curving gently outward. Above them, the top section is pulled back smooth into a small half-up ponytail, and the tie lands in the middle of the back. Waves keep an even spacing along the lengths. In rear view, the tie sits high and the waves take up the lower half.
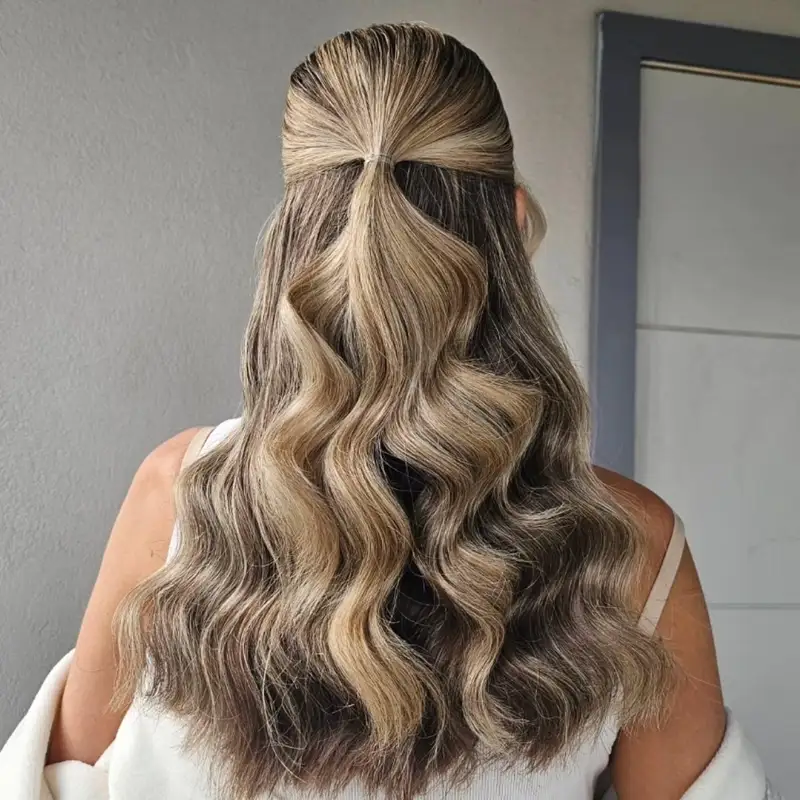
Heat protectant goes on before any curling, and a large iron shapes the waves. Run a brush through them one time, then twist one strand over the elastic to cover it. Elastic that sits snug leaves a dent, so loosen it a little. Sitting for hours tends to drag the tie downward, so check it once the meal begins. Sliding the elastic about an inch lower later in the day moves the pressure point.
19. Chestnut Open Waves
Nothing holds this hair back, so the long chestnut lengths move freely down the back instead of being tied or pinned. Smooth, straight hair at the top gives way to deeper waves from the mid-lengths downward. Gloss follows each wave, and the ends finish in rounded points. Viewed from behind, everything forms a wide, even curtain.
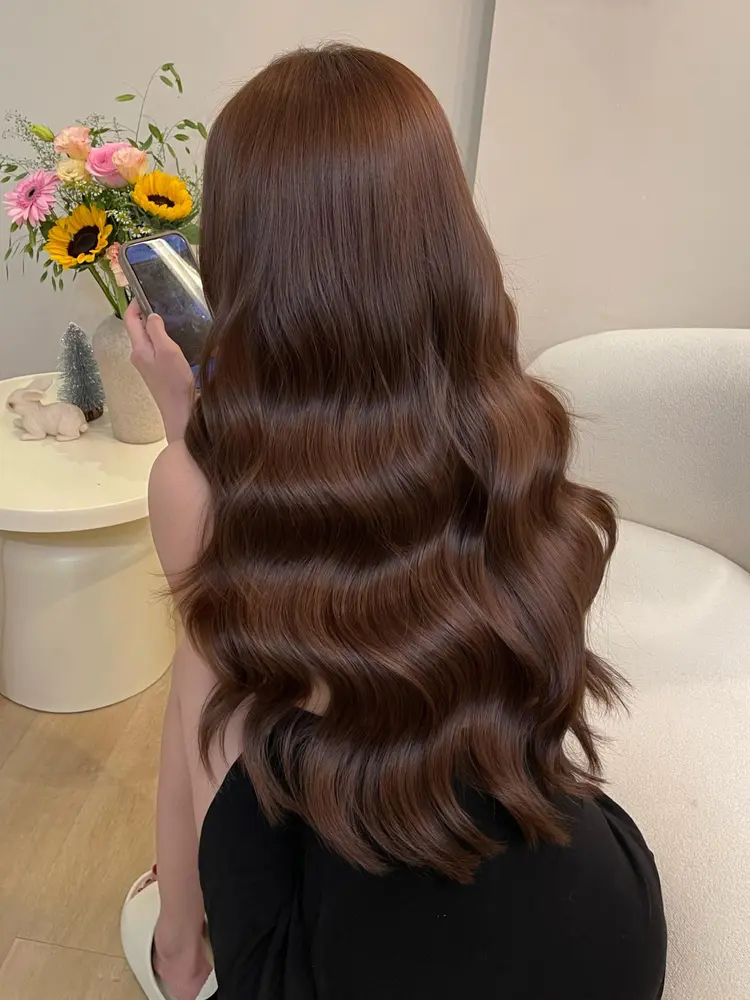
Heat protectant comes first, then a wide iron wraps large sections into waves. Brush each wave once after it cools, and dab a little shine serum on the ends. Open waves tangle at the nape, so tuck a mini brush into your purse. If the front pieces fall flat, re-wave only those. Resist touching the back waves, because hands break up shine. Let waves cool fully before touching them, since warm hair has not set yet.
20. Straight Black Length
Shine spreads across the whole surface of this sheet of dark hair, with nothing curled, braided, or tied. Every strand lines up beside the next from root to tip, and the crown lies flat and even. Bottom edge is cut blunt and straight. Length reaches down the back. Overall, it reads as a neat rectangle from behind.
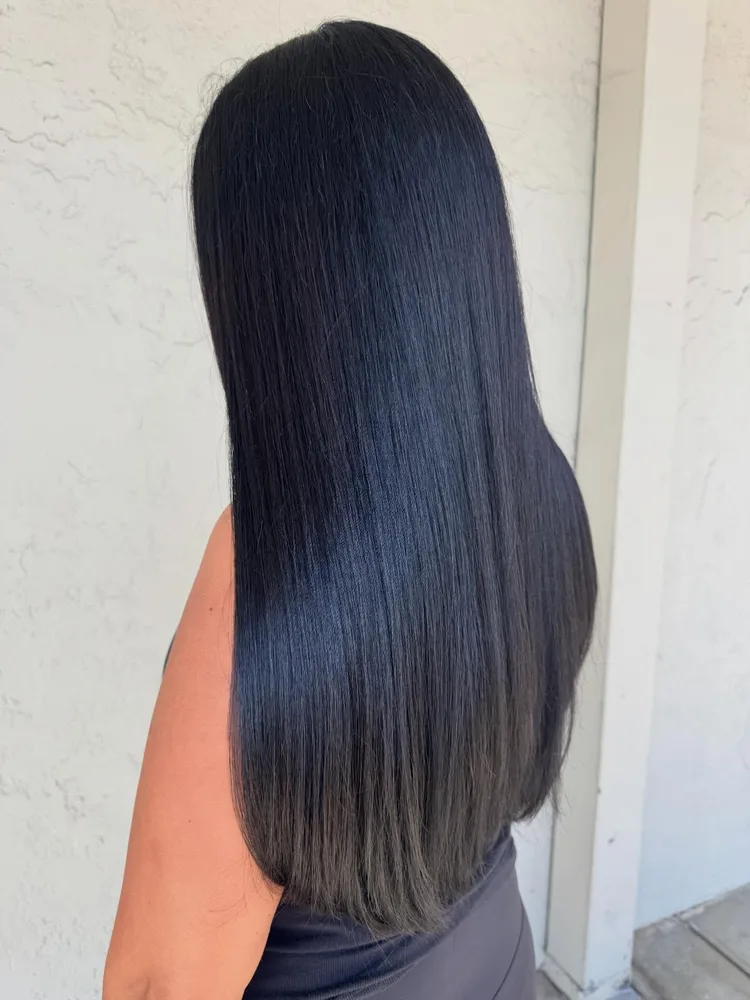
Straight hair tends to show heat damage fastest, so use a heat protectant and keep the iron at medium. Brush each thin section before ironing, and move the iron slowly rather than rushing. Close with just a dot of serum. Humidity makes straight hair frizz quickly, so rainy days call for staying indoors when you can. Before dinner, touch up just the upper layer if it needs it. Thin sections heat evenly, which helps the finish look uniform.
21. Blonde Open Waves
Waves widen toward the ends, giving the long golden hair a full shape, and nothing interrupts the surface. Smooth hair at the top leads into the loose lengths below. Shine looks even across every wave. Ends curl gently inward. Viewed from behind, the hair spreads into a wide, flowing shape. Long, loose lengths run down the back.
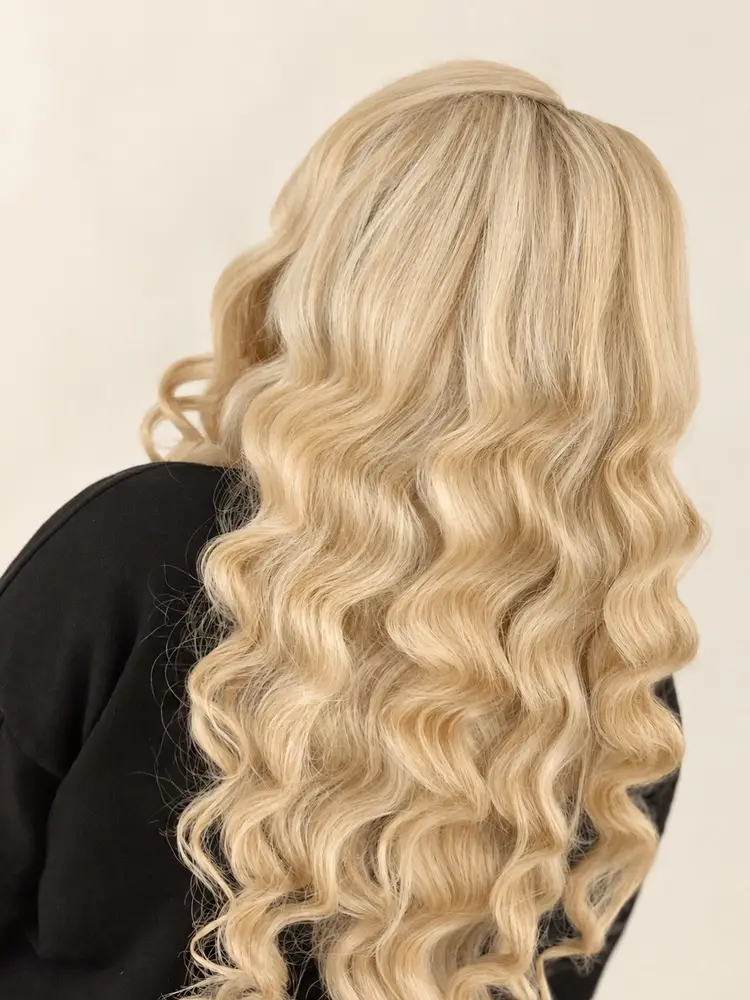
Volume starts at the roots, so apply volumizing mousse before drying, since open waves fall flat without it. Curl sections on a big barrel iron, switching direction each time. Give each wave time to set before you touch it, then brush lightly and finish with flexible spray. Redo just the outermost waves after a few hours to refresh the shape. Running a wide comb through the roots restores lift better than a brush.
22. Twisted Low Ponytail
Contrast comes from the straight tail against the tight wrap at its base. Dark hair begins smooth at the crown and winds around a low ponytail, covering the elastic entirely. Wrapped section sits tight against the nape without any gaps. Below it, the tail stays long and even, hanging straight down the center of the back.
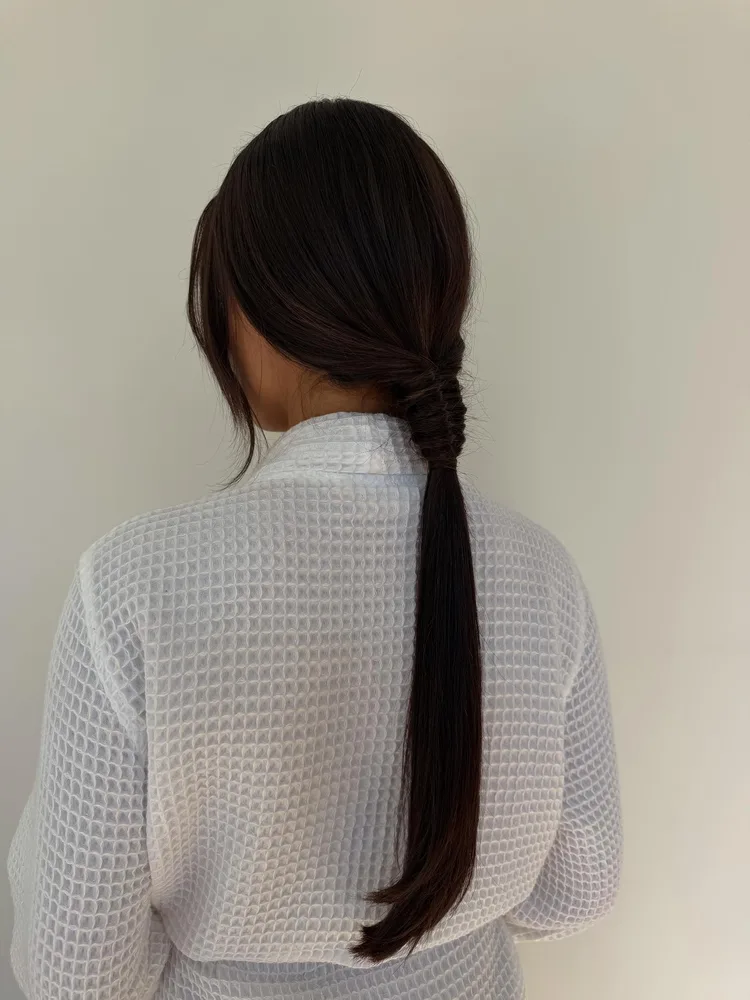
Strong elastics matter here, because weak ones slide down during the day. Take a strand and swirl it around the base once the ponytail is secured, then tuck the end beneath the tail with a pin. Mist it lightly and run a brush over the crown for a clean line. Wrapping too much hair hides the twist shape, so choose a thinner piece. Brushing the tail once before photos keeps it straight.
23. Smooth Straight Ponytail
Wrapped hair hides the elastic at the base of this low ponytail, which sits at the nape. Brown hair lies flat from the crown, and the tail hangs smooth and level along the back. Light gloss covers the whole length, and the ends taper to a point. Seen from behind, the ponytail makes a slim, tidy line.
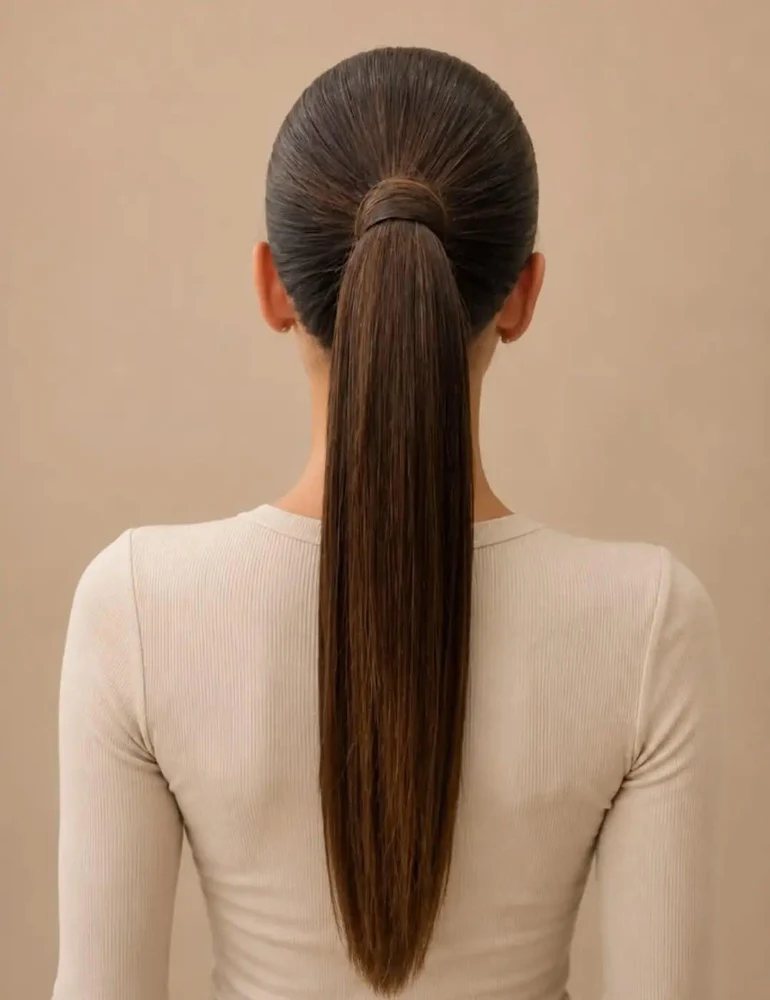
Gel can leave white flakes on darker hair, so skip it near the crown. Sweep a brush over dry hair, gather it low, and fasten it firmly before wrapping one lock over the elastic. Pin the wrap’s end underneath. Flyaways settle better under sprayed bristles than under fingers, with a light hold that does not stiffen the tail. Look at the wrap before dessert, since leaning forward can unwind it. Dry hair keeps a straighter line than damp hair here.
24. Dark Open Waves
Loose curls finish the ends of long, dark hair that moves in open waves, with nothing tying it back. Deeper movement begins at the shoulders, while the top stays smooth. Highlights glide along each ripple. In rear view, the hair spreads broad and flowing, and the movement is easy to see. Length stays loose all the way down.
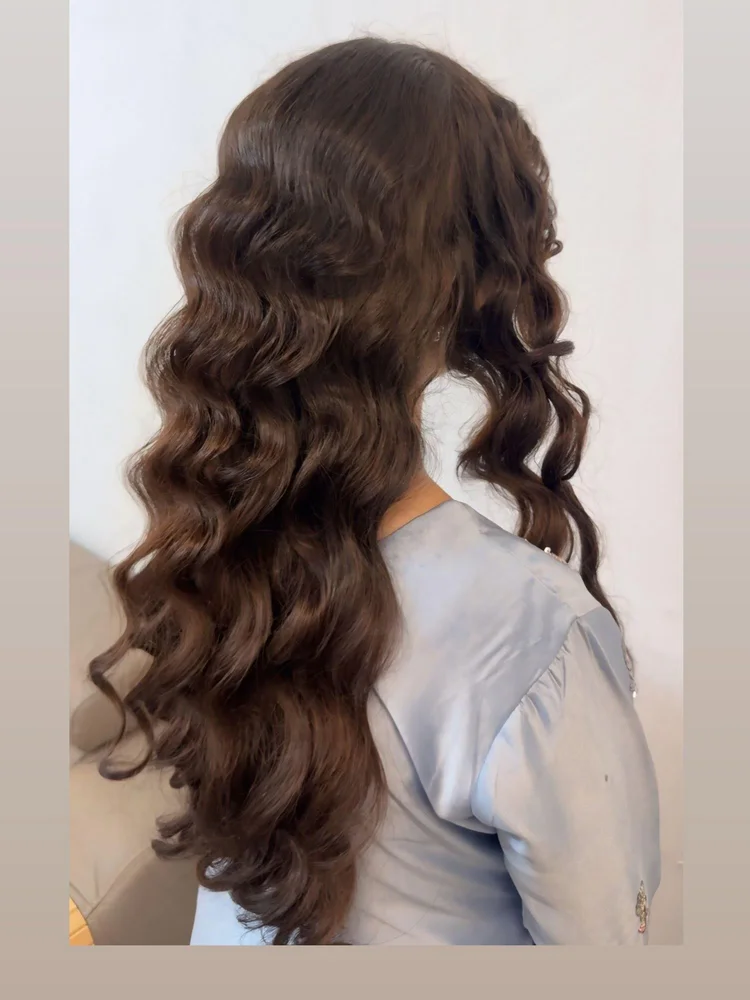
Wave cream belongs on the ends only, since putting it near the top weighs the hair down. Strong spray near the roots has the same effect. After waving medium sections, shake everything out, then brush lightly once. Give the waves ten minutes to set. Waves relax as the meal drags on, so shake the hair out again before photos. Dry hair works best for this, so wait until it is fully dry before waving.
25. Crossed Half-Up Waves
Long blonde waves hang broad and even, with shine showing through the ends. Above them, two sections cross at the center and form a half-up twist. Strands overlap into a flat knot that rests high on the back and stays easy to spot. Seen from behind, the crossed sections make an X shape over the waves.
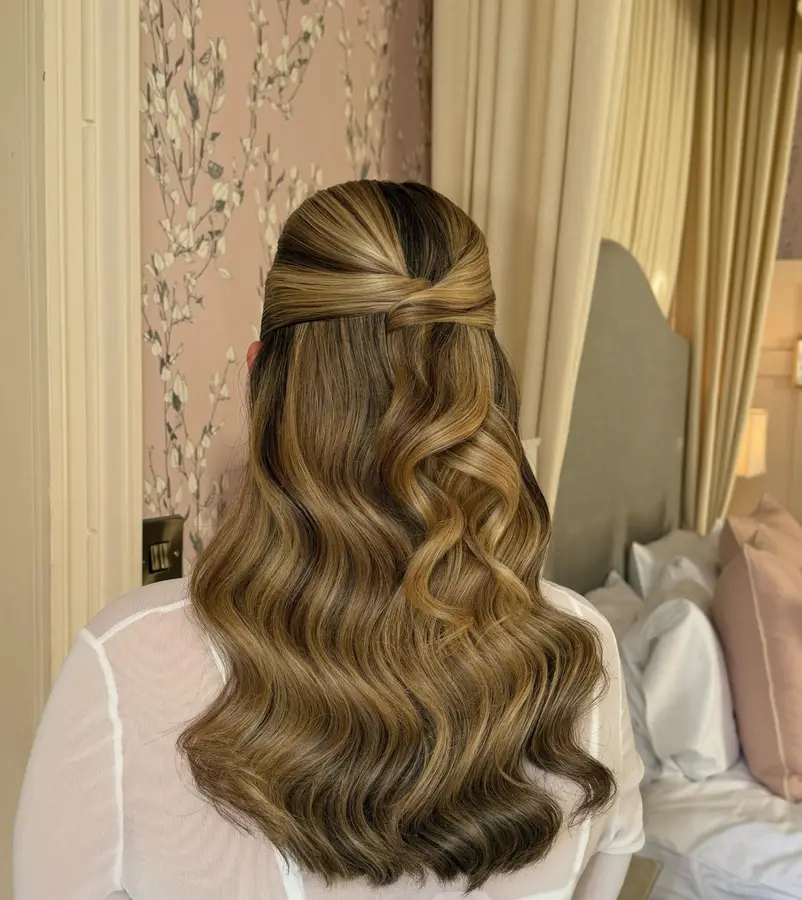
Two pins set against each other hold better than one, since a single pin tends to slip in thick waves. Overlap the top sections at the middle, twist once, and pin firmly. Shape the waves below with a big iron and brush them once. Light spray on the knot is enough. Hugging guests loosens crossed sections, so check the knot afterward and tuck the pins back in rather than re-twisting everything. Re-pinning keeps the knot neater.
Conclusion
Which look wins depends on your hair texture, the time you have, and how long you will be sitting at the table. Curly updos and braided crowns reward patience, while open waves and a smooth ponytail ask for less. Whatever you choose, practice a few days ahead and note where the pins sit. On the day itself, a spare pin or two, a compact brush, and light-hold spray handle most repairs. Pick one of these Thanksgiving hairstyle ideas, and you can focus on the food.
